Dive into our comprehensive Ruby on Rails tutorial, covering topics like exploring database contents in Rails console, adding and editing an object in Rails console, as well as adding basic validation to a model.
This exercise is excerpted from Noble Desktop’s past web development training materials. Noble Desktop now teaches JavaScript and the MERN Stack in our Full Stack Development Certificate. To learn current skills in web development, check out our coding bootcamps in NYC and live online.
Topics covered in this Ruby on Rails tutorial:
Exploring database contents in Rails console, Adding an object in Rails console, Editing an object in Rails console, Adding basic validation to a model
Exercise Preview
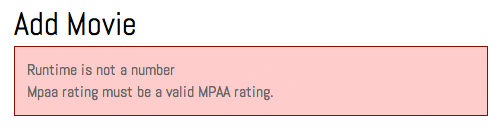
Photo courtesy of istockphoto, © Korhan Karacan, Image #15095805

Exercise Overview
In addition to the web interface, Rails provides a powerful control and debugging tool called the Rails console. It’s very similar to IRB and includes Rails functions as well as Ruby. Rails console is especially useful for manipulating model objects within the database. In this exercise you’ll learn more about it!
-
If you completed the previous exercises, you can skip the following sidebar. We recommend you finish the previous exercises before starting this one. If you haven’t finished them, do the following sidebar.
If You Did Not Do the Previous Exercises (3A–4C)
- Close any files you may have open.
- Open the Finder and navigate to Class Files > yourname-Rails Class
- Open Terminal.
- Type
cdand a single space (do NOT press Return yet). - Drag the yourname-Rails Class folder from the Finder to the Terminal window and press ENTER.
- Run
rm -rf flixto delete your copy of the Flix site. - Run
git clone https://bitbucket.org/noble-desktop/flix.gitto copy the Flix git repository. - Type
cd flixto enter the new directory. - Type
git checkout 4Cto bring the site up to the end of the previous exercise. - Run
bundleto install any necessary gems. - Run
yarn install --check-filesto install JavaScript dependencies.
Getting Started
Close all of the files you have open in your code editor.
Open the Finder and navigate to Class Files > yourname-Rails Class
Open Terminal.
Type
cdand a single space (do NOT press Return yet).Drag the flix folder from the Finder to the Terminal window.
Make sure you’re in Terminal and hit Return to change into the new folder.
-
Type the following to launch the server:
rails server Open a new window in Terminal by hitting Cmd–T.
-
Launch Rails console by typing the following command:
rails consoleThe prompt (to the left of the command line) should look just like the IRB prompt.
Exploring Database Contents in Rails Console
In Rails console we have direct access to all of our data; we can view, search, update, and create new records. Any code that we could use in a controller will work here.
-
To start, let’s try finding an existing movie by its id. In Terminal type:
movie = Movie.find(1)We would type something like
@movie = Movie.find(params[:id])if we were in the controller file, but here we don’t need theparamshash because we can type the id directly. We also don’t need the @ sign beforemoviehere because there won’t be multiple instances, so it does not need to be an instance variable. -
After pressing Return you’ll see that Rails console has returned a ton of information on this movie! It shows the SQL that was used to generate the result set:
SELECT "movies".* FROM "movies" WHERE "movies"."id" = ? LIMIT 1 [["id", 1]]After this code you’ll see a variable dump of the object, which looks pretty similar to that
debugmethod we used earlier. It’s showing us all the different properties of the movie withid 1. -
Like in IRB, we can type the name of any variable and see its return value. Type:
movieAgain, Rails console will show the contents of the
movieobject. -
Type the following:
movie.titleRails console should print the title of the movie,
Text M for Murder. We can also use any Ruby method in this context! -
Type the following in Terminal:
movie.description.upcaseThis will yield the description in all caps.
-
We can also search records by things other than their id. Type the following:
Movie.find_by title: "The Typographer's Wife"This will yield a record just as if we had searched by id. We can also use commas to locate records using multiple fields.
-
Type the following:
Movie.find_by(placement: "in_theaters", mpaa_rating: "PG")NOTE: Using parentheses in such searches is entirely optional; if you have more fields, parentheses can help keep your code tidier.
This query will return the record for
Gone With the Windows. For queries that return multiple results we use thewherecommand instead. Let’s try it out. -
Type the following to search for movies created more recently than one year ago:
Movie.where("created_at > ?", 1.year.ago)Wow, Rails console returns a ton of information! All four records, in fact.
NOTE: The line of code we just wrote looks a bit more like SQL. The question mark is a placeholder into which a value,
1.year.ago, is going to be inserted. This helps protect against SQL Injection.If you’re not familiar with SQL Injection, it’s a very dangerous security vulnerability that can arise in an application if the queries are not written in a safe way. If you’re using user input to find records (something that any dynamic data-driven website does at some point) and you don’t use a placeholder technique like we just did, the site would be vulnerable to evil-doers. A hacker could submit some additional SQL and construct it in such a way that they could execute any command they wanted against your database. It’s very important to format your syntax as we just did in order to protect against SQL Injection!
-
We used the
wherecommand when we wanted to see multiple records, but we can perform the same search withfind_byif we wanted to see just the first record that matches. Type the following in Terminal:Movie.find_by("created_at > ?", 1.year.ago) -
Let’s see more things we can do with result sets. Type the following in Terminal:
movies = Movie.where("created_at > ?", 1.year.ago)This time the result is back into a variable called
movies. -
Let’s learn more about the
moviesvariable. Type the following:movies.countRails console will print
4, since there are four records. -
Try typing this:
movies.firstThis will display the record of the first movie in the set,
Text M for Murder. -
Type the following in Terminal:
movies.lastThis returns the last record in the set,
Gone With the Windows. -
We can pass a number between brackets to access a specific record. Let’s try it. Type the following:
movies[2]This will retrieve the movie with
id: 3since offsets start counting at zero. -
We can even use a whole code block in the Rails console—let’s see what that looks like. Type the following:
movies.each do |movie|
   puts movie.title.upcase
end
This will print out the titles of the four movies in all-caps, followed by the dense, information-rich return value.
Adding an Object in Rails Console
As you can see, Rails console can be a great place to play with your site’s data and even try out new code snippets, but you can do much more with this powerful tool. You can use Rails console to make changes to existing records and add new ones. Let’s try adding a new movie.
-
Type the following:
movie = Movie.newThis might look familiar from the controller where we created a new movie to pass to the
newaction to help fill out that model form. Look at what Rails console has returned—every value will be
nilat this point.-
It’s up to us to fill in the values, so add the following new title by typing:
movie.title = "Will Code for Brains" We have a prepared file with more information ready for you to copy and paste. Switch to the Finder.
From Class Files > yourname-Rails Class > flix snippets open will_code_for_brains.txt.
Copy the Description paragraph.
Switch to the Terminal.
-
Type the following, pasting the description in place of the ellipsis (…):
movie.description = "..." -
Type the following, feeling free to copy and paste values that might be prone to errors, like the
poster_image, or type them in as you wish:movie.placement = "go_now" movie.mpaa_rating = "R" movie.poster_image = "willcodeforbrains-2x.jpg" movie.runtime = 82Remember that
runtimeis an integer so it does not need quotes around it, unlike all the strings we’ve entered so far. -
Type the following:
movie.has_subtitles = falseThis one,
has_subtitles, does NOT have an appended question mark when we are setting the value. It’s important to keep in mind thatfalseis not a string, so we don’t want to surround it with quotation marks, either. -
Let’s fill in the rest of the remaining fields. Add the following values shown in bold, keeping an eye on whether they’re surrounded by quotes or not:
movie.ticket_price = 10.25 movie.release_date = "2021-10-31" movie.director = "Rome Giorgio" -
All fields are accounted for, so type the following to save the new record:
movie.saveTerminal will show quite a bit of SQL that has been created by Rails itself. Notice that it has used many question mark placeholders; Rails is very smart and will protect itself against SQL Injection. Let’s check out the site!
Open a browser window.
-
Navigate to localhost:3000 and notice that the Will Code for Brains movie is now displaying on the main page. Adding data through the Rails console is really no different than pushing it through an HTML form.
This flexibility is one of the great things about Rails! There are so many different ways we can add our data: through an HTML form, the Rails console, pushed through a seed file. We can also edit entries through the Rails console. The MPAA has decided the rating of Gone With the Windows should be changed from PG to G, so let’s try making the change in Rails console.
Editing an Object in Rails Console
-
Switch to the Terminal type the following:
movie = Movie.find_by(title: "Gone With the Windows")NOTE:
find_byis case sensitive, so if you typed gone with the windows or some other permutation, the entry would not appear. -
Type the following to check the current MPAA Rating:
movie.mpaa_ratingTerminal should print
PG. Let’s redefine the value now. -
Type the following in Terminal:
movie.mpaa_rating = "G"Terminal should print
Gas confirmation of the change. Switch to the browser, navigate to localhost:3000/movies/4 and check if the rating has changed—and see that it hasn’t! We have not yet done the most important step of editing entries in Rails console.
-
Switch to Terminal and type the following:
movie.saveNow the change is permanent! (If you want to see it, reload the browser.)
-
There is also a
createcommand that performsnewandsavein a single action. Let’s try it out. Type the following:Movie.create(title: "The Friendly Alien")Terminal will print information about the new movie’s creation; it has
id: 6and a title, but the rest of the values arenil. Switch to the browser, navigate to localhost:3000/movies and notice that the page throws an error. We haven’t added the picture or any other information—we probably should require that more information be included in an entry before we list a movie on the main page.
-
We need to impose some rules on required fields, but first let’s delete the record for The Friendly Alien. Switch to the Terminal and type the following:
Movie.find_by(title: "The Friendly Alien").destroyNotice that we were able to chain the
destroycommand directly onto thefind_bycommand! Terminal will print some delete SQL to let us know the entry has been deleted. -
Switch to the browser, reload localhost:3000/movies and notice that The Friendly Alien is no longer on the page.
Now that the entry is gone, let’s think some more about the rules for required fields. The
moviemodel is missing some really basic validation logic. We need to make sure that certain fields likeposter_imageandruntimeare required. Rails makes this sort of validation really easy to set up! Switch to Terminal.
-
We’re done with the Rails console so type the following:
exit Close the Terminal tab in which you used the console.
Adding Basic Validation to a Model
Switch to your code editor.
If your code editor allows you to open a folder (like Sublime Text does), open the whole flix folder.
-
Open flix > app > models > movie.rb
We are going to add some very simple validations. Validations in Rails are helper methods that make sure that new records are being created correctly.
-
Add the following bold code as shown below:
class Movie < ApplicationRecord
   validates :title, :mpaa_rating, :runtime, :poster_image, presence: true
end
The
presence: trueparameter tells Rails to validate the four fields and make sure they exist. -
Let’s add a more specific validation, making sure that
runtimeis a number. Add the following bold code:class Movie < ActiveRecord::Base validates :title, :mpaa_rating, :runtime, :poster_image, presence: true validates :runtime, numericality: true endThe silly word
numericalityensures that the value is a number. Finally, we want the MPAA Rating to match one of the options on our list, so let’s add a validation for that. -
Add the following code:
class Movie < ActiveRecord::Base
   validates :title, :mpaa_rating, :runtime, :poster_image, presence: true
   validates :runtime, numericality: true
   validates :mpaa_rating, inclusion: { in: ["G", "PG", "R"] }
Did you notice that NR is not included in the array? We are deliberately omitting it for the time being so we can test the custom validation. (We will choose NR and see if the submission fails.)
Save the file.
-
Switch to the browser, navigate to localhost:3000/movies/new and send a completely blank submission.
The form will not create a new movie (you won’t be redirected to the main page and see the green banner indicating your success), but it won’t display an error message either. Where is the error message we coded? Why didn’t we see it?
When creation of a model object fails, Rails does append the error messages to the object. The error messages do exist in
@movie.errors, but users aren’t able to see that. Therefore, we’ll need to add some custom logic to our page template to tease them out and display the error to users. Switch to your code editor.
Open flix > app > views > movies >
_form.html.erb-
Add the following code at the very top of the file, above all the other code:
<% if @movie.errors.count > 0 %>

<% end %>
<%= form_with model: @movie do |f| %>
This means: if there are any errors (more than zero errors) in the
@movie.errorsinstance variable where all the errors are stored, print the contents between the tags. -
Add the following bold code:
<% if @movie.errors.count > 0 %> <div id="flash" class="alert"> </div> <% end %> -
Add the following bold code all on one line:
<div id="flash" class="alert"> <%= @movie.errors.full_messages.collect { |msg| msg }.join("<br>").html_safe %> </div>full_messagesis a property of theerrorscollection. This line of code gathers the messages up with thecollectmethod and collapses them into a string with{ |msg| msg }. This string value is then joined to a<br>tag. Additionally we need to tell Rails that the HTML is supposed to be there, so we includehtml_safe. Phew! Save the file.
-
Switch to the browser, navigate to localhost:3000/movies/new and send a completely blank submission.
This time an extensive error message should appear in a red box at the top of the page. Let’s test our validations a little more.
-
Fill out the form again (just make up some content), this time making sure to:
- Set MPAA Rating to Not Rated
- Type some letters (not numbers) in the Runtime box
-
Click Create Movie.
This will cause more specific error messages to come up, including
Runtime is not a numberandMpaa rating must be a valid MPAA rating. We can see that our custom and non-custom validations are working! Switch to movie.rb in your code editor.
-
Edit the code by adding NR to the array (don’t miss the comma!) as shown below:
validates :mpaa_rating, inclusion: { in: ["G", "PG", "R", "NR"] } Save the file.
In your browser go to localhost:3000/movies/new
Set the rating to Not Rated but don’t bother filling anything else out.
Click Create Movie to see that it will no longer throw the error message for the MPAA Rating (although you’ll see error messages for the other empty elements).
Back in Terminal, hit Ctrl–C to shut down the server.