Dive into this comprehensive Ruby on Rails tutorial that covers polymorphic relationships, making the checkout button functional, adding an order model, and procedures for checking out and emptying the cart.
This exercise is excerpted from Noble Desktop’s past web development training materials. Noble Desktop now teaches JavaScript and the MERN Stack in our Full Stack Development Certificate. To learn current skills in web development, check out our coding bootcamps in NYC and live online.
Topics Covered in This Ruby on Rails Tutorial:
Polymorphic Relationships, Making the Checkout Button Functional, Adding an Order Model, Checking Out & Emptying the Cart
Exercise Overview
In this exercise, we will get the checkout working. We will not be dealing with processing credit cards, but we will be finalizing the customer’s cart by transitioning its contents to an order object.
-
If you completed the previous exercises, you can skip the following sidebar. We recommend you finish the previous exercises (8A–10A) before starting this one. If you haven’t finished them, do the following sidebar.
If You Did Not Do the Previous Exercises (8A–10A)
- Close any files you may have open.
- Open the Finder and navigate to Class Files > yourname-Rails Class
- Open Terminal.
- Type
cdand a single space (do NOT press Return yet). - Drag the yourname-Rails Class folder from the Finder to the Terminal window and press ENTER.
- Run
rm -rf nuttyto delete your copy of the nutty site. - Run
Git clone https://bitbucket.org/Noble Desktop/nutty.Gitto copy the That Nutty Guy Git repository. - Type
cd nuttyto enter the new directory. - Type
Git checkout 10Ato bring the site up to the end of the previous exercise. - Run
bundleto install any necessary gems. - Run
yarn install—check-filesto install JavaScript dependencies.
Making the Checkout Button Functional
-
For this exercise, we’ll continue working with the nutty folder located in Desktop > Class Files > yourname-Rails Class > nutty.
If you haven’t already done so, we suggest opening the nutty folder in your code editor if it allows you to (like Sublime Text does).
-
You should still have a window with two tabs open in Terminal from the last exercise, the first of which is running the server. If you don’t, complete the following sidebar.
Restarting the Rails Server
- In Terminal,
cdinto the nutty folder:
- Type
cdand a space. - Drag the nutty folder from Desktop > Class Files > yourname-Rails Class onto the Terminal window (so it will type out the path for you).
- In Terminal, hit Return to change directory.
-
In Terminal, type the following:
rails s - Open a new tab (Cmd–T) leaving our server running in the old tab.
- In the new tab,
cdinto the nutty folder:
- Type
cdand a space. - Drag the nutty folder from Desktop > Class Files > yourname-Rails Class onto the Terminal window (so it will type out the path for you).
- In Terminal, hit Return to change directory.
- In Terminal,
In your code editor, open nutty > app > views > cart > index.html.erb
-
Highlight the checkout button code around line 72:
<a href="#"><button type="button" id="check-out" class="btn-red btn-lg">Checkout</button></a> -
Delete it and replace it with a form (shown in bold):
</div> <%= form_with url: '/cart/complete', method: :post do %> <%= submit_tag 'Checkout', id: 'check-out', class: "btn-red btn-lg" %> <% end %> </div> -
Save the file. That should be enough to get our form working.
Next, we need to let routes.rb know about our new non-resourceful route. Remember, non-resourceful routes are very simple: you just use the http verb, then the path. Then type
=>followed by the controller# then the action you want to send it to. In your code editor, open nutty > config > routes.rb
-
Around line 9, type the following bold code to set up the route:
resources :line_items, only: [:create, :update, :destroy]

   post 'cart/complete' => 'cart#complete'
   get 'cart/complete' => 'cart#complete_page

   root 'products#index'
end
We’re creating two routes here: the first is a POST route to receive the cart submission; the second is a GET route to serve up a “completed” page.
Save the file, then close it.
In your code editor, open nutty > app > controllers > cart_controller.rb
-
Add this code shown in bold:
def index @title = "Your Cart" end def complete redirect_to '/cart/complete' and return end def complete_page @title = "Your Order is Complete" end end -
Save the file.
The next step would typically be to create a view. It could be a lot of typing to set all the design up so to make things easier for you, we’ve included a snippets file with the code you need.
Open a Finder window and navigate to: Desktop > Class Files > yourname-Rails Class > snippets
Click on the complete_page.html.erb file and hit Cmd–C to copy it.
Still in the Finder, navigate to: Desktop > Class Files > yourname-Rails Class > nutty > app > views > cart
Hit Cmd–V to paste the file into the cart folder.
-
In your code editor, open nutty > app > views > cart > complete_page.html.erb
Check out the code. Aren’t you glad you didn’t have to type all this? We will need to edit it a bit later, but for now, it’s good.
Switch to the browser and go to localhost:,000.
Click on any product and click Add To Cart.
-
On the Cart page, click the Checkout button on the right.
You should be taken to a confirmation page for your order! One issue we still need to work on is getting the cart to empty after an order is placed.

Adding an Order Model
-
Type the following in Terminal:
rails g model order customer:references
rails db:migrate
Let’s make sure all our models know about each other. In your code editor, open the following file: nutty > app > models > customer.rb
-
Add the code shown in bold around line 8:
has_one :cart
   has_many :orders
end
This code means that a customer can only have one cart at a given time, but they could have any number of orders.
Save the file.
In your code editor, open nutty > app > models > order.rb
-
Add the code shown in bold around line 8:
class Order < ActiveRecord::Base
   belongs_to :customer

   has_many :line_items
   has_many :products, through: :line_items

   delegate :email, to: :customer
end
Save the file.
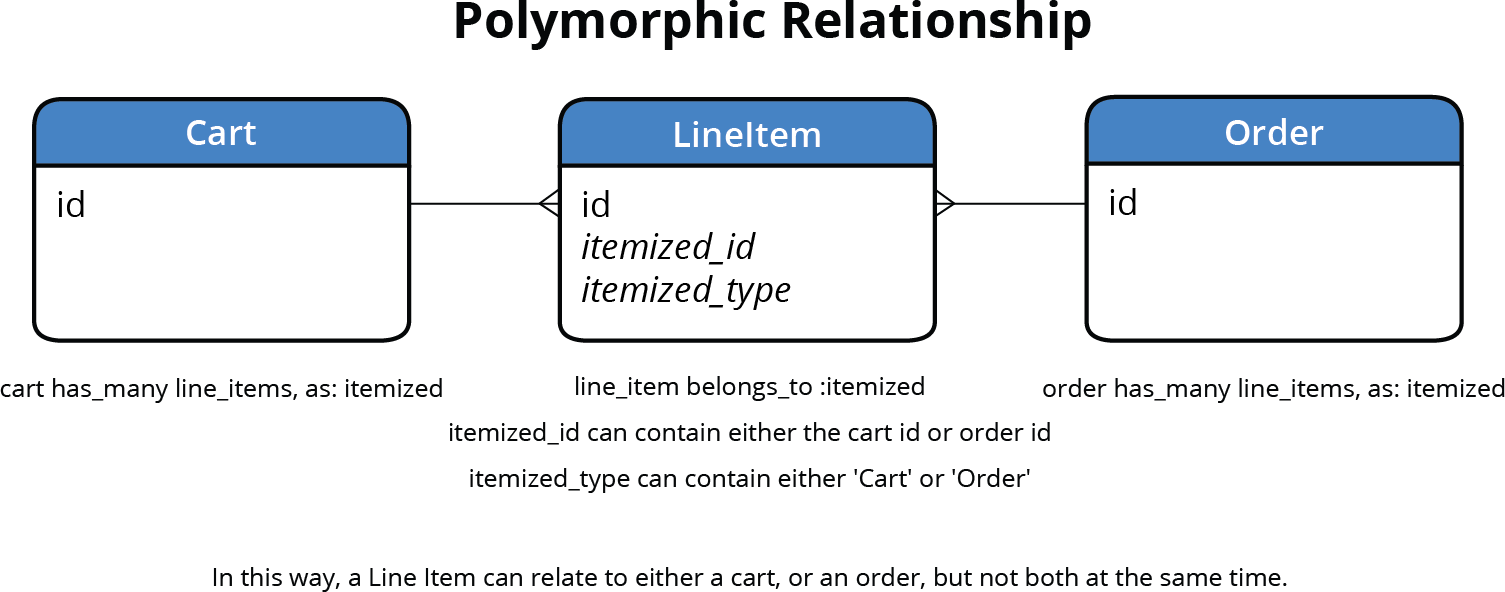
Polymorphic Relationships
Here’s a tricky question: Just like the cart model, order has many line items and it has many products through the line items. When the order finishes, we need to empty the customer’s cart and transition all the line items over to the order object instead. So how do we set up this relationship?
We could simply add order references to line items, but that could lead to confusion and some bad data down the road. Does a line item belong to a cart or an order? It can’t belong to both. In other words, an order can not simultaneously be in the checkout and be in someone’s cart. So having the two reference fields (for cart and order) attached to the line item model is a bit sloppy.
The solution we’re going to use involves a polymorphic relationship. Polymorphic relationships allow one model object (in this case, our line item object) to relate to more than one kind of model exclusively using the same relationship. That is to say a given line item could belong to a cart or to an order, but not to both. Let’s try it out and see how it works.
-
In Terminal, run a migration by typing:
rails g migration add_itemizable_to_line_items itemizable:referencesNOTE:
itemizableis the name of our polymorphic relationship. We will have to modify the migration Terminal gave us quite a bit. Go to your code editor and close any open files to tidy up the workspace.
-
In your code editor, open the following file: nutty > db > migrate > #
_add_itemizable_to_line_items.rbNOTE: The number represented by # is a timestamp and will vary.
-
Let’s take a moment to hammer out a strategy for editing this migration:
If they’re reversible, you can just use a
changemethod with most Rails migrations because Rails is smart enough to know that if you’re adding a reference in one, you’re deleting it in another. What we’ll be doing this time is complex enough that we are going to need to write anupand adownmethod.Polymorphic relationships have two fields to deal with instead of one. Remember, a standard references relationship adds a foreign key—an id field (a cart id, product id, etc.). For a polymorphic relationship, we’re going to end up with two of them: an
itemizable_idanditemizable_type. Since we’ve already got some carts and some cart data in our database, we’re going to write this migration in such a way that we can preserve that information, even as we change the relationship to polymorphic. -
Edit the code as shown in bold:
class AddItemizableToLineItems < ActiveRecord::Migration[6.0]
   def self.up
      add_reference :line_items, :itemizable, polymorphic: true, index: true,  foreign_key: true
   end
Delete the code shown in bold below (including the comma):
class AddItemizableToLineItems < ActiveRecord::Migration[6.0]
       def self.up
          add_reference :line_items, :itemizable, polymorphic: true, index: true, foreign_key: true, null: false
end-
Now, let’s step through all of our existing line items and import them from their old relationship type to cart to the new polymorphic relationship type. Add the following code shown in bold:
class AddItemizableToLineItems < ActiveRecord::Migration[6.0]
   def self.up
      add_reference :line_items, :itemizable, polymorphic: true, index: true
      LineItem.all.each do |li|
         li.itemizable_id = li.cart_id
         li.itemizable_type = 'Cart'
         li.save
      end
   end
NOTE: We can do this because we know that up to this point, every line item has been added to a cart. The order model is brand new and we don’t have any line items associated with it yet. We can safely step through each item and say that it’s part of a cart.
Note: We also need to remove the
foreign_key. This does not apply to polymorphic relationships. -
After that’s done, we don’t need the cart reference any more. In fact, having the cart reference there could confuse things. Add the following bold code around line 9:
li.save end remove_reference :line_items, :cart end -
Now we need to add a
downmethod so this migration continues to be reversible. Add the following bold code:remove_reference :line_items, :cart end def self.down add_reference :line_items, :cart, index: true LineItem.all.each do |li| li.cart_id = li.itemizable_id li.save! end remove_reference :line_items, :itemizable, polymorphic: true end endNOTE: Basically, we’re restoring the state of things before this migration ran. We put the cart reference back onto the line items table and take any line item references and put them back in the cart id instead.
Save the file and close it.
-
It’s time to apply the migration. Go to Terminal and type:
rails db:migrateWe now need to update a number of model objects to let them know about the changes we just made.
In your code editor, open nutty > app > models > order.rb
-
Add the bold code (around line 4) as shown (don’t miss the comma):
has_many :line_items, as: :itemizable Copy the whole line because we’ll be doing the same change in the next file.
Save the file, then close it.
In your code editor, open nutty > app > models > cart.rb
Paste the code over the existing
has_many :line_itemscode around line 4.Save the file, then close it.
In your code editor, open nutty > app > models > product.rb
-
Add the bold code (around line 6) as shown (don’t miss the comma):
has_many :carts, through: :line_items, source: :itemizable, source_type: 'Cart' Copy the entire line you just edited.
Paste it directly below the code you just copied (around line 7).
-
Edit that line as shown in bold:
has_many :line_items
has_many :carts, through: :line_items, source: :itemizable, source_type: 'Cart'
has_many :orders, through: :line_items, source: :itemizable, source_type: 'Order'
Save the file, then close it.
In your code editor, open nutty > app > models > line_item.rb
-
Edit the code as shown:
class LineItem < ActiveRecord::Base
   belongs_to :itemizable, polymorphic: true
   belongs_to :product
NOTE: Notice that we’re leaving
belongs_to :productalone. That isn’t part of the polymorphic relationship. Again, a line item can belong to either a cart or an order, but not both. However, it can and should belong to a product in addition to a cart or order. Save the file and close it.
Checking Out & Emptying the Cart
Now let’s transition the line items to an order object. We have everything in place to do that.
In your code editor, open nutty > app > controllers > cart_controller.rb
-
Let’s add some logic to our
completeandcomplete_pagemethods:def complete @order = Order.new(customer: current_customer) @order.line_items = @cart.line_items @order.save @cart.destroy redirect_to '/cart/complete' and return end def complete_page @order = current_customer.orders.last @title = "Your order is complete." endNOTE: First, we create a new order. In the second line, we pass all of cart’s line items to order. When we call
@order.save, because of the way we structured this polymorphic relationship, all of those line items will have the itemizable field updated to refer to this order object rather than to the cart object they were previously associated with. Finally, we can delete the cart because the customer is done with it. Then we set the title of the checkout page. Save the file.
In your code editor, open nutty > app > views > cart > complete_page.html.erb
-
We want to change the
@cartinstance variable to@orderthroughout the file. There are four instances of this in the file around lines 20,45,66, and 80. If you are using Sublime Text, there is a quick shortcut to select all instances of@carts. If you are using another code editor, make the following changes manually or using a find and replace.If you are using Sublime Text:
- Around line 20, highlight
@cartas shown in bold:<%@cart.line_items.each do |line_item| %> - Hit CTRL–Cmd–G to select all instances in this file.
- Type
@orderto replace all instances of@cart.
If you are using another code editor:
- Around line 20, change
@cartto@order:<%@order.line_items.each do |line_item| %> - Around line 45, change
@cartto@order:<td><%= number_to_currency@order.subtotal %></td> - Around line 66, change
@cartto@order:<td><%= number_to_currency@order.total %></td> - Around line 80, change
@cartto@order:<%=@order.email %>
- Around line 20, highlight
-
Save the file, then close it.
We need the order to be able to total and subtotal just like the cart does.
In your code editor, open nutty > app > models > cart.rb
-
Cut (Cmd–X) the code shown in bold:
delegate :email, to: :customer def subtotal return 0 unless line_items.any? line_items.sum(&:subtotal) end def total subtotal end end -
Save the file.
In order to keep things DRY, we are breaking out some of the code and putting it in a module. In Rails, the usual place for that to go is in the lib folder.
Create a new file.
-
Type the following in the blank new file:
module CheckoutSharedMethods end -
In between those two lines, paste the code you cut:
module CheckoutSharedMethods
   def subtotal
      return 0 unless line_items.any?
      line_items.collect(&:subtotal).inject(:+)
   end

   def total
      subtotal
   end
end
Save the file as checkout_shared_methods.rb into the Desktop > Class Files > yourname-Rails Level 2 Class > nutty > lib folder.
In your code editor, open nutty > app > models > cart.rb
-
Add the bold code as shown:
class Cart < ActiveRecord::Base
   include CheckoutSharedMethods

   belongs_to :customer
Copy the line you just added.
Save the file, then close it.
In your code editor, open nutty > app > models > order.rb
Paste the code at line 2 (it should look like the code in cart.rb).
Save the file, then close it.
By default, stuff in the lib folder isn’t automatically loaded by Rails. In your code editor, open the following file: nutty > config > application.rb
-
Around line 17, add the following bold code to ensure that the lib folder gets automatically loaded along with our application:
class Application
   config.eager_load_paths << Rails.root.join('lib')
end
Save the file, then close it.
-
Restart the rails server by pressing CTRL+C and running
rails sagain. This is necessary to pick up the change we just made toapplication.rb.Now we should finally be able to formally check out. We wrote the code in the cart controller to move line items from cart to order then delete the cart. We also have the
totalandsubtotalmethods being shared very cleanly. In the browser, go to: localhost:,000
-
Go to the Cart, then click the Checkout button.
Awesome, we’ve got our checkout page!
Notice that the Cart icon at the top right now says 0. Click on it to see that the cart is indeed empty!
Fixing the Add to Cart Button
-
Still in the browser, try adding an item to the cart.
After clicking the Add To Cart button, there is an error.
In your code editor, open nutty > app > controllers > line_items_controller.rb
-
Now that the relationship is polymorphic, we need to make a few updates here. Edit the code by adding the following bold code around line 9:
else
   line_item = LineItem.new(itemizable: @cart, product: product, quantity: params[:quantity])
end
It will automatically pick up the right relationship from the object. We don’t have to specify
itemizable_idanditemizable_type…Rails can tell it’s a cart. Save the file, then close it.
Return to the browser and go to: localhost:,000
-
Try adding an item to the cart again, then click Checkout.
Everything should be working now!
Adding a Customers Who Have Bought This Product Field
There’s something else we should change. To see it, navigate to the back-end: localhost:,000/admin
-
Sign in if prompted. If you do not have an account or started from a prepared folder, complete the following sidebar to log in.
Creating a Login
-
Log in with the following:
Email: admin@example.com Password: password At the top of the Dashboard, in the gray bar, click Admin Users.
To the far right of admin@example.com (the only user), click Edit.
-
Set the following:
Email: your email address (Use an account you can access in class!) Password: student1 Click the Update Admin user button.
- Log in again with your new info.
-
-
If you have trouble logging in, try the following workaround:
Creating User Info in Terminal
- In Terminal, open a new tab CTRL–C
- Enter the console by typing
rails c -
Type the following to create an admin username and password (all on one line in Terminal):
AdminUser.create :email => 'admin@example.com', :password => 'password', :password_confirmation => 'password' - In the browser return to http://localhost:,000/admin. You should be able to log in.
Complete steps 2–6 from the sidebar above.
At the top, click the Products link.
Click the View link to the right of one of the products you bought earlier.
Notice the Customers who want to buy this product section. We should also add a Customers who have bought this product section. That will be pretty easy to do!
In your code editor, open nutty > app > admin > product.rb
-
Find the following code around lines 30–32 and copy it:
row 'Customers who want to buy this product' do product.carts.map(&:email).join(", ") end -
Paste it immediately below the existing code you copied and edit it as shown in bold:
row 'Customers who want to buy this product' do
   product.carts.map(&:email).join(", ")
end
row 'Customers who have bought this product' do
   product.orders.map(&:email).uniq.join(", ")
end
NOTE: We added
uniqbecause while every customer has one cart, each customer could have more than one order. They could have bought the item more than once, but we’d only want to show each customer once in that list. Save the file, then close it.
In the browser, go back to the admin page for the product you bought and reload it. Now you should see a Customers who have bought this product section and your email should be listed there!
Leave Terminal, your code editor, and browser open so we can continue with them in the next exercise.