Discover how to add images and animate motion effects in Premiere Pro with this comprehensive tutorial that includes step-by-step instructions and visual aids.
This exercise is excerpted from Noble Desktop’s Adobe Premiere Pro training materials and is compatible with Premiere Pro updates through 2023. To learn current skills in Premiere Pro with hands-on training, check out our Premiere Pro Bootcamp, Video Editing Certificate, and video editing classes in-person and live online.
Topics covered in this Premiere Pro tutorial:
Adding Images, Animating Motion Effects, Adding Transitions
Exercise Preview
Exercise Overview
In this exercise you’ll learn how to add graphics such as logos and photos, animate them so they blend in well with your video footage, and add transitions.

Getting Started
In case you didn’t add all the optional b-roll in the previous exercise, we’ll start with a file that has all that work done.
In Premiere Pro, if you have a project open, choose File > Close All Projects.
Choose File > Open Project or hit Cmd–O (Mac) or Ctrl–O (Windows).
Navigate to Desktop > Class Files > Premiere Pro Class > The Interview > Finished Projects.
-
Double–click on The Interview - Ready for Graphics.prproj to open it.
NOTE: If you see a dialog about Converting Project (from a prior version) refer to Fixing Version Compatibility Issues section in Exercise 1A. If the Link Media dialog opens refer to Locating Missing Media in Exercise 1A.
-
Once the project is open, go to File > Save As and:
- Name it Your Name - The Interview version 2
- Save it into Desktop > Class Files > Premiere Pro Class > The Interview
Adding a Logo
A “bug” is a type of onscreen graphic usually in the right or left corner of the video frame. Very often they will be a company’s logo or other identifying graphics.
In the Tools panel, click on the Selection tool
 .
.In the Project panel, locate 03 - Images > Noble Logo.ai and
drag it onto the Video 3 track in the Timeline so it starts at the beginning (far left).Drag the end of the clip so it matches the length of the interview clips on Video 1.
Click on the Noble Logo clip on the timeline to select it.
-
In the Program panel, near the bottom right click on the Settings wrench
 and choose Safe Margins to enable the Action and Title safe margins.
NOTE: Safe Margins are used in broadcast television to ensure that your text won’t be cut off when it displays on a television. This video isn’t for broadcast so we will just use them here as a rough margin so we don’t place the graphic too close to the edge of the video frame.
Click on the Effect Controls panel (at the top left, next to the Source panel’s tab). If you can’t find it, choose Window > Effect Controls.
If necessary, click the arrow
 next to Motion to reveal its properties.
Change Scale to 30
-
Change Position to 1755 960
This should place the logo at the bottom right corner of the Safe Margins.
TIP: If you click on the word Motion in the Effect Controls panel, you can drag the graphic around in the Program panel.
Click on the Settings wrench
and choose Safe Margins to turn them off.In the Timeline panel, click the lock
 button to the left of the Video 3 track.
Adding Images & Animating Motion Effects
Just like video, still images can be added to a Premiere Pro sequence. However, by themselves still images can be visually unappealing/boring, so to make still images a more lively, we can animate them.
In the Timeline, move the playhead to 45:05
- In the Project panel, locate 03 - Images > Dan with Software.jpg
Drag Dan with Software.jpg to Video 2 track on the Timeline, lining the beginning of the clip with the playhead.
Click on the clip in the Timeline to select it.
In the Effect Controls panel, change Position to 560 645
On the right side of the Effect Controls panel is a mini–timeline view for this clip. The playhead should be the beginning (left), but if it isn’t, move it there now.
To the left of Position, click on the Toggle Animation stopwatch
 to create the first keyframe of our animation.
-
In the Timeline, move the playhead to 49:03
Notice this also moved the playhead in the Effect Controls panel’s mini–timeline.
-
Change Position to 1865 1000
This creates the second keyframe of our animation.
-
In the Effect Controls panel’s mini–timeline, Ctrl–click (Mac) or Right–click (Windows) on the first keyframe
 and choose Temporal Interpolation > Ease Out.
This allows the animation to start off slow and pick-up some speed as it progresses.
-
Ctrl–click (Mac) or Right–click (Windows) on the second keyframe and choose Temporal Interpolation > Ease In.
This slows down the animation at the end so the image doesn’t stop so abruptly.
- Play the sequence over this photo clip to see the final animation.
- Position the playhead at the end of the photo clip you just added.
- Press the + (plus) key twice to zoom closer in on that part of the Timeline.
- Let’s add one more photo. In the Project panel, locate 03 - Images > Dan with Work.jpg.
- Drag Dan with Work.jpg onto the Video 2 track, snapping it to right after Dan with Software.jpg.
- Move the playhead so it snaps to the beginning of the new image (so it’s between the 2 images).
- Click on the new image in the Timeline to select it.
- In the Effect Controls panel, confirm that Scale is 100
- To the left of Scale, click on the Toggle Animation stopwatch .
- In the Timeline, move the playhead to 53:17
- In the Effect Controls panel, change Scale to 50
Play the sequence over the 2 photos to see both animations.
Adding Transitions
Fading the photos in and out would make the transitions smoother.
- Open the Effects panel by choosing Window > Effects.
- In the Effects panel’s search field type cross
-
Under Video Transitions you should see Cross Dissolve.
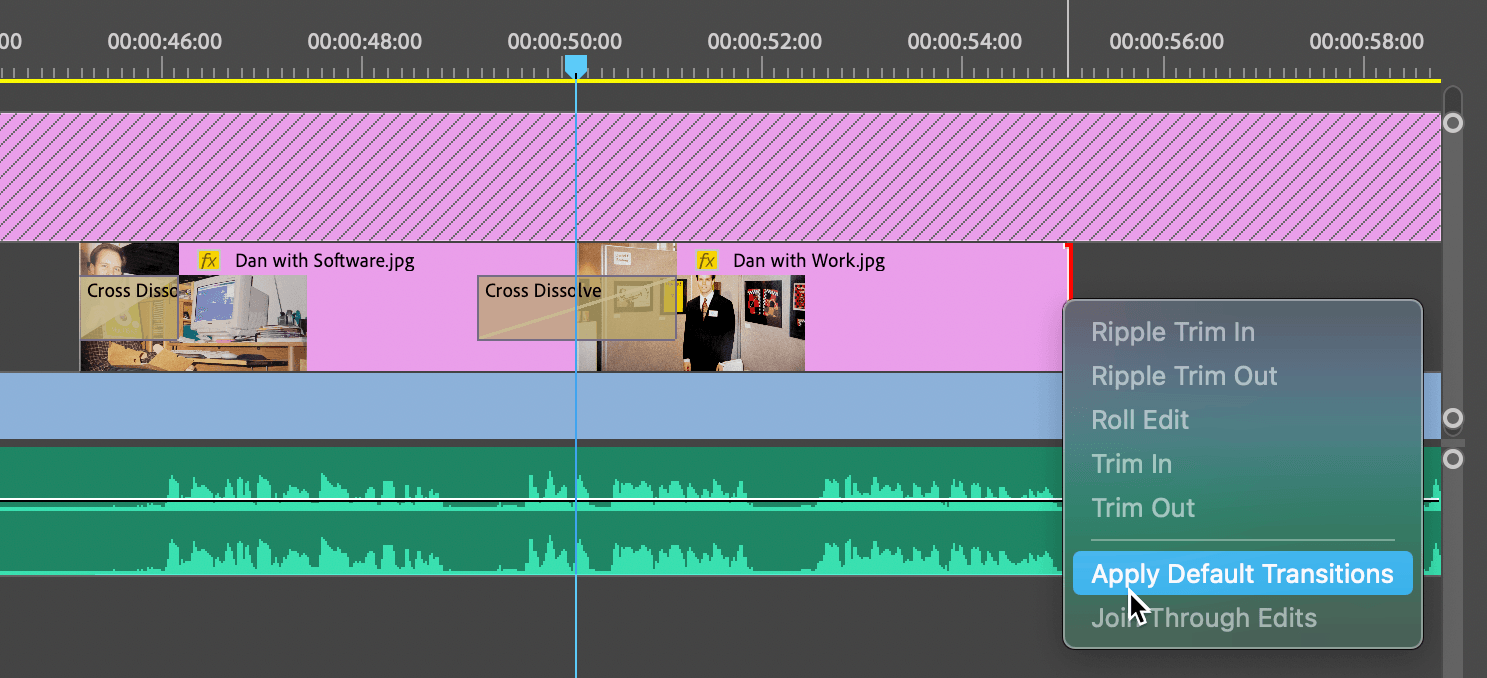
Drag the Cross Dissolve transition onto the edit line where the Dan with Software and Dan with Work clips join.

In the Timeline, hover over the beginning of the first photo (Dan with Software) and when you see the right facing bracket
 Ctrl–click (Mac) or Right–click (Windows) and choose Apply Default Transitions.
Hover over the end of the second photo (Dan with Work) and when you see the left facing bracket
 Ctrl–click (Mac) or Right–click (Windows) and choose Apply Default Transitions.
Double–click on the transition between the two clips to open the settings.
-
For Duration type 200
NOTE: In Timecode that’s 2:00 which is 2 seconds and 00 frames.
- Click OK.
- Play the sequence over the 2 photos to see photos with their transitions.
- Hit the
\(backslash) key to zoom out to see everything in the Timeline. -
Choose File > Save or hit Cmd–S (Mac) or Ctrl–S (Windows).
Keep the project open because you’ll use it in the next exercise.