Dive into this comprehensive Photoshop tutorial, where you'll learn how to use tools such as the Spot Healing Brush, Healing Brush, and Clone Stamp to remove undesired elements, enhance your images, and improve your photo editing skills.
This exercise is excerpted from Noble Desktop’s past Photoshop training materials and is compatible with Photoshop updates through 2020. To learn current skills in Photoshop, check out our Photoshop Bootcamp and graphic design classes in NYC and live online.
Topics covered in this Photoshop tutorial:
Spot Healing Brush, Healing Brush, Clone Stamp, Content-Aware Fill
Exercise Preview

Photo by Vladimir Kudinov

Exercise Overview
In this exercise, you’ll removing undesired elements (a common retouching task).
In Photoshop, go to File > Open.
Navigate to Desktop > Class Files > Photoshop Class and double–click on deer.jpg to open it.
-
As shown below, in the Layers panel, click and drag the Background layer down to the New layer icon
 at the bottom right. This creates a duplicate layer that we can edit without changing the original image.
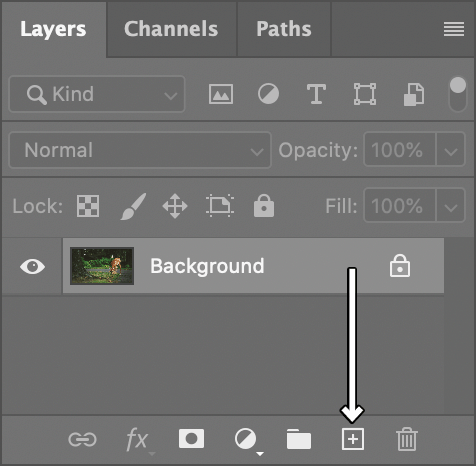
The Clone Stamp Tool
We want to remove the bright spots in dark background because they are distracting. Let’s start with the light blobs on top left near the tree.
- Choose View > 100%.
- Hold your Spacebar (the get the Hand tool) and drag anywhere on the image to scroll up to the top left of the photo (where the light blobs are).
- In the Tools panel (the toolbox on the left side of the Photoshop window), click on the Clone Stamp tool
 .
. -
At the top of the screen are tool options (in what’s called the Options bar). As shown below, click on the Brush Preset picker, and in the General Brushes folder, click on the first brush Soft Round.

- Set Size to 200 px.
- Hit Return (Mac) or Enter (Windows) to close the brush picker.
- Also in the Options bar, set Opacity to 100%.
Option–click (Mac) or Alt–click (Windows) on a section of the dark green background that you think would look good in place of the light area.
To remove one of the light areas, drag over it.
-
If it does not look good, try again:
- Choose Edit > Undo Clone Stamp.
- Option–click (Mac) or Alt–click (Windows) on another part of the background that you think should better match.
- Drag over the light area again.
The Spot Healing Brush
With the Clone Stamp your retouching will look bad if you don’t sample something that exactly matches. Let’s see how the Spot Healing Brush can help with that.
- Do Edit > Undo Clone Stamp to remove the work (you may need to choose it a few times to fully remove the previous retouching).
- In the Tools panel (the toolbox on the left side of the Photoshop window) choose the Spot Healing Brush tool
 .
. -
In the Options bar at the top of the screen and click on the Brush Preset picker and:
- Set Size to 100 px.
- Set Hardness to 100% (we’re choosing a hard edged brush this time).
- Hit Return (Mac) or Enter (Windows) to close the brush picker.
- This tool figures out what to put into the retouched area, so there’s no need to tell it what we want to sample (copy). Drag over the light area so it’s covered completely in the dark highlight. After you’ve covered the entire area you want to fix, release and you’ll see the result, which should look pretty good!
- Hold the Spacebar and drag anywhere on the image to scroll down to the base of the tree.
-
At the base of the tree (near the middle of the image) is a light tan blob which is probably an out of focus lead. Try using this Spot Healing Brush
to remove that.It probably did a pretty good job, but maybe not exactly what we want. Let’s see another way where we have more control.
Do Edit > Undo Spot Healing Brush to remove the work (you may need to choose it a few times to fully remove the previous retouching).
The Healing Brush
The Healing Brush  is like a combination of the Clone Stamp and Spot Healing Brush tools . We use the Healing Brush when we want more control than the Spot Healing brush offers, but we still want help making sure the retouching blends in nicely.
- In the Tools panel (the toolbox on the left side of the Photoshop window), click and hold on the Spot Healing Brush tool and choose the Healing Brush tool .
- Option–click (Mac) or Alt–click (Windows) on an area with the texture and color you think would look good in the leaf area.
-
Hover the cursor over the blurry tan leaf and:
- If you think this will match pretty well (it doesn’t have to be perfect) drag over the leaf to heal it.
- If you don’t think it matches well, Option–click (Mac) or Alt–click (Windows) on another area and try agin.
NOTE: You use the Healing Brush
and Clone Stamp the same way, but the Clone Stamp “clones” an area exactly (almost like copying and pasting), whereas the Healing Brush “heals” an area by melding the textures from the source and the color/brightness from the destination (where you paint). In other words, the Clone Stamp in like copy and paste, and the Healing Brush is like copy, paste, blend.
Content-Aware Fill
Sometimes it’s easier to select an area that you want to “heal”, rather than paint over it. In that case we can use a content-aware fill which will act similarly to the spot healing brush, with Photoshop figuring out what to put into the selected area.
- Hold the Spacebar and drag anywhere on the image to scroll up so you can see the area above the deer.
- In the Tools panel, click on the Lasso tool

-
Drag a selection area around the larger light blob above the deer, being sure to get all the light area and a little into the dark area of the surrounding background.
If you don’t like the selection you made, choose Selection > Deselect and try again.
-
Go into Edit > Fill.
NOTE: There is also an Edit > Content-Aware Fill but that’s for more complex needs. Right now we want the simpler and faster version, which is found in Edit > Fill.
- Set Contents to Content-Aware.
- Click OK.
- Choose Selection > Deselect so you can better see the final result.
-
The result should look pretty good!
If you don’t like what Photoshop filled the area with, you could undo the deselect, and fill it again. Photoshop will give you a slightly different result.
Saving the File
- When you’re satisfied with the results, do a File > Save As.
-
If Photoshop asks about saving to cloud documents or your computer:
- Check on Don’t show again.
- Click Save on your computer.
-
Set the following options:
- Set Format (Mac) or Save as type (Windows) to Photoshop.
- If you’re not already in the Photoshop Class folder, navigate into it.
- Name it yourname-deer.psd and hit Save.
- If you see a message about Maximize Compatibility, keep it checked on and click OK.
NOTE: We often start with JPEG files because it’s a common format for digital cameras, but you’ll want to save your retouched image as a Photoshop Document (.psd) to ensures it remains editabile with its layers. Photoshop files also maintain the image’s quality, whereas JPEG compression reduces the image quality in order to reduce the file size.
Congratulations—you’ve completed your first retouching job!
Optional Bonus (If You Get Done Early)
- In the Photoshop Class folder open surfer.jpg.
-
Try using the techniques you learned to remove the surfer.
TIP: If using the Healing Brushes or Content-Aware Fill, try to remove the unwanted element all at once, rather than in pieces for the best result.
