This comprehensive guide provides step-by-step instructions on how to effectively manage color profiles in Photoshop, demonstrating how to open a file, check and load profiles, make multiple copies for comparison, apply various settings, and compare the differences between conversions to achieve the best output for your specific device.
This exercise is excerpted from Noble Desktop’s past Photoshop color managment training materials and is compatible with Photoshop updates through 2018. To learn current skills in Photoshop, check out our Photoshop Bootcamp and graphic design classes in NYC and live online.
Getting Started
- Go to File > Open.
- Open Smiling Baby-Adobe RGB.tif from the Color Management Seminar Files folder.
- Go to File > Save As.
- Set the Format to Photoshop and name it Smiling Baby-flat4printer.psd.
- We don’t have layers in this file, but if you did, you would flatten the image now (Layer > Flatten Image).
Checking for Profiles
When dealing with printers, you will hopefully be able to get a profile from them which describes their press/paper. You’ll need to load the profile onto your computer to use it in Photoshop. We’re going to use a color profile that you may not have on your computer. To check to see if you have it, go to Edit > Color Settings.
If you can’t see all the options, click More Options.
Under Working Spaces, go to the CMYK menu and see if Light GCR 360 UCR CMYK US Negative Proofing is listed.
Cancel out of this dialog. If it is listed, skip over the next section (Loading Extra Profiles) and continue on. If it is not listed, do the next section.
Loading Extra Profiles
Hide or minimize Photoshop so you can see the Desktop.
Go into Class Files > Color Management Seminar Files, then the extra_profile.
Select the file inside the folder, GNCMYK50.PF.
Hit Cmd–C (Mac) or Ctrl–C (Windows) to copy it.
-
The location you need to paste the profile in depends on your operating system:
Mac Users
Hold Opt and from the Go menu choose Library.
Go into ColorSync > Profiles. Paste the file into the Profiles folder.
Windows Users
Go to C: drive, then into Windows > System 32 > spool > drivers > color.
Once you’re in the color folder, hit Ctrl–V to paste the file into it.
Go back to Photoshop.
Making Multiple Copies so We Can Compare the Settings
Mac users only: In Photoshop, go into the Window menu. If Application Frame is not checked, choose it to turn on the Application Frame.
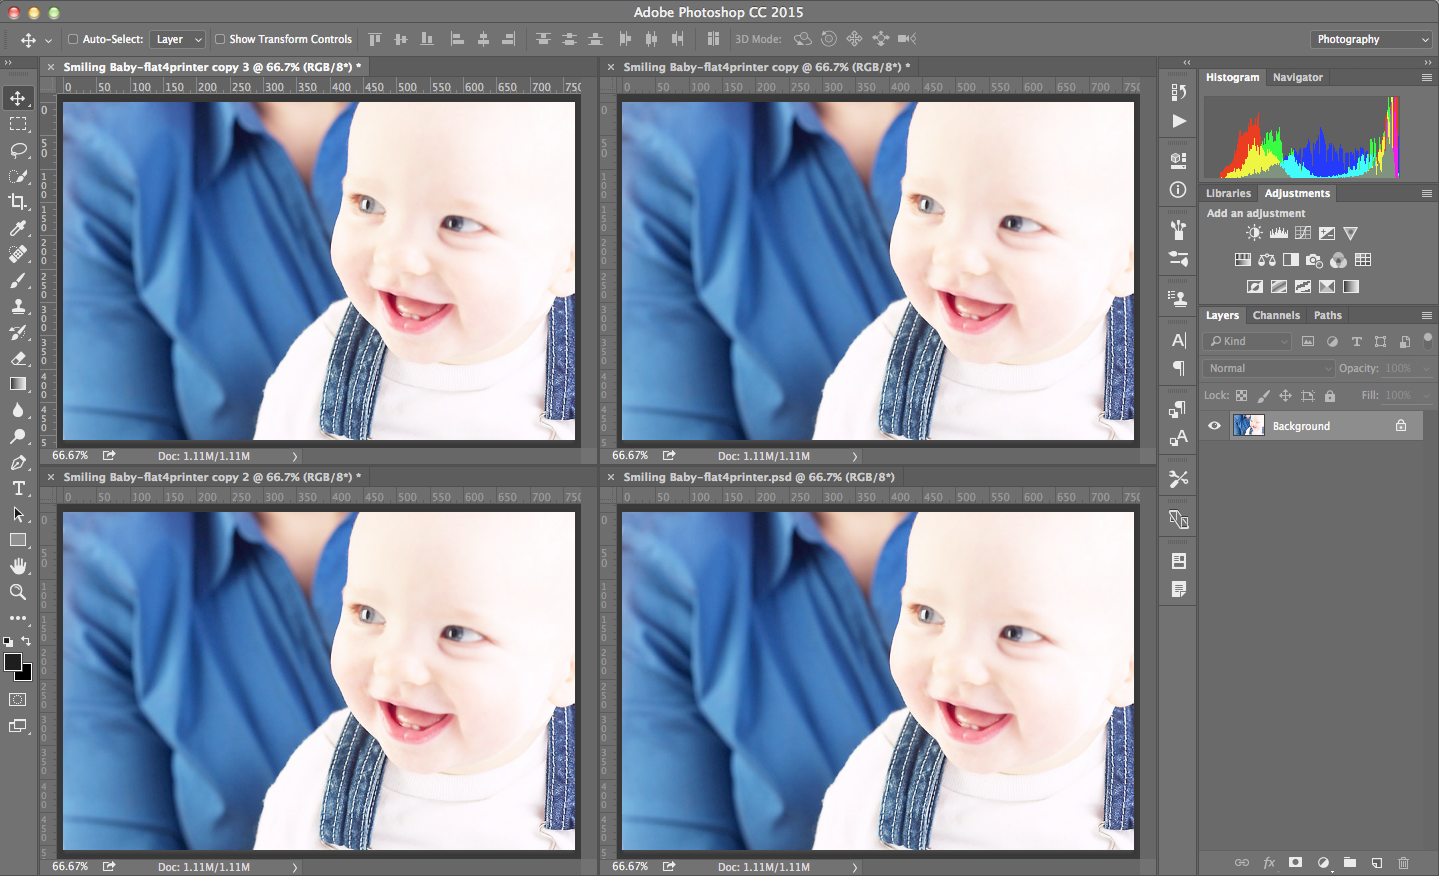
To make three new copies of the image, go to Image > Duplicate three times. You should now have four copies of the image open, making it easy to compare.
- As shown below, arrange the images so you see them all at the same time and set the zoom so you see almost the whole image. To do that:
- Go into Window > Arrange > 4-up
 .
. - Zoom out a bit so that you can see the entire image in one of the window panes.
- Go to Window > Arrange > Match Zoom.
- Go into Window > Arrange > 4-up
Applying the Settings & Converting to CMYK
We’re going to convert each of the images to CMYK using different settings.

Image 1 (on the Top Left)
Let’s start with the top left image. Make sure you are using the Move tool
 and click on the image to make sure it’s active.
Go to Edit > Color Settings (Cmd–Shift–K (Mac) or Ctrl–Shift–K (Windows)).
Under Working Spaces go into the CMYK menu. Choose U.S. Sheetfed Coated v2.
Click OK.
Now do the CMYK conversion by going to Image > Mode > CMYK Color. If a confirmation message appears, check Don’t show again and click OK.
Image 2 (on the Top Right)
Click on the image on the top right to make sure it’s active.
Go to Edit > Color Settings (Cmd–Shift–K (Mac) or Ctrl–Shift–K (Windows)).
Under Working Spaces go into CMYK and choose U.S. Sheetfed Uncoated v2.
Click OK.
Go into Image > Mode > CMYK Color.
Image 3 (on the Bottom Left)
Click on the image on the bottom left to make sure it’s active.
Go to Edit > Color Settings (Cmd–Shift–K (Mac) or Ctrl–Shift–K (Windows)).
Under Working Spaces go into CMYK and choose U.S. Web Coated (SWOP) v2.
Click OK.
Go into Image > Mode > CMYK Color.
Image 4 (on the Bottom Right)
Click on the image on the bottom right to make sure it’s active.
Go into Edit > Color Settings (Cmd–Shift–K (Mac) or Ctrl–Shift–K (Windows)).
Under Working Spaces go into CMYK and choose the profile you loaded at the beginning of this exercise: Light GCR 360 UCR CMYK US Negative Proofing.
Click OK.
Go into Image > Mode > CMYK Color.
Comparing Differences Between the Conversions
Now that all of the files are converted to CMYK, look for any differences.
Let’s look more closely. One at a time, select an image and then to the Channels panel and view only the Cyan channel, until all the images are showing the Cyan channel. Compare the differences between the images. Choosing different CMYK profiles affects how RGB images are separated into CMYK. Notice the difference between the top two images, which are both for a sheetfed press, but the left is coated and the right is uncoated. Look especially at the shadow area of the woman’s shirt collar.
One at a time, select an image and view only the Magenta channel, until all the images are showing the Magenta channel. Compare the differences.
-
Repeat this for the Yellow and Black channels to see their differences.
Wow! Some of them are quite different. Now you can really see how choosing the correct CMYK profile based on your output device can create the right separations/color specifically for that device!
When done, close all files without saving changes.
