Discover how to correctly handle images that lack an embedded profile in Photoshop, using fast and manual techniques, while learning how to assign the appropriate profile for accurate image display and conversion into a device-independent workspace for optimal editing.
This exercise is excerpted from Noble Desktop’s past Photoshop color managment training materials and is compatible with Photoshop updates through 2018. To learn current skills in Photoshop, check out our Photoshop Bootcamp and graphic design classes in NYC and live online.
Images that don’t have a profile need to be assigned one before you start editing them. There are two ways you can handle images that do not have an embedded profile. The first technique is the fastest, but you don’t get to see the changes happen. The second technique is more manual, but you get to preview the change, which is good if you are in the unfortunate situation of having to guess what profile to assign.
Technique #1: the Fast Way
- Go to File > Open.
Open Smiling Baby-no profile (should be sRGB).tif from the Color Management Seminar Files folder.
-
The following message will be displayed. As shown below, assign it the sRGB profile and check convert document to working RGB.

-
When done, click OK.
Explanation: This image had no embedded profile. It was shot on a digital camera that uses sRGB. If we don’t assign it the right profile before converting to the workspace, we may be starting off with the wrong colors.
You are now ready to edit the image as needed. We won’t be editing it now, so close the file.
Technique #2: Previewing the Change
- Go to File > Open.
Open Smiling Baby-no profile (should be sRGB).tif from the Color Management Seminar Files folder.
-
As shown below, choose Leave as is and click OK.
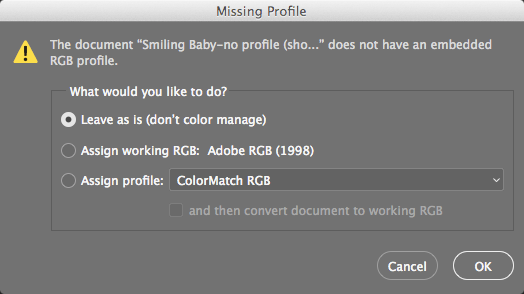
Explanation: Leaving the image as it is (not color managing the image) means no profile is assigned. Photoshop therefore displays the image using the current workspace (in our case Adobe RGB).
Assigning the Proper Profile so Photoshop Displays the Image Correctly
Let’s drop some color samplers down so we can see exactly how the colors in the image are being affected as we change profiles. Choose the Color Sampler tool
 . If it is hidden under the Eyedropper tool
  , hit Shift–I until it is selected.
Click anywhere on the image to place a color sampler.
-
The Info panel should automatically open so you can see the value of the color sampler you just placed. (Color sampler values will appear here.)
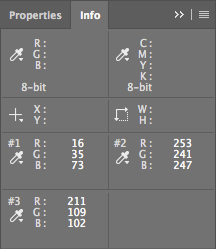
Place one or two more on different colors and note their values in the Info panel.
Go to Edit > Assign Profile.
-
This image was shot on a digital camera and, like many digital cameras, the camera shoots in sRGB. As shown below, from the Profile menu, choose sRGB but do NOT hit OK until we say!

Check the Preview box on and off. Wow, that makes quite a change in how the colors look. Now they look more realistic. The skin tones are less red and more natural. While the color may not be perfect, Photoshop is now trying to accurately display how the camera saw the color.
-
Make sure Preview is checked and look at the Info panel.
Notice how there are two sets of numbers, like 63/63. The first number is the current value. The second number is what the value is being changed to. Notice that none of the numbers are changing. That’s because assigning a profile does NOT change the color numbers in the image. It just tells Photoshop what those numbers mean, and thus how it should make any on-the-fly adjustments to accurately display the image on your monitor.
Try assigning different profiles and see how radically the color sometimes changes. This illustrates how differently various devices see color. That is why Photoshop must know what device created it and how it saw the color, so Photoshop can display the image the way it was meant to be.
When done trying different profiles, reselect the proper sRGB and click OK.

Converting into a Device-Independent Workspace for Image Editing
Go to Edit > Convert to Profile.
Don’t click OK till we say! Try selecting different profiles to convert the image to. Toggle the Preview checkbox on/off and notice the color sample values in the Info panel change. This is because converting to a profile changes the color values in your image permanently.
-
This image was shot on a digital camera that we know uses sRGB. But this RGB colorspace, while suited nicely for web design, is small and is not good to work in for print. We’ll convert to a better colorspace for editing so we aren’t limited to the capabilities of the input device (in this case, the camera). Set the following:
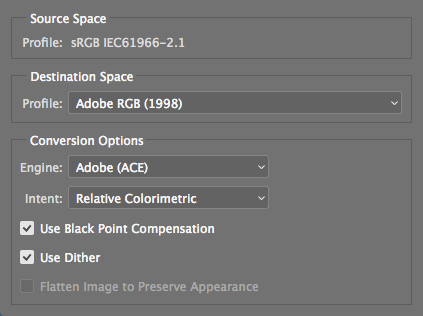
NOTE: While Adobe RGB is a good workspace, we do not want say that everyone should use it for all their work. You will need to find the RGB workspace that is best for your workflow.
-
Click OK.
Now that you are in a good device-independent workspace, you can do your work, color adjustments, etc.
We won’t be editing it now, so save and close the file.
