Learn to create simple animations with flashing text in Photoshop with this comprehensive guide, covering creating a frame animation, adding frames, setting frame duration, testing the animation, and saving as an animated GIF.
This exercise is excerpted from Noble Desktop’s past Photoshop Animated GIFs training materials and is compatible with Photoshop updates through 2019. To learn current skills in Photoshop, check out our Photoshop Bootcamp and graphic design classes in NYC and live online.
Topics Covered in This Photoshop Tutorial:
Creating a Frame Animation, Adding Frames, Setting Frame Duration Using the Frame Delay Option, Testing the Animation, Saving As an Animated GIF
Exercise Preview

Exercise Overview
In this exercise, you’ll learn how to create a simple animation with flashing text in Photoshop. We’ll show you how to create a frame animation in an existing Photoshop file, test the animation, and save it as a GIF file for viewing on the web.

Previewing the Finished Animation
Download the class files. Refer to the Downloading the Class Files page at the beginning of the workbook on how to download and install the class files.
Launch any web browser (Chrome, Safari, Firefox, etc.).
Press Cmd–O (Mac) or CTRL–O (Windows) and navigate to Desktop > Class Files > Animated GIFs Class > NYC Tours.
-
Double–click on nyc-tours.gif.
Watch the animation loop a few times to get a feel for what we’ll be working towards. There is a cycling list of tours at the bottom followed by a flashing 10% OFF banner over a static NYC background.
Getting Started
-
Launch Photoshop.
NOTE: This book has been tested with Photoshop 2020. If you’re using an older or newer version, most things should still work the same or similarly.
- Go to File > Open.
- Navigate to Desktop > Class Files > Animated GIFs Class > NYC Tours.
- Double–click on nyc-tours.psd.
- Go to File > Save As.
- Name the file yourname-nyc-tours.psd and navigate into Class Files > Animated GIFs Class > NYC Tours.
- Click Save.
If a dialog pops up asking if you want to Maximize Compatibility, just leave it checked. Then check on Don’t show again and click OK.
Creating a Frame Animation
We have an existing Photoshop file with all the elements we want to animate, but right now it’s just a static layered image. We first need to tell Photoshop that we want to create an animation.
-
Open the Timeline panel by going to Window > Timeline.
There are two options within the Timeline panel: Create Video Timeline and Create Frame Animation. The Video Timeline option is similar to video editing software—it shows what each element in the file is doing for the duration of the video/animation.
Frame Animation shows us what the image looks like during each chunk of time, instead of showing what each element does in a timeline. Each chunk of time is called a frame. By changing how elements look from one frame to the other, we can build our animation.
-
If the button in the middle of the Timeline panel says Create Video Timeline, click the arrow
 to the right of Create Video Timeline and choose Create Frame Animation as shown below.
In the Timeline panel, click the Create Frame Animation button.
Adding Frames
At the bottom of our animation, we want to cycle between different tourist spots in NYC before ending on a final message. To accomplish this, we will need to set up multiple frames in our animation, and change the text from frame to frame. First, let’s take a look at how the text layers are set up in the file.
Open the Layers panel (Window > Layers) if it isn’t already open.
-
In the Layers panel, click the arrow
 to the left of the NYC Tourist Spots folder to expand it and take a look at its contents.
As you can see, we have five different text layers. Currently they are all hidden except for the Statue of Liberty text layer. We’ll show these layers one at a time.
-
We need to create a new frame. At the bottom of the Timeline panel, click the Duplicates selected frames button
 .
.This creates a new frame (chunk of time) in our animation that’s identical to our first frame. We need to change the second frame so that it displays the next set of text.
With the second frame in the Timeline panel still selected (it will be highlighted in gray), go into the Layers panel and hide the Statue of Liberty layer by clicking the eye
 to the left of it.
Make the Empire State Building layer visible by clicking in the empty box where the eye
should be.-
Click on the first frame in the Timeline panel, then click back to the second frame again to see how the two frames are now slightly different.
Changing the Size of a Frame’s Thumbnail
If the thumbnail size is too small for you to see the difference between the two frames while you work, feel free to go to the top right of the Timeline panel and click the Timeline panel menu
 . Go into Panel Options, choose a larger size, and click OK. (The default is a medium-sized thumbnail.)
 -
Make sure the second frame is selected in the Timeline panel, then click the Duplicates selected frames button
.This created a third frame in our animation. Because we had the second frame selected when we made a duplicate, right now the third frame looks identical to the second frame.
With the third frame selected, hide Empire State Building by clicking its eye
, then show Grand Central by clicking in the empty box where the eye should be.Repeat the previous steps to create a fourth frame that hides the Grand Central text layer and shows the Times Square text layer.
Create a fifth frame that hides the Times Square text layer and shows the BOOK NOW! text layer.
Setting Frame Duration
Now that we’ve created the frames for our animation, we now have to set how long we want each frame to last.
-
Notice that the bottom of each frame currently says 0 sec.
This is how long each frame will last. We want them to be more than zero seconds each though.
Click 0 sec. on the first frame to change how long that frame will last.
-
From the menu that appears, choose 1.0 to set the first frame’s duration to 1 sec.
We want all our frames to last the same amount of time. Instead of setting each one individually however, we can set the timing for multiple frames at once.
- Click on the second frame.
Then Shift–click on the fifth frame so that the last four frames are all selected.
-
Click 0 sec. on the second frame, and choose 1.0.
All the frames are now set to 1 sec.
-
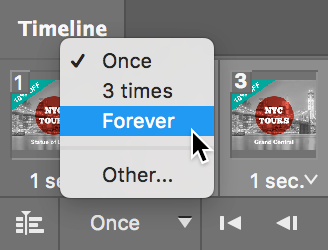
As shown below, at the bottom left of the Timeline panel, the looping menu will probably say Forever or Once. From the menu choose Forever so that the animation loops forever:
Testing the Animation
Now it’s time to test the animation! We don’t have to export the file as an animated GIF to see it working. Photoshop can give us a rough idea of how the animation looks so far.
At the bottom of the Timeline panel, click the Play button
 .
.Watch as the text at the bottom changes each second, cycling through the different NYC tourist spots. As we specified, the animation also continues to loop forever.
When you’re done testing, click the Stop button
 .
.
Adding Flashing Text
Let’s make the 10% OFF (on the teal banner at the top left) flash. To create flashing text, we will need to create several more frames so that our text can disappear and reappear a few times.
- In the Timeline panel, select frame 5.
Click the Duplicates selected frames button
.In the Layers panel, click the arrow
next to the 10% OFF folder to see the 10% OFF text layer.With frame 6 still selected in the Timeline panel, hide the 10% OFF text layer.
Click the Duplicates selected frames button
again.In the Layers panel, make the 10% OFF text layer visible in the new frame.
Click the Duplicates selected frames button
twice to make two more frames.Select frame 8 in the Timeline panel.
Hide the 10% OFF text layer in the Layers panel.
-
Test the animation by clicking the Play button
at the bottom of the Timeline panel.It looks good, but the 10% OFF text should flash faster.
- Click on frame 6.
Shift–click on frame 9 to select all the frames with the 10% OFF text.
On frame 6, click on 1 sec. and select 0.2 to change frames 6–9 to 0.2 sec.
-
Test the animation by clicking the Play button
at the bottom of the Timeline panel.The 10% OFF text is now flashing faster, but the final frame should last longer so viewers can read the full ad one last time before the animation starts over.
Select frame 9 and set it to 2 sec. (2.0).
Test the animation one last time by clicking Play
. Perfect!Do a File > Save.
Saving As an Animated GIF
To save as an animated GIF, we need to use the Save for Web option.
-
Go to File > Export > Save for Web (Legacy).
NOTE: Save for Web is marked as Legacy because Adobe won’t be updating it to support new features such as artboards. Adobe introduced newer exporting methods such as File > Export > Export As. These new methods may be suitable in some cases, but they are currently not as developed and lack some options found in Save for Web. For example, they do not support animated GIFs, but Save for Web does. Adobe is keeping Save for Web until the new methods can fully replace it.
-
A new window appears, allowing you to adjust compression settings and preview the final image. Click the 2-Up tab at the top.
You’re now looking at two images. The first is the original uncompressed image and the second is the compressed version.
- Choose View > Fit on Screen to zoom in more.
-
In the settings on the right, from the Preset menu, choose GIF 128 No Dither.
The goal when saving any graphic for the web, is to get the smallest file size possible without losing image quality. Animated GIFs require a little more work when optimizing because you have to check to make sure any changes you make to the settings look good throughout the animation by checking every frame.
-
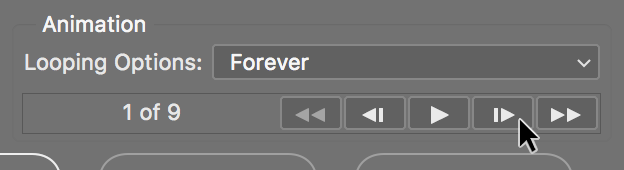
As shown below, at the bottom under Animation, there are buttons that allow you to preview the animation and step through it frame by frame. Go ahead and try them out.
NOTE: Keep in mind that if you press Play, the animation may play at a slower speed than in the final file.
Before we change any compression settings, make sure you are on a frame where most of our elements are shown, like frame 2.
-
Change Colors to 256.
GIFs can have up to 256 colors. You can reduce file size by reducing the total number of colors in an image.
-
Notice the file size below the image preview. It is currently at around 59,000.
Let’s reduce the number of colors to see if we can lower our file size without losing too much image quality.
Change Colors to 128.
Using the buttons below Animation, step through the animation frame by frame to see if reducing the colors made a difference in our image quality.
-
The image still looks good, but notice the file size has been reduced to around 44,000.
Let’s see if we can reduce the colors any more.
Change Colors to 64.
Using the buttons below Animation, step through the animation frame by frame to see if reducing the colors made a difference in our image quality.
Notice we are getting some banding under the teal banner on the top left and towards the top right of the image around the building under construction. We lost some file size, but it’s not worth the loss in image quality.
Change Colors back to 128.
-
From the menu to the left of Colors, choose the Perceptual color palette.
Adaptive, Selective, and Perceptual base their color choices on the actual image. The other options are preset color palettes, and therefore are typically not desirable. We chose Perceptual in this case because it was the smallest file size, and visually there was almost no difference between the three options.
Notice our file size is currently at around 42,000.
We don’t have any transparency in our file, so in the settings, uncheck Transparency.
-
Notice the file size below the image preview to see that the file size has increased.
That’s strange! Normally, it would make sense to uncheck Transparency if a file isn’t using it. However, bizarrely enough, even though we do not have transparency in this file, checking Transparency on reduces our file size.
Having Transparency checked on makes no visual difference to our file, so let’s check it on to save on file size.
-
In the settings, check on Transparency.
NOTE: You should always check to see if the Transparency option makes any difference in the file size of your GIFs. Like we saw here, even though a file doesn’t have any transparency, checking the option on reduces our file size.
Using the buttons below Animation, step through the animation frame by frame to make sure it looks good.
-
From the Metadata menu, choose None.
This saves us a little bit on file size, although you may not see any noticeable change in the file size preview in Photoshop.
Click Save.
Name it yourname-nyc-tours.gif and navigate into Class Files > Animated GIFs Class > NYC Tours.
Click Save.
To preview the file, open a browser (Chrome, Safari, Firefox, etc.).
Press Cmd–O (Mac) or CTRL–O (Windows) and navigate to Class Files > Animated GIFs Class > NYC Tours.
-
Double–click yourname-nyc-tours.gif.
You should see your animated GIF playing! Hurray!
Checking File Size
If you compare the file size that was listed in the Save for Web window with the file size listed on your system, you may notice that they don’t match up. This is mostly due to your operating system handling size calculations differently. It may also be because your system is tacking on some metadata to your file. There are some tools out there that can further reduce your file size by optimizing compression parameters and removing junk metadata. For more information on how you can further reduce the file size of your images, read the Image Optimization Tools reference at the end of the book.
