Learn how to enhance the quality of your photos by correcting lens distortion and adding a vignette through this comprehensive Lightroom tutorial.
This exercise is excerpted from Noble Desktop’s past Lightroom training materials and is compatible with Lightroom updates through 2020. To learn current skills in Lightroom, check out our Photo Retouching Certificate and graphic design classes in NYC and live online.
Topics Covered in This Lightroom Tutorial:
Lens Corrections Using a Built-in Profile, Adding a Vignette
Exercise Preview
Exercise Overview
In this exercise, you’ll learn how to correct lens distortion caused by using wide-angle lenses for photographing tall objects such as buildings. You will also learn how to add vignetting for a visual effect.

Lens Corrections Using a Built-In Profile
- If you have not imported the photos that were imported in Exercise 2E:
- Go into the Library module.
- At the bottom left of the screen, click Import.
- In the dialog box that appears, on the left under Source, navigate to Desktop > Class Files > Lightroom Class and select the Develop folder.
- At the top, above the photos, make sure Add is selected (highlighted).
- On the bottom right, click Import.
Go into the Library module.
Click on the last photo (NYC 9/11 Memorial: _CAS4132).
Press D to go into the Develop module.
In the Navigator panel on the left, click on FIT.
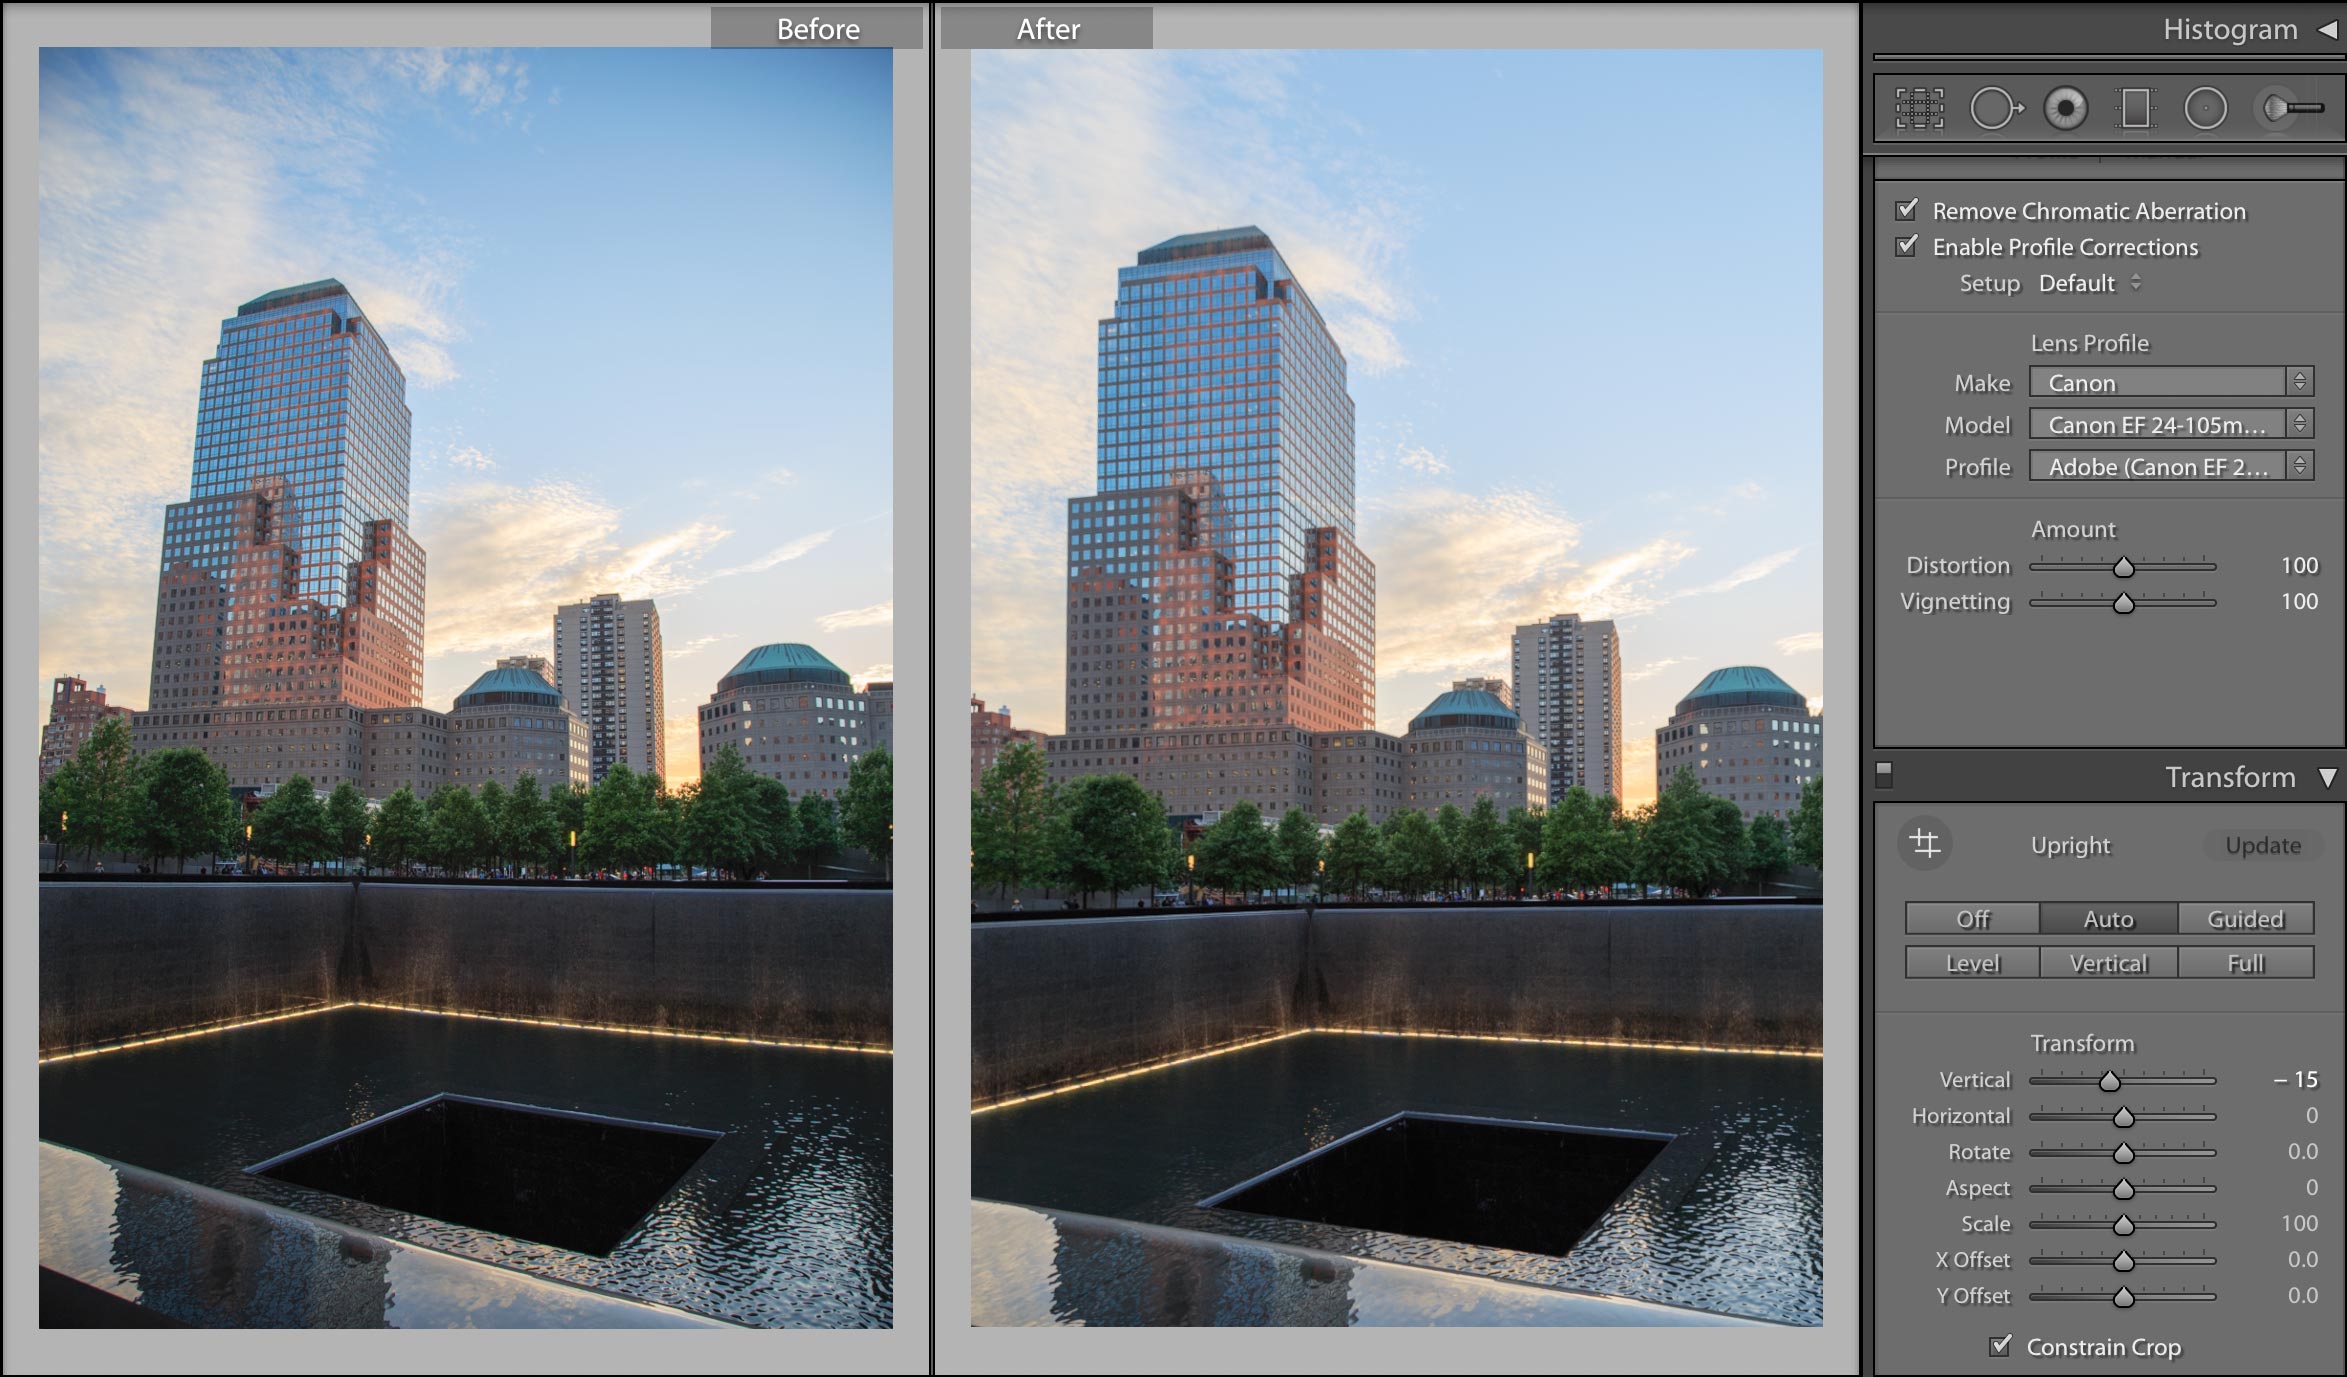
This photo was taken with a wide-angle lens that caused some distortion in the buildings. The lens also introduced some vignetting (darkening of the corners). Let’s reduce both of these issues. Expand the Lens Corrections panel on the right. (Collapse the other panels as needed.)
At the top of the Lens Corrections panel, click on Profile.
-
Check the box next to Enable Profile Corrections.
Lightroom looks at the photo’s metadata, figures out the camera lens, and uses Lightroom’s built-in profiles to auto-correct for distortion.
Check the box next to Remove Chromatic Aberration. This will remove any color fringing that was caused by the optics of the lens. (You’d have to zoom in to 1:1 to see this adjustment.) This is more noticeable in the left edges of the tall building, as well as some of the other buildings.
Below the Lens Corrections panel is a Transform panel. Towards the bottom of the Transform panel, make sure Constrain Crop is unchecked.
-
In the Transform panel, click the Level button.
This option attempts to level (straighten) the horizontal lines in the photograph. This could be helpful in another situation, but it’s not the right option for this image.
-
Still in the Transform panel, click the Auto button.
This is a pretty good correction! The lines of the building are much straighter. It’s a real improvement, but let’s try another option.
-
Click the Vertical button.
This option attempts to adjust every line in the photograph that it thinks should be perfectly vertical. This creates white triangles in the lower corners of the photo, which we can crop out.
In the Transform panel, check on Constrain Crop. This automatically crops out the white areas, but also other parts of the image.
We’ve lost a bit too much of the bottom of the photo, so let’s go back and compare the Auto and Vertical corrections. In the History panel, click on the Upright Perspective that says Auto on the right side of the panel.
Noticing the correction, click on the topmost Constrain Crop to see which you think is better.
We prefer Auto because it does not crop the bottom as much, so in the History panel choose the Upright Perspective with Auto on the right.
We’re not limited to these automatic settings. We can manually adjust the image as well. In the Transform panel, check on Constrain Crop.
-
To further reduce some of the vertical distortion, in the Transform panel drag the Vertical slider left to around -15.
That’s looking much better!
Adding a Vignette
A vignette is a classical dramatic effect that draws the viewer’s eye to the center of a photo.
Press G to return to Grid View.
Click on the church façade photo (20111008_swny_030).
Press D to go into the Develop module.
Expand the Effects panel on the right.
Under Post-Crop Vignetting, drag the Amount slider left to – 40. Pretty sweet!
In the top-left corner of the Effects panel, click the Switch
 off and on a few times to check out your work.
-
At the bottom of the screen, click the Before & After icon
 for a side-by-side view of your changes.
NOTE: You can also click the Before & After icon until the side-by-side view gives you a better indication of the changes (e.g.,
 )
) -
In the Navigator panel, click on FILL.
Nice job!
