Dive into this comprehensive tutorial on JavaScript & jQuery where you'll learn the initial setup, defining content cycles, and how to create dynamic animations.
This exercise is excerpted from Noble Desktop’s past JavaScript training materials. Noble Desktop now teaches JavaScript and the MERN Stack in our Full Stack Development Certificate. To learn current skills in web development, check out our coding bootcamps in NYC and live online.
Topics Covered in This JavaScript & JQuery Tutorial:
Initial Setup, Defining What Content Gets Cycled, Adding More Cycles & Exploring Options, Reversing the Animation
Exercise Preview

Exercise Overview
In this exercise, you’ll learn how to use the jQuery Cycle plugin to create a simple slideshow. It can cycle through content with a variety of transitions like fades, pushes, etc. This allows you to display many items in a small space (but one at a time) without the user having to do anything. The next slide is automatically displayed after a time delay of your choosing.

Getting Started
Open your code editor if it isn’t already open.
Close any files you may have open.
For this exercise we’ll be working with the Cycle-Simple-Slideshow folder located in Desktop > Class Files > yourname-JavaScript jQuery Class. You may want to open that folder in your code editor if it allows you to (like Visual Studio Code does).
Open index.html from the Cycle-Simple-Slideshow folder.
Preview index.html in Chrome (we’ll be using its DevTools).
Towards the bottom of the page, CTRL–click (Mac) or Right–click (Windows) on the Jive T-Shirts image, and choose Inspect.
-
The DevTools will open at the bottom of the window. As shown below, select the subContent1 div on the left side of the DevTools.
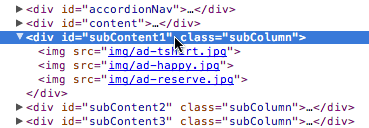
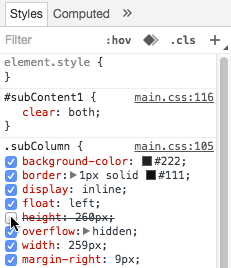
We want each of the three subContent sections at the bottom of the page to cycle through related content. Each column is a div that contains hidden content. We’ll use the Cycle plugin to display the hidden content, but first let’s see that hidden content. On the right side of the DevTools, find the .subColumn style.
-
As shown below, mouse over height and uncheck the property.
Close the DevTools.
-
Scroll down the page and notice that you can see many previously hidden content such as Happy Hour, Private Jive, Our Philosophy, etc.
NOTE: If you have multiple elements in a slideshow, it’s possible the extra elements will be visible for a short time when the page first loads. Once the Cycle JS loads, it will hide the extra elements, but in the meantime you may see a brief flash of unstyled content (FOUC). To avoid this, you can use CSS to hide everything except the first one (which is what we’ve already done by setting a height on the container and setting overflow: hidden). In the next exercise, we’ll look closer at another technique for doing this.
Switch back to your code editor.
Initial Setup
We’ve already downloaded the Cycle plugin and included it in our class files. At jQuery.malsup.com/cycle2 you can download the files, find useful documentation, examples, and other support. It’s another free plugin, but we encourage you to donate to its creator if you like it!
Now that we know the page is ready with the content we want to be cycled, we can make it actually happen. Switch back to index.html in your code editor.
-
We need to add links to some script files. The preferred order of linking is jQuery, plugins, then your JS files. Around line 93, before the link to main.js add the following two bold links:
</div>
<script src="js/vendor/jquery-2.1.0.min.js"></script>
<script src="js/vendor/cycle/jquery.cycle2.min.js"></script>
<script src="js/main.js"></script>
</body>
Save the file.
Defining What Content Gets Cycled
From the js folder open main.js.
On line 30 notice we already have jQuery’s document ready code. We only need one instance of this, so we can add our jQuery code inside it.
From the snippets folder open cycle-example.js.
Select all the code.
Copy it and close the file.
-
On line 33, below the // Cycles comment within the document ready braces, paste the code so it appears as below:
// Cycles $('element').cycle({ fx: 'effectName', speed: 300, timeout:,000, delay: 0 }); }); -
Let’s customize this to cycle through our first subContent div, which we gave an ID of subContent1. Make the following changes in bold:
// Cycles
$('#subContent1').cycle({
   fx: 'scrollHorz',
   speed: 300,
   timeout:,000,
   delay: 0
});
Save the file.
Preview index.html in a browser. Watch for the sliding animated content!
Leave the page open in the browser so we can come back to it later.
Let’s slow down the cycling. Switch back to main.js in your code editor.
-
Change the timeout amount to ,000.
NOTE: Timeout is the amount of time between each cycle. It’s measured in milliseconds, so each ,000 is equal to 1 second. ,000 is 4 seconds.
Save the file.
Switch to the browser and reload index.html.
That’s much better, but the animation itself is quick and a bit jarring. Let’s slow that down. Switch back to main.js in your code editor.
-
Change the speed to 600.
NOTE: Speed is the amount of time the transition takes. It’s also measured in milliseconds, so a speed of 600 is 0.6 seconds.
Save the file.
Switch to the browser and reload index.html. Excellent.
Adding More Cycles & Exploring Options
Switch back to main.js in your code editor.
-
Select the entire cycle() code shown below:
$('#subContent1').cycle({
   fx: 'scrollHorz',
   speed: 600,
   timeout:,000,
   delay: 0
});
Copy it.
Paste a copy directly below it. Make sure it’s still above the end }); braces and within the document ready function.
-
This time, we’ll do a fade transition. Fade is the default effect if none is specified, so we can remove the fx setting. Delete the fx line so you have the following code:
$('#subContent1').cycle({ speed: 600, timeout:,000, delay: 0 }); -
Now we have to target the proper element. In the pasted code, change subContent1 to subContent2:
$('#subContent2').cycle({
   speed: 600,
   timeout:,000,
   delay: 0
});
Save the file.
Switch to the browser and reload index.html.
-
Wait a moment and watch for What’s The Jive? to change. You’ll see that Jive T-Shirts animates, but What’s The Jive? doesn’t. Why?
The Cycle plugin looks for images inside the parent div. In subContent1 (on the left) we have nested img tags. But in subContent2 (in the middle) we have nested div tags. Cycle can work with nested div tags, but we must tell it to look for them instead of img tags.
Switch back to main.js in your code editor.
-
Add the following line of code shown in bold:
$('#subContent2').cycle({
   slides: '> div',
   speed: 600,
   timeout:,000,
   delay: 0
});
NOTE: We give the slides option a jQuery selector. Parent > child in CSS means to find the immediate children of the parent, without finding further nested elements. So
'> div'finds div tags that are children of the element we’re currently giving to the cycle (which in this case is #subContent2) without finding div tags inside of those div tags. Save the file.
Switch to the browser and reload index.html.
Wait a moment to see it fade from What’s The Jive? to Our Philosophy.
Switch back to your code editor.
Select the entire subContent1 cycle code. That’s the first one, not the second!
Copy it.
Paste a copy below the subContent2 version. Make sure it’s still above the end }); braces and within the document ready function.
-
Let’s do a different scroll effect for this one. In the code you just pasted (the third and last cycle), change both the name of the element and effect name as shown below in bold:
$('#subContent3').cycle({
   fx: 'scrollVert',
   speed: 600,
   timeout:,000,
   delay: 0
});
Save the file.
This transition is not included in the core Cycle JS file. It’s available as a separate file which we’ve already downloaded for you and added into this site. Switch to index.html so we can link to it.
-
At the bottom, around line 94, find the Cycle plugin’s script tag. Add the following bold code underneath it as shown:
<script src="js/vendor/jquery-2.1.0.min.js"></script>
<script src="js/vendor/cycle/jquery.cycle2.min.js"></script>
<script src="js/vendor/cycle/transitions/jquery.cycle2.scrollVert.min.js">
</script>
<script src="js/main.js"></script>
</body>
Save the file.
-
Switch to the browser and reload index.html. Wait a moment to see Premium Jive change to Battle of the Bands.
It’s a little silly having all the cycles change at the same time. The delay option can take care of that by pausing before the first animation, making it start later. Setting a different delay for each one will stagger the animations. Return to your code editor.
Switch to main.js in your code editor.
In the subContent1 cycle code, set the delay to ,000.
Save the file.
-
Switch to the browser and reload index.html.
Notice that the animations don’t all happen at the same time now.
Switch back to your code editor.
In the subContent2 cycle code, set the delay to ,000.
In the subContent3 cycle code, set the delay to 2500.
Save the file, switch to the browser, and reload index.html. Awesome!
Reversing the Animation
Currently, the horizontal animation moves from right to left and the vertical moves from top to bottom. But what if we wanted them to go in the opposite direction? That’s easy, so let’s see how.
Switch back to your code editor.
-
On the third cycle, add the following line of bold code:
$('#subContent3').cycle({
   fx: 'scrollVert',
   reverse: 'true',
   speed: 600,
   timeout:,000,
   delay: 2500
});
NOTE: This same option will work on scrollHorz as well.
Save the file and switch to the browser to reload index.html. Notice that the right column should now animate from bottom to top.
Optional Bonus Challenge: Exploring Other Transitions
In addition to scrollVert, there are some other optional transitions that you can load and use. As a challenge, see if you can use a different transition without specific instructions. Here’s the general idea:
Link index.html to the appropriate .js transition script. You will find the files in Cycle-Simple-Slideshow > js > vendor > cycle > transitions.
- In main.js change the fx option to one of the following:
- FlipVert
- FlipHorz
- TileSlide
- TileBlind
If you need any help, refer to the demos at jQuery.malsup.com/cycle2/demo
NOTE: If you want to refer to our final code example, go to Desktop > Class Files > yourname-JavaScript jQuery Class > Done-Files > Cycle-Simple-Slideshow.
Two Ways to Code Cycles
The Cycle jQuery plugin is a bit unique in that it can be coded two different ways. This exercise focused on using JavaScript to set what elements will be cycled and the options for how the cycles work. The other way you can define cycles is a declarative method which focuses purely on HTML. This is how most of the Cycle website’s documentation is written. This approach has you do the following:
Link to the Cycle JS file(s). You don’t need to write any JavaScript yourself. No script tag or document.ready is needed.
Add a class=
"cycle-slideshow"to the container. The Cycle plugin will automatically find these containers and start the cycles on them.Add data-cycle-
*attributes to the container to set options.
Which coding method you choose is partially based on personal preference. Writing the JavaScript (as we did in this exercise) keeps your HTML clean and allows you to easily reuse the options across elements within a page or across many webpages. It also gives you more control. Using the declarative style (with HTML classes and attributes) is easier for those not comfortable with JavaScript, which is maybe why Cycle’s website prefers it (so they don’t get as many support emails). It’s OK for simple stuff, but doesn’t offer some of the control that we’ll need in later exercises.
