Learn how to master the art of iOS Development with our comprehensive tutorial that covers key topics such as data source and delegate protocols for Table Views, code organization with mark sections, and user interaction capabilities.
This exercise is excerpted from Noble Desktop’s past app development training materials and is compatible with iOS updates through 2021. To learn current skills in web development, check out our coding bootcamps in NYC and live online.
Topics Covered in This IOS Development Tutorial:
The Data Source & Delegate Protocols for Table Views, How Mark Sections Keep Your Code Organized, Writing Methods That Populate the Table View with Data, Writing a Delegate Method to Delete Table View Cells, Adding a New List Title to the Table View When the User Taps the Plus Button, Segueing to the Second View Controller When the User Taps on a List Title, Testing the App in the Simulator
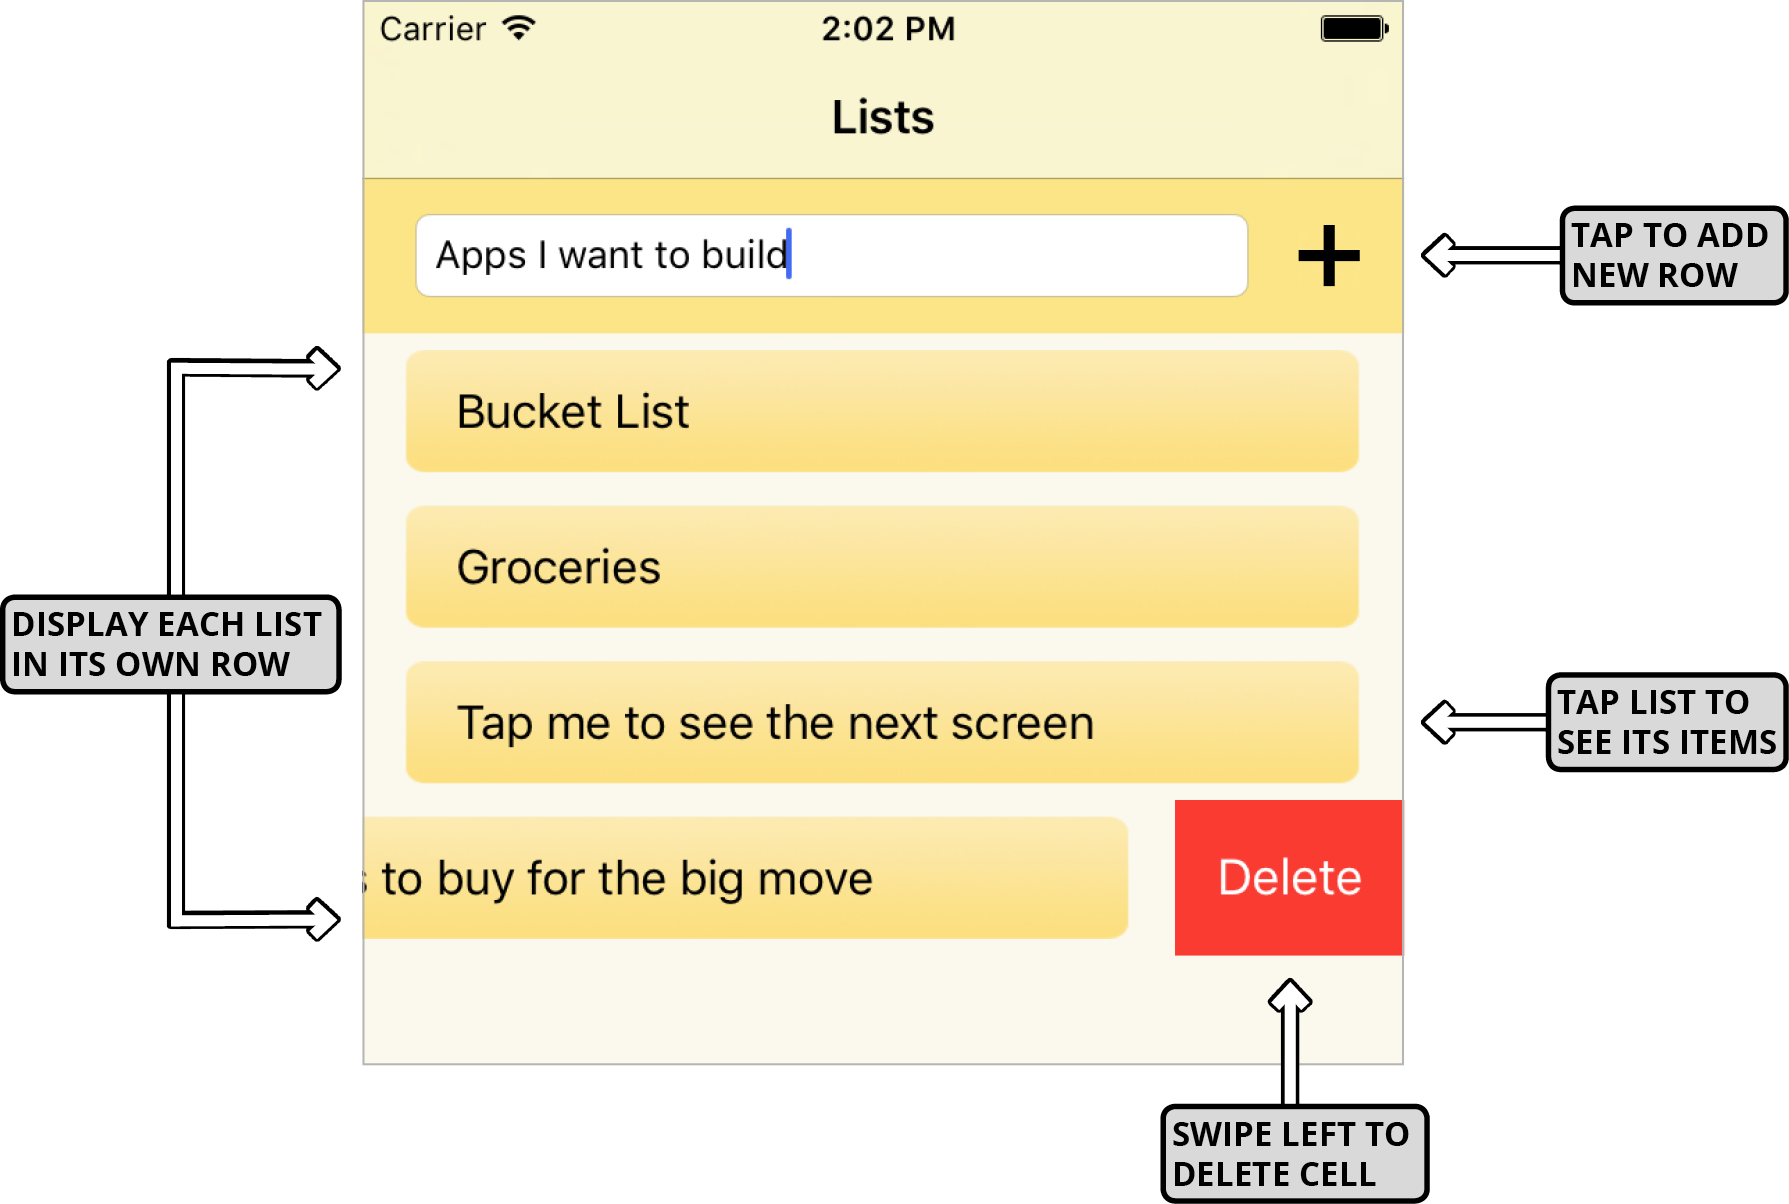
Exercise Preview
Exercise Overview
In this exercise, we’ll write the code our first View Controller needs to create the Table View that takes up most of this screen in our UI. In order for a View Controller to display a Table View, it needs to conform to the Table View’s datasource protocol. We’ll write the two methods this protocol needs to draw the Table View on-screen.

To give users the ability to interact with our Table View, we will implement the Table View’s delegate protocol and write a method that allows the user to delete a row from the table. Additionally, we’ll make the Plus (+) button functional and create the segue from this View Controller to the second one that displays a list’s items.
Getting Started
Launch Xcode if it isn’t already open.
If you completed the previous exercise, Lists.xcodeproj should still be open. If you closed it, re-open it now.
-
We suggest you complete the previous exercises (5A–5C) before doing this one. If you did not do the previous exercises, complete the following:
- Go to File > Open.
- Navigate to Desktop > Class Files > yourname-iOS App Dev 2 Class > Lists Ready for Lists View Controller and double–click on Lists.xcodeproj.
If you do not have Main.storyboard and Data Model.swift open in separate Editor tabs, open them now. (Remember that the Cmd–T shortcut opens a new tab.)
The Data Source & Delegate Protocols for Table Views
Both of our View Controllers have a Table View as one of their child objects. In order for our app to display them when it’s running on a user’s iPhone, several things in our app must interact. We first need a View Controller that contains the Table View itself. We’ve got that covered!
Secondly, our View Controller needs to conform to the data source protocol associated with a UITableView object. This protocol is delegated control of the data that gets passed in to the Table View (such as a list title). A UITableView also has a delegate protocol, which is an object that controls user interaction with the Table View’s UI. Whenever you want the user to be able to change the cells in your Table View, you need to implement this protocol. We will do so for this app.
We first need to visually connect both of our Table Views with their respective View Controllers. If you aren’t in the Main.storyboard tab, switch to it now.
If the Document Outline is not showing, go to the bottom left of the Editor and click the Show Document Outline button
 .
.Go to the Document Outline. If the Lists Scene isn’t expanded so you see the superView’s child Lists Table View, go to the Editor. On the middle controller that says Lists at the top, click where it says Table View Prototype Content.
In the Document Outline, hold Control and drag from the Lists Table View up to the Lists View Controller
 .
.In the pop-up that appears, select dataSource.
The Table View’s parent View Controller usually contains both the data source and delegate. We want to do this, so once again Control–drag from the Lists Table View to the Lists View Controller
.Select delegate this time.
-
Let’s rinse and repeat for the second View Controller (the third and final Scene):
- Look in the List Items Scene. If you can’t see Items Table View, go to the Editor and click on the corresponding Table View.
- To create the two connections, Control–drag from the Items Table View to the List Items View Controller .
- The first time, select dataSource. Then choose delegate.
Let’s get down to business—programming our first View Controller! Press Cmd–T, then in the Project navigator click on ListsVC.swift.
-
Just like we needed to create the connections in the Storyboard, we also need to add the two protocols here in the code. Add the following to the class ListsVC line:
import UIKit

class ListsVC: UIViewController, UITableViewDataSource, UITableViewDelegate {

   @IBOutlet weak var newListNameTextField: UITextField!
   @IBOutlet weak var listsTableView: UITableView!
Now that this View Controller knows it needs to act as the data source and delegate for the Table View that comprises most of this screen’s UI, you’ll see a red error
 . Click it to see that our View Controller doesn’t conform to the dataSource protocol.
How Mark Sections Keep Your Code Organized
Before we write some methods to get rid of the error, let’s organize our file.
-
We need to write a few different types of methods in this file, so let’s create separate sections by adding the commented MARK code shown below:
override func viewDidLoad() {
      super.viewDidLoad()
   }


// MARK:—TableView DataSource methods————————————// MARK:—TableView Delegate methods————————————// MARK:—UI responsive methods————————————

   @IBAction func addListButtonTapped(_ sender: Any) {

   }
We’ll need to write quite a few methods to get this relatively simple app to work. Just think about how long a View Controller file for a complex app like X (formerly known as Twitter) or Instagram would be! How do their iOS developers find what they’re looking for in such a large file? Let’s see how the MARK comments we just added make this a lot easier.
-
Go to the top of the file above all the code but below the tabs. To the right of the ListsVC.swift name, click on ListsVC (or whatever you see):

-
A pop-up will appear. As you can see in the image below, each MARK section has a section icon
 next to it. Each method has an M icon.
Feel free to click on a few sections, methods, or outlet variables (marked with a P because they are p roperties) to highlight them. Very handy for navigating through files with a lot of code!
Writing Methods That Populate the Table View with Data
The Table View’s data source protocol tells the View Controller what information to load. To get rid of the red error, we need to implement two of the protocol’s predefined methods. The first will tell the View Controller how many cells it needs to display. Secondly, we need to draw the actual content inside each visible cell.
-
In the TableView DataSource methods section, start typing numberOfRows. Once you see the numberOfRowsInSection code, press Return so you have the following:
// MARK:—TableView DataSource methods————————————func tableView(_ tableView: UITableView, numberOfRowsInSection section: Int) -> Int {
      code
   }


// MARK:—TableView Delegate methods————————————
NOTE: If you’ve ever created an app with a Table View Controller, you may recognize this code because it is included by default. So why didn’t we just use a Table View Controller instead? That’s because they aren’t very flexible or useful—they can only display a Table View and its cells! Because we needed to add the area at the top with the Add new list text field and Plus (+) button, we had no choice but to opt for the best practice of using a View Controller, which is easily customizable.
-
The numberOfRowsInSection method specifies how many rows the Table View will have. It needs to return an integer, so return all the items of the List class as shown:
func tableView(_ tableView: UITableView, numberOfRowsInSection section: Int) -> Int { return lists.count } Every array has a built-in count property that returns the number of items inside it. To refresh ourselves on what our lists array does, go to the top of the file and switch to the Data Model.swift tab.
-
At the bottom, find the lists variable we just referenced in the Table View Data Source’s numberOfRowsInSection method:
var lists = [List]() { didSet { lists.sort() { $0.title < $1.title } } }Remember that this variable is global because it’s outside of the two classes in the model. This is so any object (such as our Table View) can access it. It’s an array of instances of the List class, as indicated by the square brackets (
[]) around List. The array starts off empty but the watchful didSet property observer adds any new instance of the List class, and sorts it in alphabetical order. To add more Table View Data Source code, switch back to the ListsVC.swift tab.
-
To make the error go away, we also need to tell the Table View what to put in each cell. Below the previous method, start typing cellForRowAt and press Return when you get the following suggestion highlighted in blue:

-
You should now have the following code:
func tableView(_ tableView: UITableView, cellForRowAt indexPath: IndexPath) -> UITableViewCell { code } -
We need to draw a Table View Cell in each row. The cellForRowAt method returns the cell object with all the data it needs to be drawn on-screen. Let’s break it down:
- Each time the Table View loads, the host View Controller needs to call the numberOfRowsInSection method followed by this one to populate the Table View with the data the user sees visually on-screen.
- Because the numberOfRowsInSection method is called first, this cellForRowAt method knows how many lists are in our array. It will get called that many times. If there are two lists, the View Controller will call the cellForRowAt method twice.
- Remember that an array has numbered indexes. This is what the indexPath parameter refers to. It tells us which row the method is currently being called for. To draw our first row, it passes in an indexPath of 0. It repeats this process until there is a corresponding Table View Cell for each index in our lists array.
-
We need our method to grab the corresponding cell we designed in the Storyboard. Within the cellForRowAt method’s curly braces, replace the code placeholder by typing tableView.dequeue. Choose the suggestion highlighted in the image below:

-
You should now have the following code:
func tableView(_ tableView: UITableView, cellForRowAt indexPath: IndexPath) -> UITableViewCell {
   tableView.dequeueReusableCell(withIdentifier: String, for: IndexPath)
}
Remember that when the app is running, it can store a Table View Cell in memory for quick and efficient reuse. This code asks our tableView (the parameter of type UITableView at the top of the method) to dequeue a reusable cell. This takes it out of the reuse queue for cells that are not showing, and places it on-screen.
We need to replace one of the placeholders with the cell’s reuse identifier, which is a string we added in the Storyboard. Switch to the Main.storyboard tab.
-
To avoid making an error, it’s best to copy the reuse identifier so we can paste it into the code. Do the following:
-
Show the Utilities by going to the top right and clicking the button
 .
. - In the Document Outline’s Lists Scene, select the ListTitleTVCell. (You may need to expand its parent Table View.)
- In the Attributes inspector
 , notice the Identifier is ListTitleTVCell. Copy it.
 -
Hide the Utilities once more.
-
Show the Utilities by going to the top right and clicking the button
-
Return to ListsVC.swift and fill in the two placeholders as shown in bold. In the first one paste in the string you just copied, but don’t forget the double quotes:
tableView.dequeueReusableCell(withIdentifier: "ListTitleTVCell", for: indexPath)Don’t worry about the new red error. We’ll return a UITableViewCell object next so it goes away. When the method is called, it will pass in the
"ListTitleTVCell"reuse identifier so that it knows what type of cell to pick. We’re also passing the tableView object an indexPath variable, so it knows which row that it will be working with.NOTE: Technically, an indexPath contains both a section and a row. Our Table View does not have multiple sections, so the row number is the only part of the indexPath that is relevant for our purposes.
-
We want to instantiate a new cell called listTitleTVCell. This is the object we want to return, so add the following bold constant and return statement:
func tableView(_ tableView: UITableView, cellForRowAt indexPath: IndexPath) -> UITableViewCell {
   let listTitleTVCell = tableView.dequeueReusableCell(withIdentifier: "ListTitleTVCell", for: indexPath)
   return listTitleTVCell
}
The error will disappear because the Table View Cell with the identifier we just passed in inherits from the UITableViewCell class.
-
We want to customize our cell object by adding some data from the ListTitleTVCell class. To get access to its custom properties (its two outlet connections), we need to cast our listTitleTVCell instance to be of this type. In the dequeueReusableCell line, add the bold code:
let listTitleTVCell = tableView.dequeueReusableCell(withIdentifier: "ListTitleTVCell", for: indexPath) as! ListTitleTVCell -
We want our cell to display the title that’s stored in the lists array. Add the additional data we want the table to draw by typing the bold line of code:
let listTitleTVCell = tableView.dequeueReusableCell(withIdentifier: "ListTitleTVCell", for: indexPath) as! ListTitleTVCell listTitleTVCell.listTitleLabel.text = lists[indexPath.row].title return listTitleTVCell -
Let’s break that down:
- The listTitleLabel is one of ListTitleTVCell’s two outlets. We’re assigning it the title of the corresponding list, so this label outlet’s text matches the info stored in the data model.
- To get the title that corresponds to the row number we’re asking about, we go into the lists array’s indexPath’s row. (We need to go into this property because the indexPath also has a section property.)
- Remember that the entire cellForRowAt method will get called as many times as there are cells to display. This line will run twice if there are two cells, and so on.
Writing a Delegate Method to Delete Table View Cells
So far, we have not implemented any of the Table View Delegate methods. This means that the cells in our table are static and unchangeable. However, it’s quite likely that the user will want to delete a list they no longer need such as a shopping list for Christmas or a birthday. Let’s add a method from the UITableViewDelegate to enable the user to swipe left to delete a row.
-
In the TableView Delegate methods section, start typing commit and press Return once you see the suggestion with an editingStyle parameter. You should have the following code:
// MARK:—TableView Delegate methods————————————func tableView(_ tableView: UITableView, commit editingStyle: UITableViewCell. EditingStyle, forRowAt indexPath: IndexPath) {
      code
   }
UITableViewCell. EditingStyle is a predefined enumeration associated with the UITableViewCell class. CTRL–Cmd–click on this word to see that this enum has three cases. The insert and delete cases display their respective editing controls. We will only use its delete case, which displays a red button with the word Delete.
To return to ListsVC.swift, go to the area above the code but below the tabs and click the Go Back button
 .
.-
Write an if statement that specifies what happens if the user is deleting a row:
func tableView(_ tableView: UITableView, commit editingStyle: UITableViewCell. EditingStyle, forRowAt indexPath: IndexPath) { if editingStyle ==.delete { } } -
Because the Table View is coordinated with the model, we need to update both the model and the UI. Fill in the if statement as shown in bold:
if editingStyle ==.delete {
   lists.remove(at: indexPath.row)
   tableView.deleteRows(at: [indexPath], with:.fade)
}
The first line removes the item corresponding to the specified index path row from the lists array in our model. (The remove method with an at parameter is associated with an array.) The second one goes into the tableView’s specified indexPath and visually deletes the row using the predefined fade animation.
Adding a New List Title to the Table View When the User Taps the Plus Button
We need to make our Plus (+) button add a new list whenever the user taps it (and the text field to its left is not empty). As we did for the previous method, we’ll need to make sure that the new list gets added to both the model and the Table View.
-
In the addListButtonTapped function, add the if statement shown below:
// MARK:—UI responsive methods————————————@IBAction func addListButtonTapped(_ sender: Any) {
      if newListNameTextField.text == "" { return }
   }
This code specifies that if the text field outlet’s text is empty when the user taps the button, we will get out of this function. We have a similar precaution in the initializer for the List class in our data model (another if statement), so this ensures there’s no way an empty string will get added anywhere.
We previously wrote code that keeps our UI in sync with the data model. We also want to do that here in this method, so let’s look to our model for some guidance. Switch to the Data Model.swift tab.
-
The Plus (+) button adds a list to the UI, which means it will also instantiate an object of the List class. Inside this class, find the following initializer:
init?(listTitle: String, items: [ListItem] = [ListItem]()) {
   if listTitle == "" { return nil }
   title = listTitle
   self.items = items
}
Remember that this initializer is fallible because we don’t want the user to add an empty list. Because initialization is optional (as indicated by the question mark (?) after the init keyword), we’ll have to unwrap it in the code we’re about to write.
Additionally, take note of the properties we need to initialize. An object of the List class needs both a listTitle and an array of items. The second View Controller will take care of the items, so we set a default value for this parameter (an empty array of the appropriate type). This means we only need to specify a listTitle in the View Controller code we’re about to write.
Switch back to the ListsVC.swift tab.
-
If the text field does contain text when the user taps the Plus (+) button, we want to add the listTitle to the lists array in the data model using the predefined append method for arrays. Add the following bold code:
@IBAction func addListButtonTapped(_ sender: Any) {
   if newListNameTextField.text == "" { return }
   lists.append(List(listTitle: newListNameTextField.text!)!)
}
This line instantiates a new object of the List class, feeding it the listTitle it needs. The precaution in the previous line ensured that if we advance to this line, there will be text in the newListNameTextField, so we can safely unwrap both the listTitle (which Apple strangely requires us to do) and the List itself.
-
A Table View has a predefined method called reloadData that reloads every visible row. We want to keep the UI synced up with the model, so call it as shown:
@IBAction func addListButtonTapped(_ sender: Any) {
   if newListNameTextField.text == "" { return }
   lists.append(List(listTitle: newListNameTextField.text!)!)
   listsTableView.reloadData()
}
Remember that the listsTableView is the outlet which corresponds to the Table View on this View Controller. By calling the reloadData function, the table view will then call the two dataSource functions, and reload everything from the model.
Segueing to the Second View Controller When the User Taps on a List Title
When the user taps on one of their lists to see the items on that list, we want to transition away from this View Controller and display the next one. We created this segue on our Storyboard in a previous exercise—let’s make it functional!
Segue objects perform a visual transition between View Controllers. Because information needs to be exchanged between the two controllers, we first need to ensure they will be able to work together. The info that gets passed during the segue is stored in our model, so switch to the Data Model.swift tab.
-
The first View Controller’s purpose is to display objects of the List class. Inside this class, find the following property (not the similar global variable at the bottom!):
var items = [ListItem]() { didSet { items.sort() { $0.title < $1.title } } }This shows that a List object can have many items of the ListItem type (our first custom class). Because the model’s two classes are LinkedIn this way, we also need to tell the second View Controller that the list items it will display are associated with a list.
Press Cmd–T, then in the Project navigator click on ListItemsVC.swift.
-
Declare a list variable that is an object of the List type:
@IBOutlet weak var newItemNameTextField: UITextField!
@IBOutlet weak var itemsTableView: UITableView!

var list: List!

override func viewDidLoad() {
We just saw that the List type stores items of the ListItem type. This controller displays ListItems, so it cannot do its job unless it has a reference to the List class these items belong to. This variable bridges that gap, so we’re good to go!
Switch back to the ListsVC.swift tab so we can finish coding it up.
-
Right before the segue between the source (first) and destination (second) view controllers occurs, the source View Controller’s prepare method is called. It’s part of a controller’s life cycle. In this method we first need to add a reference to the destination View Controller so the segue knows where to pass the proverbial baton:
// MARK:—Navigation————————————override func prepare(for segue: UIStoryboardSegue, sender: Any?) {
      let listItemsVC = segue.destination as! ListItemsVC
   }
We told the listItemsVC constant that it is of the ListItemsVC type. This reference instantiates the class, and sets it as the destination View Controller that the segue object will transition to.
Remember that casting a constant or variable as a type allows us to access all the properties and methods of that class. Doing so in this line ensures we can tell the destination View Controller what to do with the list variable we just declared.
-
We need to use that variable now to tell the destination View Controller which list from the first screen the user tapped on. Add the bold code:
override func prepare(for segue: UIStoryboardSegue, sender: Any?) { let listItemsVC = segue.destination as! ListItemsVC listItemsVC.list = lists[(listsTableView.indexPathForSelectedRow?.row)!] } -
This line ensures that the destination List Items View Controller can extract all the list items from the correct list, so they can be visually displayed in its own Table View. Let’s break that down:
- Remember that the list property belongs to the List Items View Controller, which is why our listItemsVC constant can access it. The lists property comes from our model—it’s the array of all the user’s lists (the “list of lists”).
- We’re going into the model’s lists array and pulling out the correct list by referring to its selected row in the listsTableView (the Table View here in the source View Controller). Remember that we can do this because the source View Controller’s visuals are synced with the info in our data model.
- The exclamation mark (!) at the end indicates that we are unwrapping the number of the row, since it might not exist (as indicated by the question mark (?) after indexPathForSelectedRow).
The prepare method now has all the info it needs to segue over to the List Items View Controller and display the data the user requested to see!
Testing the App in the Simulator
Let’s see how our app looks so far! At the top left in the active scheme area, click where it says Lists and choose iPhone 13 Pro.
-
Go to the top left and click the Run button
 .
.There’s our first View Controller! It’s showing up because in an earlier exercise, we set it as the Navigation Controller’s root scene.
-
Click in the Add new list text field. Type the name of a list (such as Groceries) and click the Plus (+) button to add it.
Awesome, the new list name gets added to the screen in its own Table View Cell!
-
Add a few more lists. You will need to delete the existing text first, unless you want to make a list with a similar name such as Groceries for Thanksgiving. If you want to sort your lists in numeric order, you can preface it with a number.
Notice that it sorts the lists in alphabetical order. This is because in a previous exercise we added this functionality in our data model.
Hover over a list name and drag the mouse to the left to mimic a swipe to the left.
-
A red Delete button will appear to the right of the list name. Click it to see the predefined fade animation fire, removing the list from the screen in style!
NOTE: Remember that this screen is synced with our data model, so this list is fully gone from memory.
-
Let’s test out the segue to the next View Controller! Click on one of your list names.
Oops, that’s no good! This should take you right back into Xcode’s AppDelegate.swift file that handles changes in the application’s state. Its class declaration has a red Thread 1: signal SIGABRT error next to it. This means our app just encountered a fatal error and crashed as a result!
To fix the issue, we need to make our second View Controller display data from our model. This file is currently pretty empty, but we’ll remedy that in the next exercise.
In the Navigator area on the left, you should be in the Debug navigator
 . It shows up by default whenever your app crashes, to help you resolve the issue. We don’t need it, so switch to the Project navigator by clicking its icon
  .
.In the Project navigator, switch back to ListsVC.swift (or whatever file got automatically switched over to AppDelegate.swift).
Save the file and keep Xcode open so that we can continue with this project in the next exercise.