Delve into this comprehensive InDesign tutorial covering various topics such as placing Excel tables, table headers, table formatting, and reordering table cells, complete with a step-by-step guide and visual aids.
This exercise is excerpted from Noble Desktop’s past Adobe InDesign training materials and is compatible with InDesign updates through 2020. To learn current skills in InDesign, check out our InDesign Bootcamp and graphic design classes in NYC and live online.
Topics Covered in This InDesign Tutorial:
Placing Excel Tables (with Their Formatting), Table Headers, Formatting Tables (fills, Strokes, Etc.), Reordering Table Cells
Exercise Preview

Exercise Overview
In this exercise, you’ll import and place data from an Excel document and learn how to format it with InDesign’s table tools.

Creating the Table
Open Table.indd.
- Go to File > Place and:
- At the bottom of the window, check on Show Import Options (Mac users may need to click the Options button).
- Choose the Excel file named Table-company-directory.xls.
- Click Open.
-
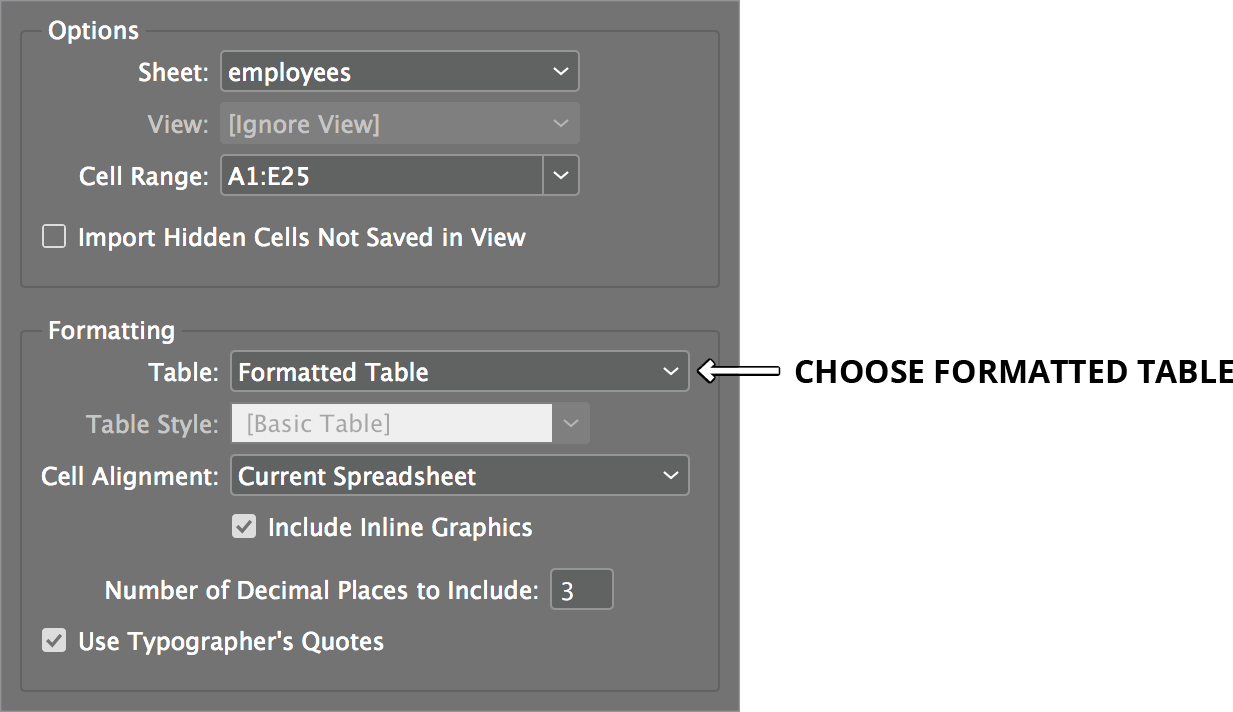
You’ll then see import options. Set them as shown below and click OK. Everything should be already set, but make sure Formatting is set to Formatted Table.
NOTE: If you get any messages about missing fonts just click Close. We’ll be changing the fonts anyway.
The text is now loaded in the cursor. Position the cursor over the primary text frame and click once. Notice the text frame was filled with the tabular data and additional pages were automatically created to fit the rest of the data that didn’t fit on the first page.
Formatting the Table & Defining Table Headers
You should still be on page 1 and should see the table. Notice the First Name, Last Name, etc. headers at the top of the table?
Scroll down to the second page and notice that the headers are not on that page. We need to make the table look nicer and add those headers to every page.
Before we get to the table headers, let’s change the font. Make sure you’re in the Type tool
 .
.Click anywhere in the table and go to Table > Select > Table.
In the Control panel, change the font to 8 pt Myriad Pro Regular.
- With the table still selected, see how there’s no space between the First and Last name?
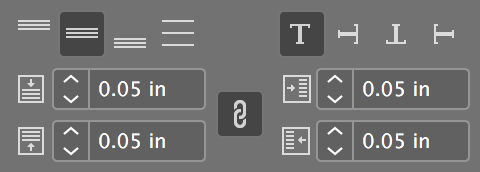
- Open the Tables panel (Window > Type & Tables > Table). (If you have a big enough screen, these options are also in the Control panel.)
- Set the following (check the link icon so you only have to enter the number once):
Let’s define the header. Scroll back up to the first page if you’re not already there.
With the Type tool
, click anywhere in the first table row (it reads First Name, Last Name, etc.).Go to Table > Convert Rows > To Header.
Without deselecting the table, take a gander at the second page. You’ll see that the header is there as well.
-
We’d like the table to fit within the margin guides. Position the cursor over the table’s right border. When it turns into a double arrow
 , hold Shift and drag the border until it snaps with the right margin guide.
NOTE: Holding Shift resizes all the columns in the table evenly.
Now that the width of the entire table is set, feel free to reduce or increase the width of the other columns as you like. To adjust one set of columns without changing the width of the entire table, hold Shift while dragging a column border to affect just that border.
Scroll to the other page of the table and see that the sizes carry over to this page as well, since it’s all one big table!
-
Let’s make the column headings stand out more. Go back to the first page if you aren’t already and select the top row of the table by dragging over those table cells.
NOTE: You can only edit the header in the first text frame in which it appears. If that’s hard to find, just place the text cursor anywhere in the table and choose Table > Select > Header Rows.
In the Control panel, change the font to 10 pt Myriad Pro Bold.
Go to the second page and see how it did it there too? Tabuloso!
More Table Formatting
Go back to page 1 and click anywhere in the table so the text cursor is blinking in some table cell.
- Go into Table > Table Options > Alternating Fills and:
- Under Alternating Pattern, choose Every Other Row.
- Check Preview in the bottom-left corner so you can see how it looks while you are trying different options.
- Try whatever Color and Tint amount (on the left) you think looks good.
- Click OK when you’re done.
Reordering Table Cells
The table looks good, but the phone numbers are supposed to be in ascending order. At the top of the listings on page 1, notice that Janet Baduche’s phone number is greater than Joe Millionaire’s. We need to put Joe’s row above Janet.
-
We can drag and drop rows (and columns) to reorder them. Let’s try it out!
To select the entire table row, hover over the left edge of the Joe Millionaire cell, then click when you see the black arrow
 .
.NOTE: A downward-pointing black arrow shows up if you hover over the top of a column. If you ever need to select an entire column, that’s the fastest way.
Hover anywhere in the selected cell except for a border. When the cursor looks like this
 click and hold the mouse button down. Don’t release it until we say so!
-
While holding the mouse button down, drag up. Release the mouse when a thick blue line appears between the header and the Janet Baduche row, as shown below:

Go to Edit > Deselect All to see your work more clearly. Looks great!
You’re done! To get a better look at the finished thing, at the very bottom of the Tools panel, click and hold on the bottom Normal button
 , and from the menu that appears, choose Preview.
