Dive into the world of HTML and CSS with our in-depth tutorial that covers everything from the outline algorithm and semantic elements to understanding articles, sections, and the main element, among other essential topics.
This exercise is excerpted from Noble Desktop’s past front-end web development training materials and is compatible with updates through 2022. To learn current skills in web development, check out our coding bootcamps in NYC and live online.
Topics Covered in This HTML & CSS Tutorial:
The Outline Algorithm, the Header, Nav, Aside, & Footer Elements, Understanding Articles & Sections, the Main Element, the Figure & Figcaption Elements
Exercise Preview
Exercise Overview
In a previous exercise, we used span and div tags to group content. These are non-semantic tags, because they say nothing about their content. HTML5 added new semantic tags (such as article, header, footer, nav, etc.) that actually describe their content. They are beneficial for developers, screen readers, and search engines.
Who Decides the HTML Specifications?
The W3C (World Wide Web Consortium) is an international community of member organizations led by Web inventor Tim Berners-Lee. Later, the WHATWG (Web Hypertext Application Technology Working Group) was formed by Apple, Google, Mozilla (makers of Firefox), and Opera because of some controversial decisions made by the W3C. The two groups have since come to an agreement that the WHATWG decides and publishes the HTML Living Standard. You can learn more at whatwg.org and w3.org. For a brief story about their history, read en.wikipedia.org/wiki/whatwg

Getting Started
- In your code editor, hit Cmd–O (Mac) or CTRL–O (Windows) to open a file.
- Navigate to Desktop > Class Files > Web Dev Class > Structural Semantics.
- Double–click on semantic-elements.html to open it.
- Before we start tagging the content, let’s get acquainted with it. Preview semantic-elements.html in a web browser.
- Scroll down the page and scan the content. In particular, note the three headings: two about birds (Peacocks and Eagles) and one about fish (Sharks). These three articles are the primary content for the page.
- Switch back to semantic-elements.html in your code editor.
- Look over the headings in the code, which range from h1 through h3.
The Outline Algorithm
Every webpage has an outline. It’s similar to a table of contents. In the provided webpage, we’ve marked up some text and tagged the basic content, but, aside from the heading levels (h1 through h6) the page does not have as much semantic structure as it could. Let’s take a look at the document outline and see how it can be improved. There are various online tools and browser extensions to help you visualize a document’s outline. We’ll use one created by Geoffrey Sneddon.
- Open a web browser and go to: gsnedders.HTML5.org/outliner
- Under Input HTML, click the Choose File or Browse button (the button name differs between browsers).
- Navigate to Class Files > Web Dev Class > Structural Semantics.
- Double–click semantic-elements.html to choose it.
-
Click the Outline this! button just below the file.
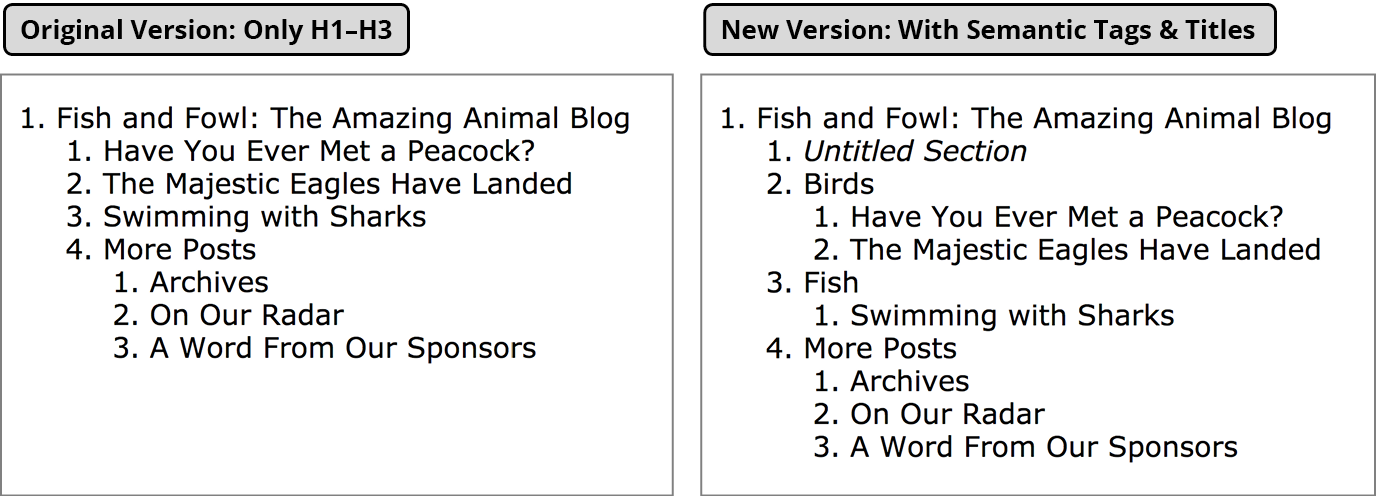
The outline you see reflects the structure indicated by our use of heading tags (currently we have h1, h2, and h3 tags). The top level (main topic) is an h1. That is broken into subtopics using h2 tags. Those subtopics are further broken into nested subtopics using h3 tags, as illustrated below:

In HTML4, this was the only way to outline a document. HTML5 semantic elements offer new tags for controlling the outline and creating a semantic structure that is more friendly for both developers and machines to read. Let’s investigate!
The Header
Let’s begin with the header element. According to the HTML spec, “A header typically contains a group of introductory or navigational aids. A header element is intended to usually contain the section’s heading (an h1–h6 element), but this is not required. The header element can also be used to wrap a section’s table of contents, a search form, or any relevant logos.”
-
Switch back to your code editor and find these two lines of code just after the start of the body tag:
<h1>Fish and Fowl: The Amazing Animal Blog</h1> -
As shown below, wrap these two lines of code in a header tag.
TIP: If you’re using Visual Studio Code (and set up the wrap keystroke using the instructions in the Before You Begin section near the start of this book), you can quickly wrap a tag around a selection using a keystroke. Select the code you want to wrap and hit Option–W (Mac) or ALT–W (Windows). Then type in the name of the wrapper (which in this case is header) and hit Return (Mac) or Enter (Windows).
<header>
   <h1>Fish and Fowl: The Amazing Animal Blog</h1>
</header>
NOTE: Because semantic tags allow us to partition our content logically, each discrete section can have its own h1 (according to the HTML specification). However it is a best practice to have only one h1 per page until screen readers and search engines support multiple h1 tags.
Proper Semantics for Nav Elements
-
Just below the header are some links to navigate the site. Wrap a nav tag around them, as shown below:
<nav>
   <a href="#">About Us</a>
   <a href="#">Our Mission</a>
   <a href="#">Contact Us</a>
</nav>
NOTE: These don’t link to real pages, yet. Setting the href to # is a common way to create a placeholder link because it doesn’t go anywhere. It allows us create and style the links before we build the rest of the site.
-
While we’re here, let’s mark up the links with some additional semantic tags. This is essentially a list of links, so we’ll mark them up as an unordered list. Wrap a ul tag around the links, as follows:
<nav> <ul> <a href="#">About Us</a> <a href="#">Our Mission</a> <a href="#">Contact Us</a> </ul> </nav> -
Now wrap each link in an li (list item) tag, as follows:
<nav>
   <ul>
      <li><a href="#">About Us</a></li>
      <li><a href="#">Our Mission</a></li>
      <li><a href="#">Contact Us</a></li>
   </ul>
</nav>
Save the file.
The Article, Aside, & Footer Elements
-
Below the nav, find the first blog post (an h2 and two paragraphs). The article element is ideal for this type of content.
According to the HTML spec, “The article element represents a complete, or self-contained, composition in a document, page, application, or site and that is, in principle, independently distributable or reusable, e.g., in syndication. This could be a forum post, a magazine or newspaper article, a blog entry, a user-submitted comment, an interactive widget or gadget, or any other independent item of content.”
-
As shown below, wrap the following lines of code in an article tag:
<article>
   <h2>Have You Ever Met a Peacock?</h2>
Code Omitted To Save Space
<p>Source: <a href="https://en.wikipedia.org/wiki/peafowl">Wikipedia</a></p> </article> -
Wrap the article tag around the two remaining articles. The code should look like this when you are finished:
<article>
   <h2>The Majestic Eagles Have Landed</h2>
Code Omitted To Save Space
<p>Source: <a href="https://en.wikipedia.org/wiki/eagle">Wikipedia</a></p>
</article>

<article>
   <h2>Swimming with Sharks</h2>
Code Omitted To Save Space
<p>Source: <a href="https://en.wikipedia.org/wiki/whale_shark">Wikipedia</a></p> </article> -
Now let’s mark up the additional posts and links. The aside element is used to indicate tangential, additional content. The makers of the HTML spec chose “aside” over “sidebar” because it more accurately describes the semantic value of the content rather than the content’s position on the page. Sidebars are often placed off to the left or the right but then they are moved to the bottom of the main content for a mobile layout. Aside is a more flexible term.
As shown below, wrap the following content in an aside tag:
<aside>
   <h2>More Posts</h2>
   <h3>Archives</h3>
Code Omitted To Save Space
<h3>A Word From Our Sponsors</h3> <ul> <li>PETA</li> <li>ASPCA</li> </ul> </aside> -
The last paragraph contains a copyright notice. It’s a perfect footer element, which according to the HTML spec, “typically contains information about its section such as who wrote it, links to related documents, copyright data, and the like”.
Wrap the footer tag around the last paragraph, as shown below:
<footer>
      <p>© fish-and-fowl.org—all rights reserved—all wrongs reversed</p>
   </footer>
</body>
The Section Element
According to the HTML spec, a section element is “a thematic grouping of content, typically with a heading. Examples of sections would be chapters, the various tabbed pages in a tabbed dialog box, or the numbered sections of a thesis. A website’s home page could be split into sections for an introduction, news items, and contact information.” We have two groups of articles (birds and fish), so the section element will be perfect for marking them up.
-
Wrap the two articles about birds (peacocks and eagles) in a section tag, as shown below:
<section>
   <article>
      <h2>Have You Ever Met a Peacock?</h2>
Code Omitted To Save Space
</article>

   <article>
      <h2>The Majestic Eagles Have Landed</h2>
Code Omitted To Save Space
</article> </section> -
Wrap the last article (about sharks) in a section tag, as shown below:
<section>
   <article>
      <h2>Swimming With Sharks</h2>
Code Omitted To Save Space
</article>
</section>
Save the file.
Section Vs. Article
An article is perfect for syndication: it describes a discrete piece of content that can stand on its own and be reused elsewhere. Think of a blog post or a news story.
A section is used to divide content into different subject areas. Here we grouped articles into sections but, if the articles were longer, we could also have sections nested in articles to further divide the content.
Checking the Updated Document Outline
In a browser, go back to gsnedders.HTML5.org/outliner
Under Input HTML, click the Browse or Choose File button.
Navigate to Class Files > Web Dev Class > Structural Semantics.
Double–click semantic-elements.html to choose it.
- Click the Outline this! button just below the file.
-
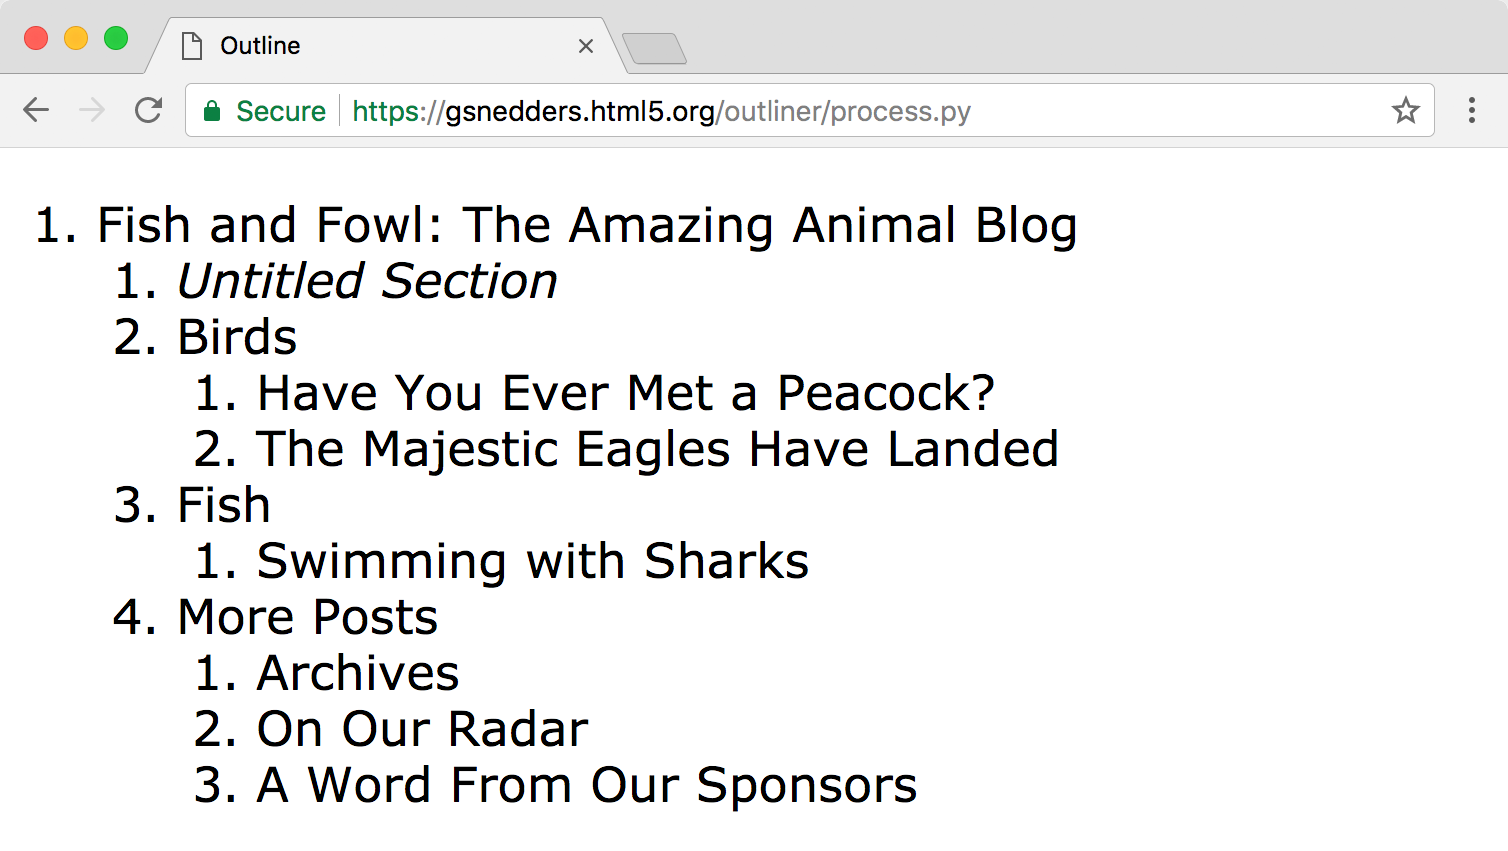
Notice that there are now 3 Untitled Sections. The first is for the nav, and the second and third are for the bird and fish sections.

Adding Titles to Sections
According to the HTML spec for creating an outline, “Each section can have one heading associated with it”.
For the bird and fish sections, we can add a heading to label them. That would be useful info and actually improve the page for users.
For the untitled nav section we don’t want a visible heading. The spec says sections can have a heading, but not must. We can technically leave the nav untitled. We may want to code in a heading for accessibility reasons (to help people with vision impairments), but then we’d probably want to hide it visually. That’s a deeper topic than we want to get into right now, so we’ll leave the nav section untitled.
- Return to semantic-elements.html in your code editor.
-
Let’s give the birds section a logical heading. Directly after the opening section tag add the following bold code:
<section> <h2>Birds</h2> <article> <h2>Have You Ever Met a Peacock?</h2> -
Let’s give the fish section a logical heading too. After the section opening tag type:
<section> <h2>Fish</h2> <article> <h2>Swimming With Sharks</h2> -
Now that we the section headings are h2 tags, the article headings should change from h2 to h3. Change the three article headings, as shown below in bold:
<section>
   <h2>Birds</h2>
   <article>
      <h3>Have You Ever Met a Peacock?</h3>
Code Omitted To Save Space
</article>

   <article>
      <h3>The Majestic Eagles Have Landed</h3>
Code Omitted To Save Space
</article>
</section>

<section>
   <h2>Fish</h2>
   <article>
      <h3>Swimming with Sharks</h3>
Save the file.
Rechecking the Outline
In a browser, go back to gsnedders.HTML5.org/outliner
Under Input HTML, click the Browse or Choose File button.
Navigate to Class Files > Web Dev Class > Structural Semantics.
Double–click semantic-elements.html to choose it.
-
Click the Outline this! button just below the file. You’ll notice that the logical structure of the page has improved with our title sections.
The Main Element
Let’s define the most important content in the document with the main tag. It does not affect the document outline but adds semantic value. The main element’s primary purpose is to improve accessibility. It helps screen readers understand where the main content begins. It can only be used once per document and it must not be nested inside of an article, aside, footer, header, or nav.
- Return to semantic-elements.html in your code editor.
-
Wrap the two section elements in the main tag, as shown below.
<main>
   <section>
      <h2>Birds</h2>
      <article>
Code Omitted To Save Space
</article>

      <article>
Code Omitted To Save Space
</article>
   </section>

   <section>
      <h2>Fish</h2>
      <article>
Code Omitted To Save Space
</article>
   </section>
</main>
Save the file.
Optional Bonus: Figure & Figcaption
Let’s add an image of an exotic animal to our page.
- Return to semantic-elements.html in your code editor.
-
Between the nav and the main tags, add the following img:
</nav> <img src="img/tawny-frogmouth.jpg" height="346" width="700" ALT="Tawny Frogmouth"> <main> -
Save the file and preview semantic-elements.html in a web browser.
What a cool bird! It would be nice to add a caption to the image to provide details about the bird. HTML5 introduced the figure element to use in combination with figcaption as a semantic way to include an image, chart, or code example accompanied by an explanatory caption. Let’s see how it works.
Return to semantic-elements.html in your code editor.
-
Wrap the img tag in the following figure element:
<figure> <img src="img/tawny-frogmouth.jpg" height="346" width="700" ALT="Tawny Frogmouth"> </figure> -
Add the figcaption element inside the figure tag below the image, as follows:
<figure> <img src="img/tawny-frogmouth.jpg" height="346" width="700" ALT="Tawny Frogmouth"> <figcaption></figcaption> </figure> - To save you some time, we’ve provided you with the caption content. To open a file hit Cmd–O (Mac) or CTRL–O (Windows).
- Navigate to Class Files > Web Dev Class > Structural Semantics > snippets and open content-figcaption.html.
- Select all the text.
- Copy it.
- Close the file and return to semantic-elements.html.
-
Paste the code inside the empty
<figcaption></figcaption>tags, as follows:<figcaption>The Tawny Frogmouth (Podargus strigoides) is a type of bird found throughout the Australian mainland, Tasmania…frogmouths are more closely related to nightjars and oilbirds. Source: <a href="https://en.wikipedia.org/wiki/tawny_frogmouth">Wikipedia</a></figcaption> -
Save the file and preview semantic-elements.html in a web browser. Interesting!
Notice that some margin space has been added on the left of the figure. There’s also margin on the right, but it’s not obvious. These margins could be modified with CSS, but for now we just wanted to focus on the HTML, not CSS.
