Enhance your understanding of exporting graphics for web use with our comprehensive Figma tutorial, covering topics such as exporting individual assets, frames (artboards), and pixel-based graphics as JPEG and PNG, with detailed step-by-step instructions and valuable tips and tricks.
This exercise is excerpted from Noble Desktop’s Figma training materials and is compatible with Figma updates through 2023. To learn current skills in Figma with hands-on training, check out Noble Desktop's Figma Bootcamp, web design classes, and graphic design classes in-person or live online.
Topics Covered in This Figma Tutorial:
Exporting Individual Assets, Exporting Frames (artboards)
Exercise Preview
Exercise Overview
In this exercise, you’ll learn how to export graphics for use in webpages.

Opening or Uploading the File
-
If you still have Pulse—Prototyping Done.fig open from the previous exercise, skip the next section (about exporting). Otherwise open it as follows:
In Figma, if you’re not on the homescreen (file browser), do the following:
- In the Desktop app: Click the
 Home tab (Mac users can also choose File > Open File Browser).
 - In the Web app: Click the Main menu button
 and choose Back to files.
- In the Desktop app: Click the
-
If you previously uploaded the file, double–click on Pulse—Prototyping Done to open it.
If you have not uploaded the file, click
 Import file (may be an icon near the top right). Then navigate into Desktop > Class Files > Figma Class > Pulse and double–click on Pulse—Prototyping Done.fig to open it.
Exporting Vector Graphics As SVG
- At the top of the Home Page frame, select the black navbar.
- Zoom to the selection by hitting Shift–2.
- We want to select the logo.
- In the Layers panel, click on Pulse logo (in the Home Page frame).
- The layer name is used for the exported file name, so let’s rename this. Double–click on the Pulse logo name.
- Rename it to pulse-logo and hit Return (Mac) or Enter (Windows) to apply it.
- Make sure the logo is still selected.
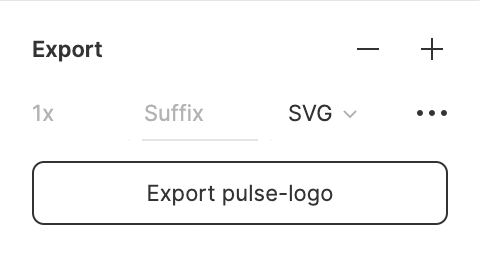
- In the Design panel, to the right of Export click the Plus(+) button (you may have to scroll down to see Export).
- Click on the file format menu (which currently says PNG) and choose SVG.
-
Just below that click the Export pulse-logo button.
- If you’re using the figma.com website, the file will go to your Downloads folder.
- If you’re using the Desktop app, you’ll be asked where to save the file. Navigate to Desktop > Class Files > Figma Class > Pulse > Web Assets and click Save.
TIP: When you have multiple elements selected, each will be are exported separately (using the layer names for the file names.)
Exporting Pixel-Based Graphics As JPEG
- Select the photo below the black navbar (behind New Autumn Attire).
- In the Layers panel double–click on the feature photo name to edit it.
- Web filenames can’t have spaces in them. Change the space into a dash to make it feature-photo (Hit Return (Mac) or Enter (Windows) to apply the change.)
- In the Design panel, to the right of Export click the Plus(+) button.
- Click on the file format menu (which currently says PNG) and choose JPG.
- To the right of Export click the Plus(+) button again.
-
A 2x has been added, but change its format to JPG.
NOTE: If you only want 2x (not both 1x and 2x), you can change the 1x to 2x on the single export (without adding another export).
-
Just below that click the Export feature-photo button.
- If you’re using the figma.com website, the file will go to your Downloads folder.
- If you’re using the Desktop app, you’ll be asked where to save the file. Navigate to Desktop > Class Files > Figma Class > Pulse > Web Assets and click Save.
-
Let’s look at the final exported files. Keep Figma open, but switch to the Desktop (the Finder on Mac or Windows Explorer on Windows).
- If you’re using the figma.com website, navigate to your Downloads folder.
- If you’re using the Desktop app, navigate to Desktop > Class Files > Figma Class > Pulse > Web Assets.
-
Notice the following:
- The feature-photo was exported at 1x and 2x sizes.
- The pulse-logo is vector and rendered at the full resolution of the screen, so there’s no need for 1x or 2x sizes.
Exporting & JPEG Quality
Sadly you cannot set JPEG quality in Figma. If you need to control the file size, you should export a PNG, open that in Photoshop, and then export as a JPEG.
Even though a 2x image has more pixels than a 1x image, it will occupy the same amount of space within the webpage as the 1x image. This means the pixels of the 2x image end up being smaller (half the size). Any JPEG compression artifacts in a 2x image will end up being smaller than at 1x.
This means you should compress a 2x image more than a 1x. You can even use settings that would be unacceptable for a 1x image. If you’re compressing 2x images at the same quality as 1x, you are wasting file size and a user’s time! For example:
• In Photoshop, you’d export a 1x JPEG with higher quality (such as 60%). • In Photoshop, you’d export a 2x JPEG with lower quality (such as 30%).
You then have the ideal compression for both 1x and 2x JPEGs (or just go with 2x and don’t bother with 1x anymore).
Exporting Pixel-Based Graphics As PNG
- Switch back to the Figma app or website (whichever you were using).
-
In Figma, go to the homescreen (file browser) as follows:
- In the Desktop app: Click the Home tab (Mac users can also choose File > Open File Browser).
- In the Web app: Click the Main menu button and choose Back to files.
- In the Desktop app: Click the
-
If you already have iTastify Design Done from a previous exercise, double–click on it to open it.
If you do not have that file, do the following:
- To open a local file, click Import file (may be an icon near the top right).
- Navigate into Desktop > Class Files > Figma Class and double–click on iTastify Design Done.sketch to open it (yes Figma can open Sketch files).
- Once the file has uploaded, click Done and double–click on the file to open it.
- If you get a message about missing fonts, choose Arial for the replacement (or don’t worry about it as we’ll only be focusing on graphics).
- To open a local file, click
-
Near the top of the frame, there’s a hand holding an iPhone. It requires a transparent background, so it can be composited onto the background pattern in the final webpage. JPEG is best for compressing photos, but it doesn’t support transparency. We’ll have to make this a PNG.
The photo is nested in several groups, so hold Cmd (Mac) or CTRL (Windows) and click on the hand holding an iPhone.
- With the photo selected, in the Design panel, to the right of Export click the Plus(+).
- The file format menu should currently say PNG which is what we want.
- To the right of Export click the Plus(+) button again to add a 2x size.
-
Just below that click the Export iphone-hand-mockup button.
- If you’re using the figma.com website, the file will go to your Downloads folder.
- If you’re using the Desktop app, you’ll be asked where to save the file. Navigate to Desktop > Class Files > Figma Class > Pulse > Web Assets and click Save.
Close this file.
Exporting All Marked Assets in One Pass
After you’ve marked all the assets you want to export (in their various formats and resolutions), you can export everything in one pass (rather than exporting each thing individually). Here’s how:
- At the top left click the Main menu and choose File > Export (Mac users can choose File > Export from the top menu bar).
-
An Export panel will pop-up where you can choose what you want to export (uncheck any you don’t want). When ready, click Export.
- If you’re using the figma.com website, the file(s) will go to your Downloads folder (multiple files will be zipped, so you may have to unzip the download).
- If you’re using the Desktop app, it will ask where to save the file(s).
Optional Bonus: Exporting Frames (Artboards) As PDF
When sending the entire design (all the frames) to a client or developer, the best method is using Figma’s online sharing which we’ll cover in the next exercise. You can also export a multiple page PDF file, as follows.
- If you closed the Pulse—Prototyping Done file, reopen it now.
- Click onto an empty part of the canvas to make sure nothing is selected.
-
At the top left click the Main menu
and choose File > Export frames to PDF (Mac users can choose File > Export frames to PDF from the top menu bar).- If you’re using the figma.com website, the file will go to your Downloads folder.
- If you’re using the Desktop app, it will ask where to save the file. Navigate to Desktop > Class Files > Figma Class > Pulse > Web Assets and click Save.
- Switch back to the Web Assets folder open on your Desktop.
- Double–click on PDF file to open it.
- Scroll through the PDF file to see that each frame is a different page.
- Close the PDF file.
- Switch back to Figma.
Close the Figma file.
