Delve into the intricacies of Cinema 4D, learning to work with imported 2D vector files, animate cameras, and apply procedural textures, with our comprehensive tutorial.
This exercise is excerpted from Noble Desktop’s Cinema 4D Lite training materials and is compatible with Cinema 4D updates through 2023. To learn current skills in Cinema 4D with hands-on training, check out our Cinema 4D in After Effects Bootcamp, Motion Graphics Certificate, and video editing classes in-person and live online.
Topics Covered in This Cinema 4D Tutorial:
Working with Illustrator Files, ****, Animating Cameras, C4D Tags
Exercise Preview
Exercise Overview
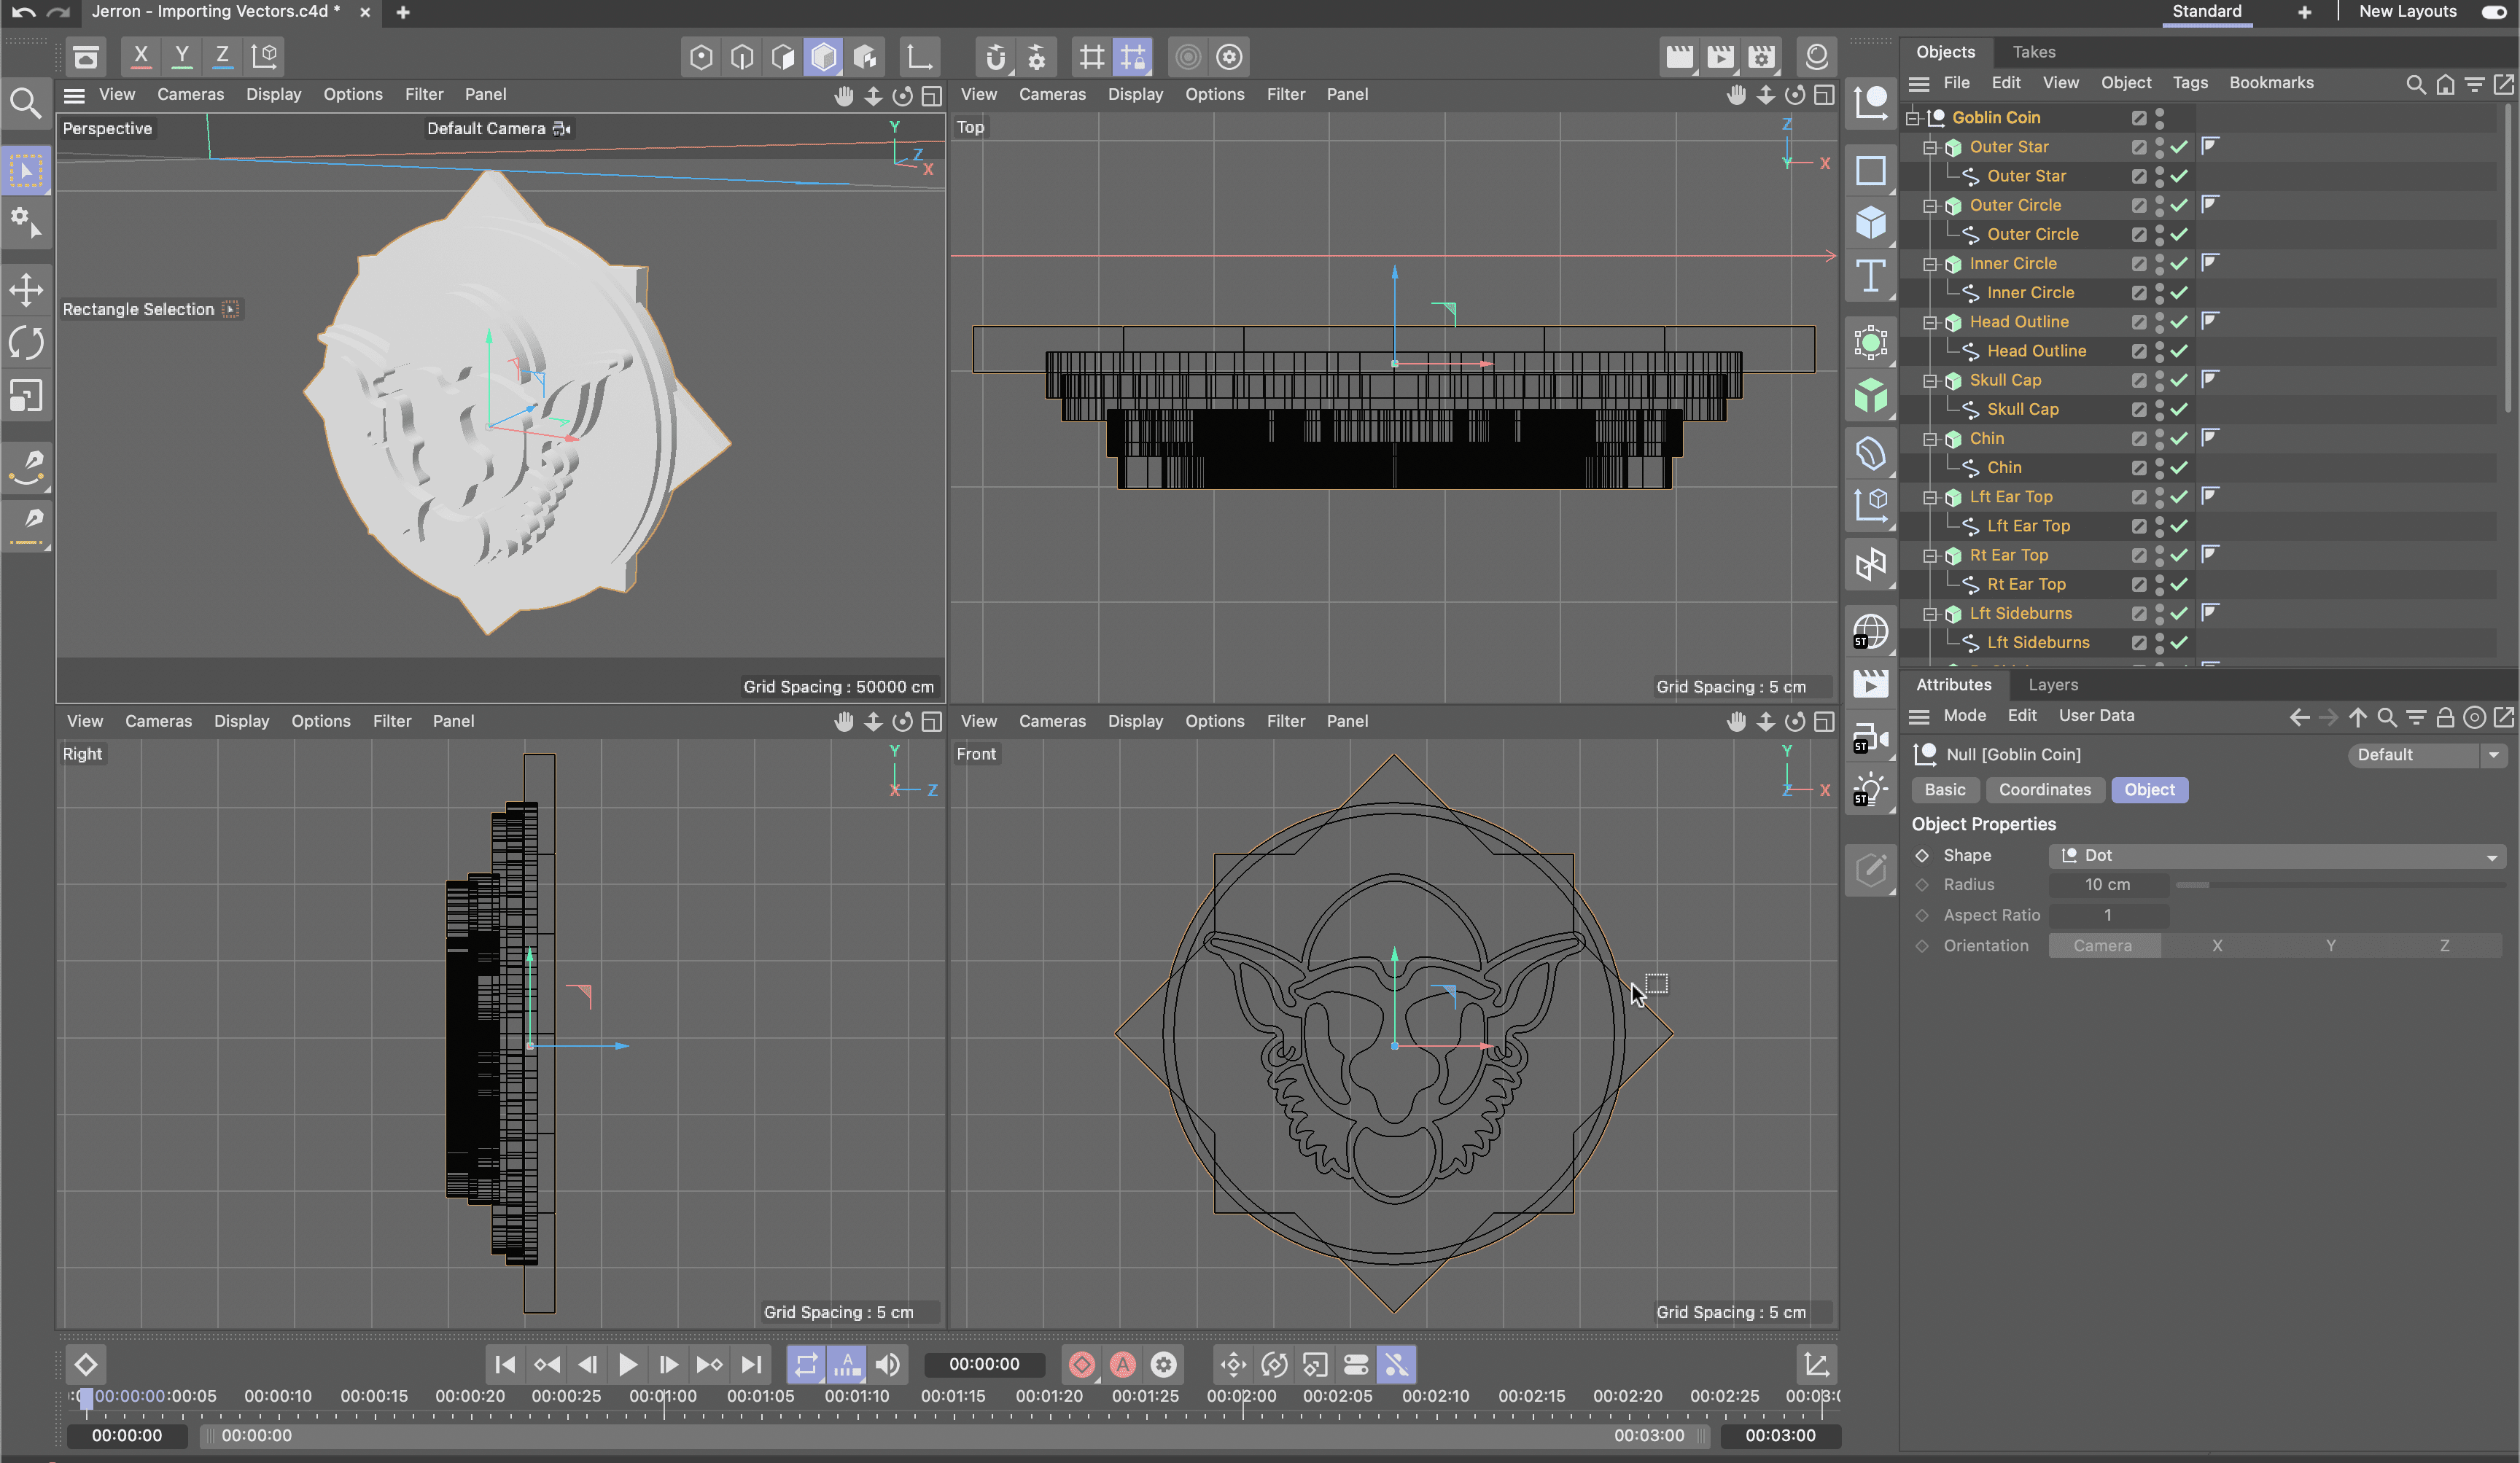
In this lesson you will work with imported 2D vector files and convert them into 3D Geometry. A technique could be useful in projects where you have to create a 3D logo or iconography.

Previewing the Final Video
This project has no preview file.
Getting Started
In Cinema 4D Lite, if you have a project open, choose File > Save.
Choose File > Close All Projects. This will leave you with one empty project.
-
Choose File > Save Project As and:
- Navigate to Class Files > C4D in AE Class > Importing Vector Shapes
- Name the file Your Name—Importing Vectors.c4d
- Save it into Class Files > C4D in AE Class > Importing Vector Shapes.
Importing Illustrator Files
The process of importing vector files is the same process you use when importing external 3D files. One thing to note if you are working with Adobe Illustrator files is that only Illustrator Version 8 and older files are supported for import.
In C4D switch to the default 4 views layout.
With a C4D document open, choose File > Merge Project.
Navigate to the vector file you want to import and double–click on it.
-
In the dialog:
- Set Scale to 100 Centimeter.
- Disable both checkboxes.
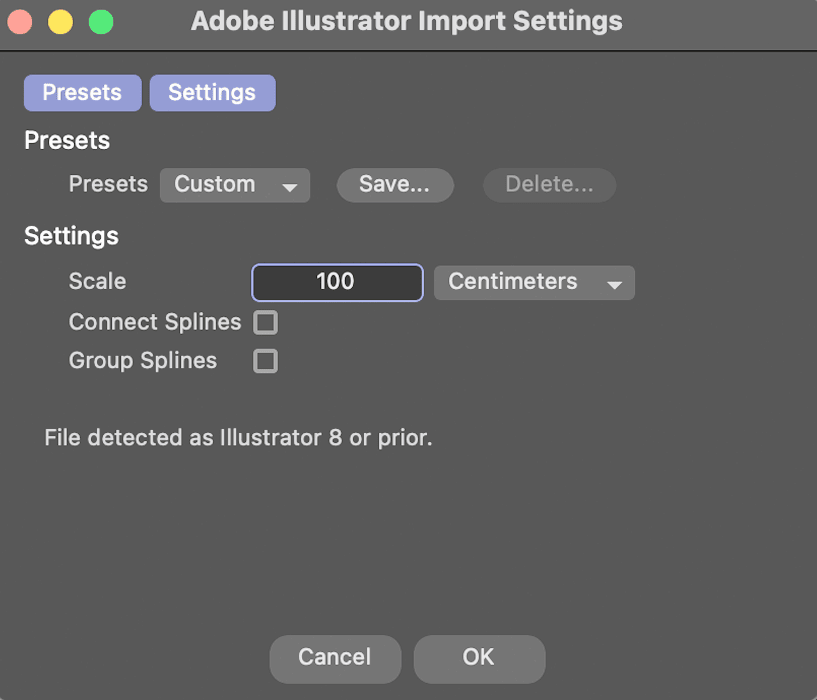
- Click OK
Once imported, hover your cursor over each viewport and press H on the keyboard to zoom to your geometry.
Press Cmd–S (Mac) or CTRL–S (Windows) or choose File > Save Project to save your C4D project
Cleaning up Imported Files
Imported vector files will be grouped together into a null object and because of the settings used each path will be a separate spline.
Rename the null object that holds your splines.
Rename your splines to make them easier to recognize.
NOTE: If you find it difficult to tell when a spline is selected or unselected you can change selection color by going to Edit > Preferences > Scheme Color > Activation > Polygons and picking a new color.
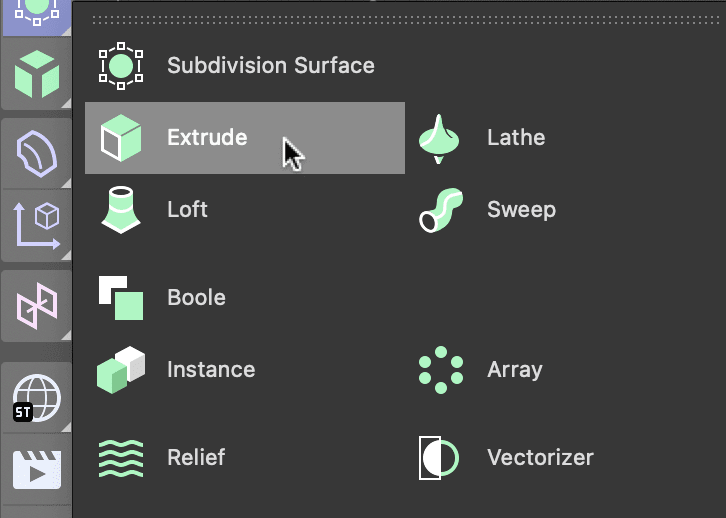
Applying an Extrude Generator to a Spline
Imported vector files are converted into C4D splines. The problem are splines are two dimensional shapes and have to be converted to 3D geometry to be visible.
In the Object Manager, select all of the Splines you want to receive extrude generators
-
Hold down the Option (Mac) or ALT (Windows) key on your keyboard and choose Extrude from the Create menu.
With the multiple extrude generators selected adjust their attributes, most importantly the Offset attribute which controls how thick the extrusions are.
Just as you renamed your splines you should take the time to rename the individual extrude generators so you can identify the parts of your model.
If your graphic is constructed of overlapping parts you will need to separate it to see the details.
If your splines were constructed by mirroring and clipping them you will probably have to adjust the Direction attribute to Z.
Using the Asset Browser for Materials
C4D Lite can access a group of free models and textures using the Asset Browser.
Choose Window > Asset Browser.
In the Asset Browser click on the folder with the material type you would like to use.
-
In the Materials List, any material with a cloud icon next to it can be downloaded as part of your subscription.
Double–click on a material to download it.
Drag the new materials onto the objects in your scene.
Press Cmd–S (Mac) or CTRL–S (Windows) or choose File > Save Project to save your C4D project.
Procedural Textures
A procedural is generated algorithmically using mathematical functions, rather than being created using an image. Unlike bitmap textures, which store pixel data for the texture, procedural textures are created in real-time based on parameters and algorithms. This makes procedural textures highly flexible and versatile, allowing for easy adjustment of the texture’s properties and appearance. Some common examples of procedural textures include noise patterns, gradient ramps, and cellular patterns. These textures can be used to create a variety of effects such as bumps, creases, and surface imperfections. Because procedural textures are generated mathematically, they are also resolution-independent, meaning that they can be scaled up or down without losing quality.
Creating a Golden Texture
In 3D software, textures are applied to objects using materials, which control the appearance and properties of the object. Textures are images or patterns that are applied to the surface of 3D objects to give them more detail and realism. Textures can be used to simulate a wide variety of materials and surfaces such as wood, metal, skin, cloth, and more. By applying textures to objects in a 3D scene, you can add depth, interest, and realism to the scene.
-
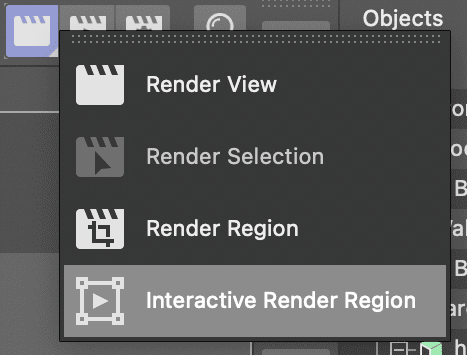
Long press on the Render View button and choose Interactive Render Region.
-
Adjust the render region window so it covers at least part of the artwork you are going to texture.
NOTE: When using the interactive Render Region you will want to adjust the quality slider (the arrow on the right) to as high as your computer hardware will allow.
-
Click on the Material Manager
 button or press Shift–f2.
Notice that there are a lot of gray materials there. Each extrusion object was assigned its own material when it was converted from AE to C4D.
Click the New Default Material
 button.
Double–click the new Material icon
 to open the Material Editor. We’re going to create a material that looks like gold.
Click on the Color Map to make sure it’s active. We’re going to add a Lumas shader to the base color since it lets us mimic metallic materials better than other shaders.
Click the arrow to the right of Texture and choose Effects > Lumas.
Click on the word Lumas that is now listed to the right of the arrow. This opens the Lumas shader’s properties so you can edit them.
Click on the Shader tab if necessary.
-
Click on the Color swatch and change the color so that R = 255, G = 240, B = 0
- Click on the Material Editor to close the Color Chooser.
-
Click on the Specular 1 tab and:
- Click on the Color swatch and change the color so that R = 255, G = 168, B = 0
- Click on the Material Editor to close the Color Chooser.
-
Click on the Specular 2 tab and:
- Click on the Color swatch and change the color so that R = 255, G = 199, B = 0
- Click on the Material Editor to close the Color Chooser.
-
Click on the Specular 3 tab and:
- Click on the Color swatch and change the color so that R = 198, G = 145, B = 0
- Click on the Material Editor to close the Color Chooser.
-
Click on the Anisotropy tab and:
- Click on the Active switch.
- Change Y Roughness to 125
- Click on the Material Editor to close the Color Chooser.
-
Click on the switch next to Luminance to activate it reveal its properties.
- Click on the Color swatch and change the color so that R = 209, G = 153, B = 0
- Click on the Material Editor to close the Color Chooser.
- Change Brightness to 40
Click on Reflectance to reveal its properties click Remove to get rid of the default reflection map.
Click Add and choose Beckman from the list of shaders.
-
In the Beckman shader click the arrow next to Layer Fresnel to reveal its properties and:
- Choose Dielectric from the Fresnel menu.
- Change Strength to 85
- Change IOR to 1.5
-
Click on the switch next to Glow to activate it reveal its properties.
- Change Outer Strength to 200
- Change Random to 20
Close the Material Editor and then close the Material Manager.
Click off the Interactive Render Region.
Press Cmd–R (Mac) or CTRL–R (Windows) to render the camera view.
Press Cmd–S (Mac) or CTRL–S (Windows) or choose File > Save Project to save your C4D project.
Rendering a C4D Lite File
To render Cinema 4D Lite file you use After Effects.
Open After Effects.
In your new After Effects project, choose File > Import.
Navigate to the C4D file you want to import and double–click on it.
In the Project panel, right click on the C4D file and choose New Comp from Selection.
In the new comp, click on the C4D layer to select it.
In the Effect Controls menu locate the Cineware effect.
-
Change the Renderer to Current.
NOTE: Depending on your computer, this may take a while to preview.
You can now use either the Render Queue or Adobe Media Encoder Queue to render your AE comp.