Discover the power of AutoCAD's Array command in this comprehensive tutorial, exploring its usage in creating and manipulating patterns of objects in your design projects.
This exercise is excerpted from Noble Desktop’s past AutoCAD training materials and is compatible with Photoshop updates through 2020. To learn current skills in AutoCAD, check out AutoCAD Bootcamp and AutoCAD classes in NYC and live online.
Topics covered in this AutoCAD tutorial:
Array Command
Exercise Preview
Exercise Overview
In this exercise, you will learn to use the Array command to make arranged and evenly spaced copies of multiple objects in one step. You can start Array by typing AR Enter or choosing one of the three Array methods from the menu attached to the Array button in the Modify panel or toolbar. In this exercise you will learn to use all three array methods (Rectangular, Path, and Polar).

The Array Command
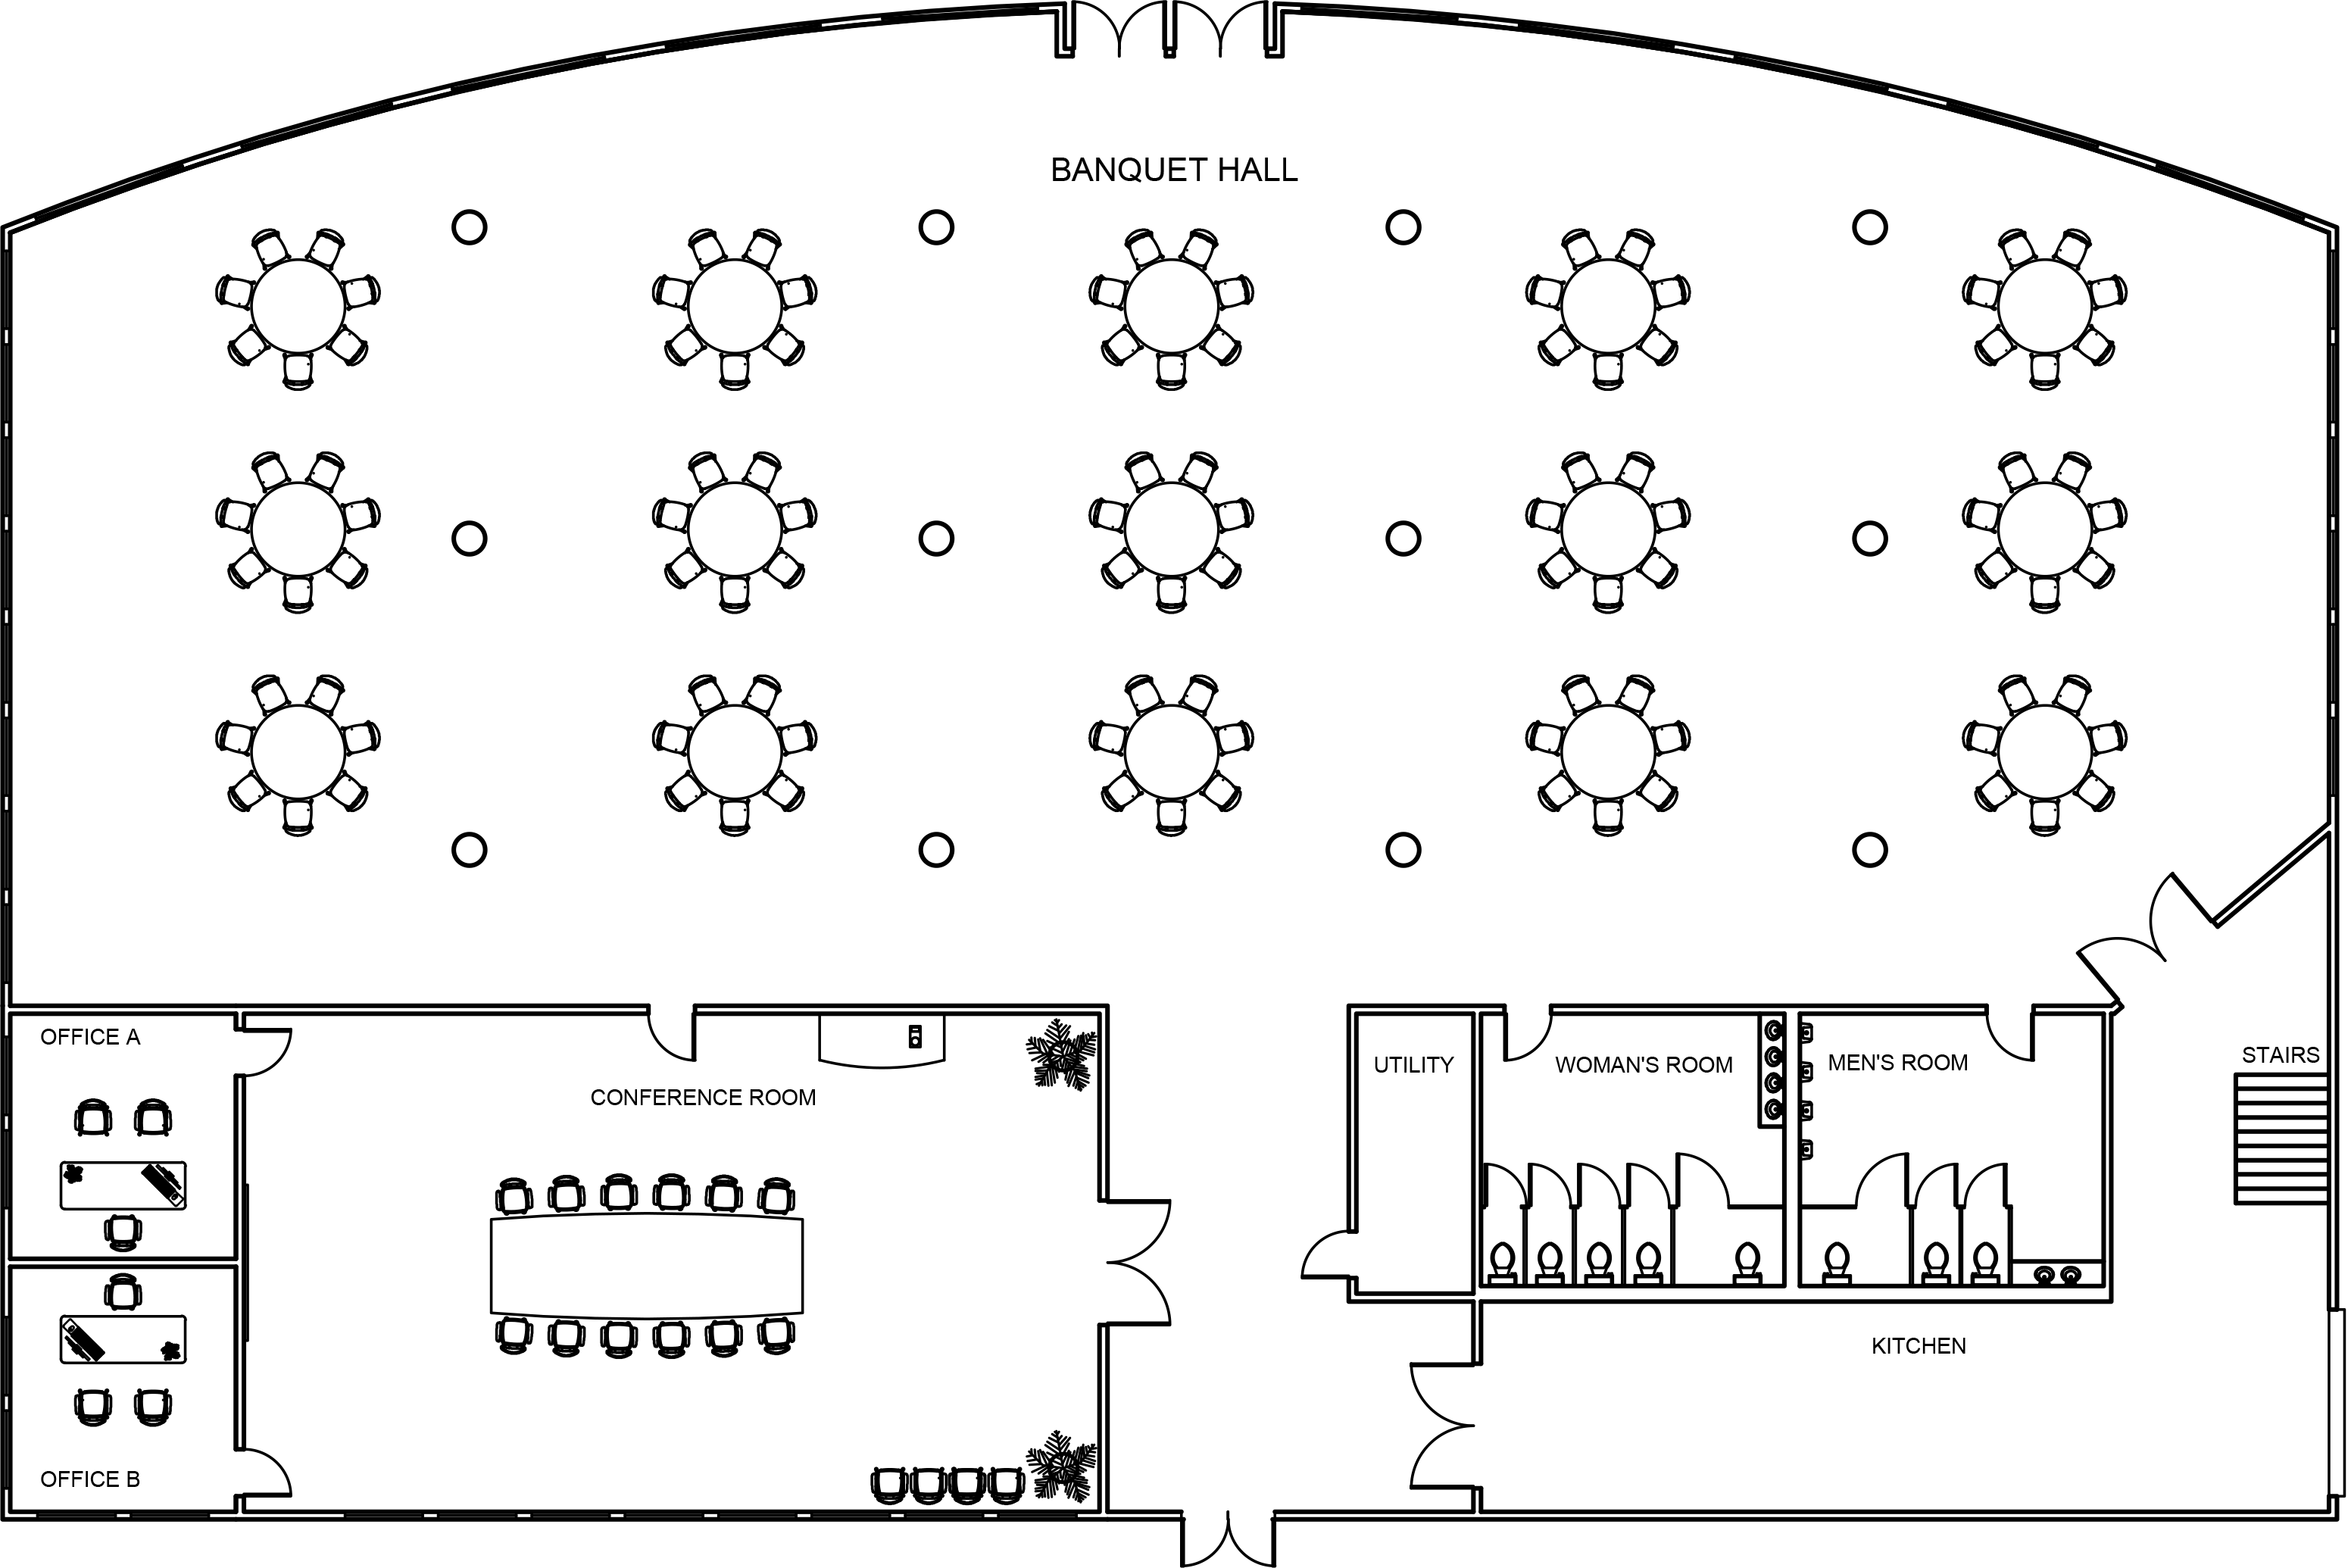
Open the file Array-Banquette Hall.dwg.
-
Type AR Enter to start the Array command. When prompted to select objects, select the column (small circle) in the lower left corner of the Banquette Hall next to the round table and chair. Enter Rectangular for the Array Type.
-
The circle will be duplicated and arranged in the default Rectangular Array configuration. You will see grips to change the number of rows and columns, as well as alter the distance between them. You will learn to use the grips later in this exercise, for this example you will enter these values in the Array Creation tab in the Ribbon.

-
The Array Creation tab will appear whenever you make an array. Set the Columns field to 4, Rows to 3, and for the Between distances, enter 30’ under Columns, and 20’ under Rows.

NOTE: Once the array has been created, you can select it at any time to change the settings using the grips or the Array tab, which is almost identical to the Array Creation tab, but is for editing the array once it’s been created. Press Esc to deselect the array and close the Array Creation tab.
-
The distance between columns and rows of a Rectangular Array is the distance between their center points, not the gap between objects. If you’d like to enter the distance between objects, add distance of the gap plus the length or height of the object as the distance between as shown below.

TIP: If the length and height of your objects is 3 inches, and you’d like the gap between your objects to be 1 inch, then you would enter 4 inches as the distance between Columns and Rows, the same as the distance between center points. For example: 3”(length)+1” (gap)= 4” (distance between)
The Polar Array
-
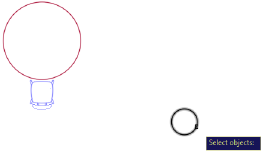
Now you will use Polar Array to duplicate chairs around a table. Zoom in on the round table and chair in the lower left corner of the Banquet Hall. Start the Array command and select the chair. Choose Polar for the Array type. When prompted to specify a center point, click on the center point of the table. Six chairs will be arranged around the table, which is the default for the Polar Array. The Array Creation Ribbon tab will once again appear, this time with options for a Polar Array. Note the Fill field reads 360. This means that the arrayed items fill the circle a full 360˚. You are about to change this with grips.
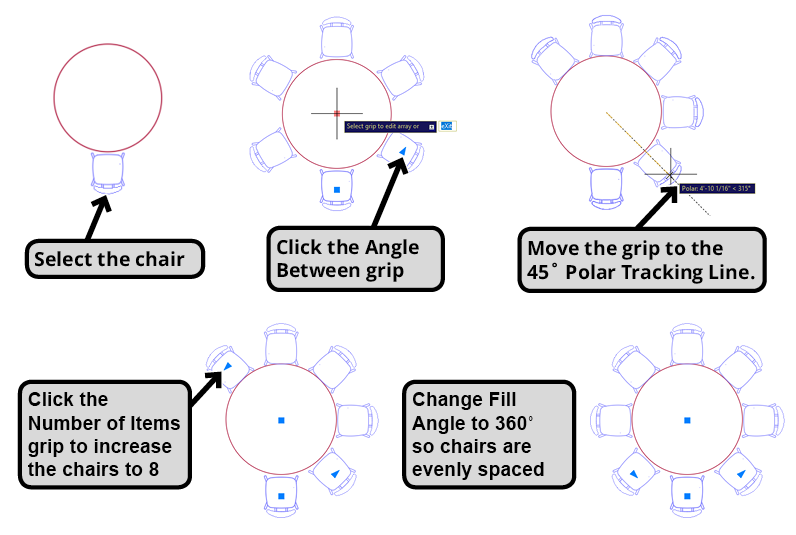
You will see a triangular grip on the lower right chair, this is the Angle Between grip. Click on the grip and pull downward until you snap to the 45˚ Polar Tracking line. The angle between the chairs will shrink and the chairs will no longer fully surround the table. In the Array Creation Tab, the Fill angle is reduced from 360˚ to 225˚. Now there is another triangular grip at the end of the array. This grip will change the number of items if the Array doesn’t cover the circle a full 360˚. Click and drag the grip to add 2 more chairs for a total of 8. You will see that the angle between the last and first chairs doesn’t match the angle of the other chairs. In the Array Creation tab, change the Fill to 360˚ so that the chairs completely fill the circle and the chairs will be evenly spaced.
You can also change the number of items in the Array Creation Ribbon Tab. Click in the Items field, change the number from 8 to 7. Note that the chairs are all facing the center of the table. This is because Rotate Items is turned on in the Array Creation tab, which is the default.
Click on the Rotate Items button in the Array Creation tab to turn it off and look at the result. There will be times where you don’t want your arrayed items to be rotated to the center, this is not one of those times, click the Rotate Items button to turn it back on so the chairs will once again face the center of the table. Press Esc to deselect the objects and close the Array Creation tab.
-
Press Enter to repeat the Array Command. Now you will make a rectangular array to fill the Banquet Hall with tables and chairs. Select the table and the chair array. Choose Rectangle for the array type. Use the grips to add one more column and evenly space the tables throughout the Banquet Hall. The outer triangular grips add and subtract rows and columns, and the inner grips control the spaces between. Press Esc to deselect the objects and close the Array Creation tab.
Use the grips to add a Column for a total of 5 and evenly space the tables throughout the Banquet Hall as shown below:

The Path Array
-
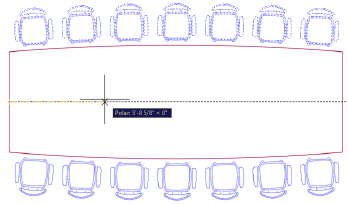
The Path Array can arrange copied objects along a single curved line segment. Zoom in on the long table in the Conference Room. The table is a polyline, but you can only use polyline on a single line segment, you will have to use the Explode command (X Enter) to explode the table.

Press AR Enter to start the Array Command. Select the chair and choose Path for the Array Type. When prompted to Select Path Curve, click on the top curved edge of the table. A row of 6 chairs will be arranged across the curved path and Array Creation tab will appear with options for a Path Array. The array will be slightly off center. There will be one triangular grip to control the distance between chairs. Since that array always stretches across the entire path by default, the distance between chairs will determine the number of chairs. The closer the distance, the more chairs can fit along the path. You may have trouble finding a distance that will center the array without adding unwanted chairs. Take a moment to move the grip and see the effect.
-
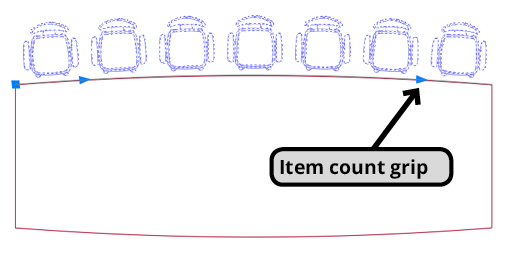
The Items field in the Array Creation tab will be locked because the number of items is determined by the distance between so that the array always covers the entire path. However, if you click on the icon to the left of Items, the item count will be unlocked, and you can type in a number. Also, a second triangular grip will appear at the end of the array which will also allow you to change the number of items. You will also be able to choose a distance and number of items that doesn’t extend across the entire path. Click the Item button to unlock the field. Change the number of chairs to 7, either by clicking on the second grip or typing it in the Item field. Use the inner grip to change the distance between the chairs to center the Array.
-
Use the Mirror Tool to duplicate the array of chairs on the other side of the table. Explode the chair arrays. You can explode an array to manipulate the objects individually or keep intact so you can change the settings at any time.
-
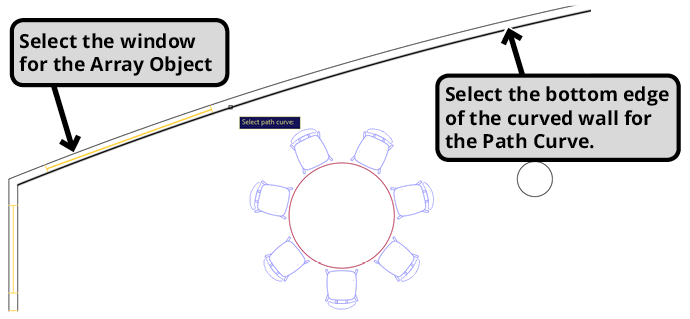
Zoom in on the single display window in the curved wall in the upper right corner of the Banquet Hall. Start the Array Command and select the window. For the path curve, select the bottom curved edge of the wall. Enter 14’ for the Between distance in the Array Creation ribbon tab. Use the Mirror tool to mirror the window array. Use the Midpoint in the square that separates the front doors as the first point in the Mirror Line as shown in the diagram below.
Mirror the Window Array:

Use the Midpoint of the square separating the doors as the first point in the Mirror Line as shown below:

Save and close the file.