Gain an in-depth understanding of AutoCAD's Object Snap feature, including its various settings and applications, through this comprehensive tutorial.
This exercise is excerpted from Noble Desktop’s past AutoCAD training materials and is compatible with Photoshop updates through 2020. To learn current skills in AutoCAD, check out AutoCAD Bootcamp and AutoCAD classes in NYC and live online.
Topics covered in this AutoCAD tutorial:
Intro to Object Snap, Object Snap settings
Intro to Object Snap
Just as you can snap to a Polar Tracking line to specify an angle without typing it in, you can also snap to specific points with Object Snap so you don’t have to enter a coordinate. Not only will Object Snaps make drawing much faster and easier, but also more accurate. When you snap to a point with Object Snap, you can be sure that you clicked on the exact point you intended. You should never “eyeball”, or visually place the cursor to click a point without snapping or entering a specific coordinate. That method will never be accurate. As the name would imply, Object Snap allows you to snap to points on preexisting objects. The more objects you have in your drawing, the more useful Object Snap will be.
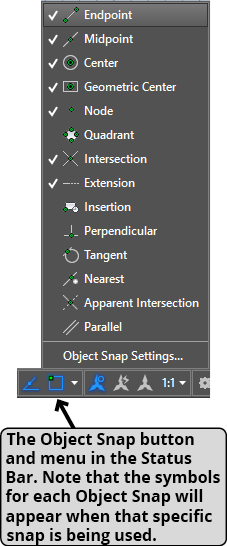
There are different Object Snaps that will snap to different points on objects, or use objects as a reference to place other points. Object Snaps can be used with many commands, and Object Snaps only work when another command is active. You can decide which Object Snaps to turn on and off at any time, or turn them off entirely, even if you’re in a command. There are different symbols for each Object Snap, so when you snap to a point, you’ll know exactly which Object Snap is being used. You will often change what combination of Object Snaps you are using because some Object Snaps will interfere with other Object Snaps in different situations, or may cause you to snap to the wrong point. You can turn Object Snaps on or off by pressing F3 or clicking on the Object Snap button  in the Status Bar. The arrow next to the Object Snap button will open the Object Snap menu so you can choose which snaps to activate.

Object Snaps
Endpoint: Snaps to the start or end point of any line, arc, or line segment, including points where segments of a Polyline meet, such as the corner points of a rectangle.
Midpoint: Snaps to the center of any line, arc, or line segment.
Center: Snaps to the center point of any circle or arc.Geometric Center: Snaps to the geometric center point of any closed Polyline.
Node: Snaps to any point made with the Point, Divide, or Measure tool.
Quadrant: Snaps to the vertical and horizontal topmost, bottommost, leftmost, or rightmost points of any circle or arc.
Intersection: Snaps to points were lines and arcs intersect and can create intersections where polar tracking lines meet objects. Note that you can only create intersections along tracking lines when Polar Tracking is active.
Extension: Use this snap to place points specific distances from object snaps but snapping to point without clicking your mouse button, pulling the cursor along a tracking line, and typing in a distance to place the next point for whatever command is active.
Insertion: Snaps to the insertion point (base point) of a block.
Perpendicular: Snaps to or creates perpendicular intersections. It can be particularly useful in Ortho Tracking mode because the Intersection snap only creates perpendicular intersections with Polar Tracking.
Tangent: Snaps to any point on a circle or arc with the Line tool making a smooth transition with no sharp corners.
Nearest: Will snap to any random point along any object. It can be useful in many situations, like placing objects against walls, but most users should only turn it on when needed because it’s very easy to place something at the wrong point when the Nearest snap is on.
Apparent Intersection: Snaps to the point where two not intersecting lines would intersect if they were extended.
Parallel: Allows you to make tracking lines parallel to any other line if those lines don’t conform to Polar Tracking lines. When in the Line Command, you can snap to any line without clicking and the Parallel Snap symbol will appear. A tracking line that is parallel to the line you snapped to will appear when the cursor is moved to a point where a parallel line could be made with the start point made with the Line command.
Object Snap Override
A Snap Override allows you to activate an Object Snap for one use. The selected Object Snap will automatically turn off when the command is finished. When using a command that works with Object Snaps, you can Right–click to access the Snap Override menu. Note that if you Right–click with the Line Command before you’ve established a start point, the line will start at the last endpoint made with the line tool rather then opening a Right–click menu, so you can’t use a Snap Override to establish the first point with the Line Tool. You can also activate Object Snap Overrides with the Object Snap Toolbar.