Delve into the intricacies of After Effects with this in-depth tutorial, covering topics such as rotating text & graphics on the Y-axis, creating realistic oscillating overshoot, and syncing text color changes with graphics animation.
This exercise is excerpted from past After Effects training materials and is compatible with After Effects updates through 2020. To learn current skills in After Effects, check out our After Effects classes and video editing classes in NYC and live online.
Topics covered in this After Effects tutorial:
Rotating Text & Graphics on the Y-axis in After Effects 3D, After Effects’ 3D Camera and Layer Perspective, Realistic Oscillating Overshoot, Syncing Text Color Changes with Graphics Animation, Anticipation Keyframes Before a Major Animation, Stacking the Graphics to Form a Solid Color Square
Exercise Preview
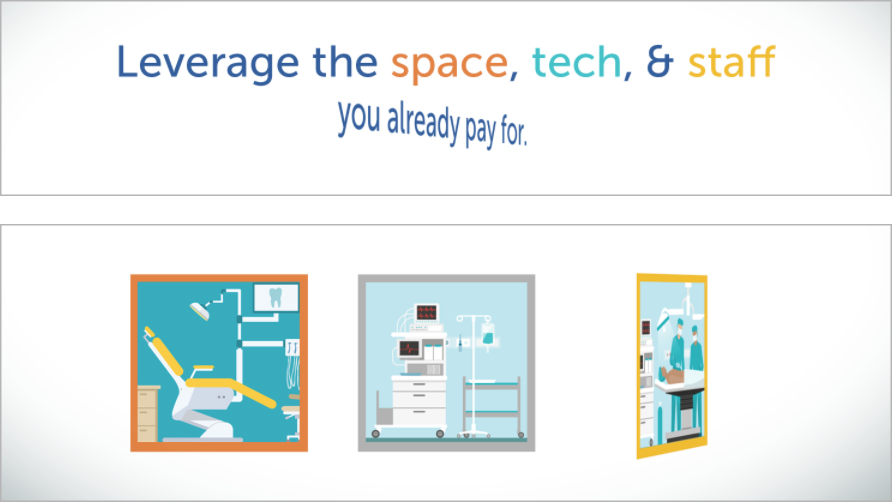
Exercise Overview
After Effects can animate layers within a 3D environment with the click of a switch, adding depth and intricacy to your projects! In this exercise, we’ll turn some elements in our third layout into 3D layers so we can rotate them in 3D space. We’ll also create a more complex overshoot animation, and an animation that anticipates a big motion by first inching a little backwards.

Previewing What You’ll Make in This Exercise
-
You should still have yourname-Text Animation.aep open in After Effects. If you closed it, re-open it now. We recommend you finish the previous exercises (2A–2B) before starting this one. If you haven’t finished them, do the following:
- Open Text Animation-Ready for 3D Rotation.aep (from the Text Animation > Finished AE Projects folder).
- Save the file as yourname-Text Animation.aep in the Text Animation folder.
On the Desktop, navigate to Class Files > After Effects Level 2 Class > Text Animation > Finished Clips and double–click Text-Animation-Leverage.mov.
-
Play the video and notice the following (you may need to slide the playhead slowly):
- As the pie chart splits apart to reveal the next layout, the first line of text revolves clockwise in 3D. It overshoots its final position, then settles down.
- Right before the text settles into its resting position, an illustration with an orange border spins into view. As it gets less distorted, the word it represents turns orange to match the graphic’s border color. The two other graphics do the same thing.
- After the three bordered illustrations stop animating, another rotating line of text comes in and overshoots its destination. It spins back and forth multiple times, losing a bit of momentum each time until it comes to a halt.
- After viewers have had time to read all the text, the lines of text inch slightly rightward, revving up in preparation to exit the frame in the opposite direction.
- As the text moves off-screen left, the left and right illustrations move toward the center graphic and turn gold when they merge into the gold-bordered graphic.
Replay the video as many times as you need—we’ll be reproducing it in this exercise. Keep it open so you can refer back to it as needed.
Preparing the Multiple Text Elements for Animation
Switch to After Effects, where yourname-Text Animation.aep is open.
In the Timeline, switch to the Text Animation-MAIN tab if you aren’t already there.
Select the [03-Leverage] pre-comp, and press I to see that our third layout comes into the composition at 7;19 (7 seconds and 19 frames).
Double–click the [03-Leverage] layer to open this pre-comp in a new Timeline tab.
Look at the timecode to see that this pre-comp starts at 0;00. So we can keep better track of the timing of the animations we’ll add to this layout, let’s change its start timecode to match its in point in the main composition.
Press Cmd–K (Mac) or Ctrl–K (Windows) to open the Composition Settings.
Set the Start Timecode to 719 so it’ll start at 7 seconds and 19 frames.
Click OK and you will see the timecode change to match!
-
Select the Leverage the space… layer that contains the lines of text and press M to see that it has five masks. The first three isolate the words that will change color, and the last two separate the layer into two separate lines.
Make sure each mask’s blending mode is set to Add.
Let’s use a script to separate it into five layers we can manipulate separately. Go to Window > MasksToLayers.jsx.
Change Anchor Point to Move To Mask Center and click the Proceed button.
Close the panel using the panel menu
 or the red button above the panel.
The original Leverage the space… layer is still selected. Rename it to original text.
Click the original text layer’s arrow
 to close it up. Then drop it below all the other layers. (It should become Layer 12.)
-
The script created five new layers! To keep track of their purpose, rename as follows:
Top layer: space Second layer: tech Third layer: staff Fourth layer: line 1 Last layer: line 2 Click on the space layer, Shift–click on the line 2 layer, and press M.
Click the empty lock switch
 next to each mask to keep them in place.
Collapse all these layers in the Timeline.
-
While holding Cmd (Mac) or Ctrl (Windows), click on the line 1 and line 2 layers to remove them from the selection.
Keep the space, tech, and staff layers selected until we tell you otherwise.
Let’s make sure these three individual words in line 1 will animate along with the line. Under one of the selected layers’ Parent column, drag the pick whip
 to the line 1 layer name and release. The menu should change to 7. line 1.
Click on one of the lavender label color squares and change it to Blue.
Let’s change the text colors! Go to Effect > Generate > Fill.
Each layer is now red because that is the default fill color. Because we want a different color for each layer, deselect all.
-
Change the colors as follows by selecting a layer, going to the Effect Controls panel, and clicking the swatch next to Color:
space: #E7814B (WaitingRoom’s branded orange) tech: #30C2C7 (WaitingRoom’s branded turquoise) staff: #F4BC44 (WaitingRoom’s branded gold) We’ll work with the space, tech, and staff layers once we’ve animated the lines and graphics. To temporarily hide these three layers, click their eye switches
 .
.
Making Layers 3D
Press Cmd–A (Mac) or Ctrl–A (Windows).
Make sure the layer switches are showing, then click any layer’s Shy switch
 .
.Next to any layer that is expanded, click the arrow
to close up every layer.Deselect all the layers.
To select the layers we want to animate in 3D, click on the line 1 layer and Shift–click on space pic. You should be selecting Layers 7–11.
Click the Shy switch
 for any of these layers to make the shy guy reappear.
Go to the top middle of the Timeline and click the big Shy button
 to temporarily remove the other layers from the stack.
Turning a 2D layer into a 3D layer is as simple as a mouse click! Click any layer’s rightmost switch, the 3D Layer switch
 .
.-
With all the layers still selected, expand any layer, then its Transform properties.
NOTE: You will also see a set of Material Options. These control how a 3D layer interacts with 3D lighting and shadows.
Notice that the Anchor Point, Position, and Scale properties now have a third value. This is the z coordinate that controls an object’s depth (distance from the “camera”).
Press R to hide the other properties, leaving only the four Rotation properties visible.
Deselect all, then select the line 1 layer.
Experimenting with 3D Rotation
Let’s set an object’s Orientation, rotate it on each axis to see the difference between the Rotation properties, and learn some new best practices along the way. If you took our Level 1 class or already know these properties like the back of your hand, feel free to skip this section and go on to the next one.
Let’s test out these properties! Go to the Tools panel and select the Rotation tool
 . Alternately, you can press the W key (for W otation) to choose it.
Go to the Composition panel and mouse over the green arrow. The cursor should disappear and the tooltip will indicate that you’re hovering over the Y-axis.
Hover over the red arrow to see that it controls the X-axis.
There’s also a blue arrow that controls the Z-axis. It’s harder to see because by default, 3D objects start off with no apparent depth until you change any z values. Near the anchor point
 , hover over the blue hexagon to see its tooltip appear.
In the middle of the Tools panel, notice that it says Set Orientation for 3D layers. If it doesn’t, go into the menu that says Rotation and change it to Orientation.
-
While looking in the Composition panel, click and hold on the green y-axis. Drag it leftward and rightward to see the text rotate around like a revolving door or a spinning top.
Keep holding the mouse down. If you already released it, press Cmd–Z (Mac) or Ctrl–Z (Windows) to undo.
-
Look in the Timeline and continue to drag the mouse. You will see the Orientation property change.
Notice that no matter how many times you rotate it, the Orientation property never displays any full revolutions (such as 1x). The max value is 359.9°, which means this property can only set an object’s tilt!
Release the mouse and press Cmd–Z (Mac) or Ctrl–Z (Windows) to undo.
-
In the middle of the Tools panel, find where it says Set Orientation for 3D layers. Go into the menu that says Orientation and change it to Rotation.
The Orientation Property for 3D Layers
The Orientation property is how we set up the initial rotation of a 3D layer, before we animate with the X, Y, and Z Rotation properties. Think of it like college orientation—it happens before we start spinning around! Orientation values are not ideal for animation, because unlike Rotation values, they don’t include the Revolutions property (such as 0x+0.0°).
-
We animate using the X, Y, and Z Rotation properties. We just saw how a 3D object revolves around its y-axis, so let’s test the x! Do the following:
- Hover over the red x-axis and drag upward and downward to see it rotate front and back, just like a doggy door. Keep on holding the mouse.
- Pick a direction, either up or down. While looking in the Timeline, drag in that direction until you see that the number of revolutions (the 0x) never changes!
- Release the mouse and press Cmd–Z (Mac) or Ctrl–Z (Windows) to undo.
The tool can only set the tilt for an element. This is why we recommend setting Rotation in the Timeline. Press V to choose the Selection tool
 .
.In the line 1 layer next to Z Rotation, hover over the tilt value (0.0°) and drag the hand slider
 left or right to see that good ol’ familiar clocklike spin that we remember from our 2D rotations.
Release the mouse and press Cmd–Z (Mac) or Ctrl–Z (Windows) to undo.
Rotating Each 3D Line of Text & Graphic on its Y-Axis
Now that you’ve learned the ropes, let’s animate! Move the playhead to 8;04.
In the line 1 layer, keyframe the Y Rotation property by clicking its stopwatch
 .
.Move the playhead to 8;00, where our line will slightly overshoot its destination.
In the Timeline, change the Y Rotation value to 0x+10°.
Move the playhead to 7;20, one frame after the pie chart splits apart to start revealing the third layout. This is the first point in time where the first line is visible on-screen, so it makes sense to start animating now instead of at 7;19.
To make sure this layer is invisible before it starts animating, press Opt–[ (Mac) or Alt–[ (Windows) to trim its in point.
Change Y Rotation to 0x–90° to make the text invisible. All you should see is its bounding box and the layer’s three colored arrow controls!
Select the second keyframe
 (at 8;00) and press F9 to Easy Ease it.
Click on the Y Rotation property name to select all three keyframes.
Copy them.
We want the second line to start animating 2 seconds after the first line does. Move the playhead to 9;20.
Select the line 2 layer and paste the keyframes.
Press Opt–[ (Mac) or Alt–[ (Windows) to set a new in point at this timecode.
We want the left illustration to start rotating at 8;00. Because one of the open layers (line 1) has a keyframe here, press J until you get to this timecode.
Select the space pic layer (the last one listed in the Timeline) and press Opt–[ (Mac) or Alt–[ (Windows) to start the layer at this point in time.
-
Paste the keyframes. Notice that the layer isn’t invisible! How odd…
How After Effects’ 3D Camera Influences Layer Perspective
All 3D layers are viewed from a camera’s perspective, so we aren’t working in a true front view. The camera has got its “eyes” fixed to the center of the screen. The further away an object is from this focal point, the more the perspective distorts. It’s no biggie—we just need to correct for this distortion.
To get a better look, let’s temporarily hide the layer handles (its bounding box and 3D layer controls). Go to the top left of the Composition panel. To the right of the comp name and above the comp directory, click the panel menu
and select View Options.In the window that appears, uncheck the box next to Layer Controls and click OK.
So we don’t accidentally move all the selected keyframes, deselect all.
In the space pic layer, select the first keyframe
 .
.-
To zero in on the perfect invisible side view, do the following:
- To get the values to change in precise increments (.1 degree at a time), hold down the Cmd (Mac) or Ctrl (Windows) key. Do not release yet!
- In the Timeline, drag the Y Rotation value leftward until you find the sweet spot. Either 0x–98° or 0x–98.1° should do the trick!
Next up, the middle image! Move the playhead to 8;16.
Select the tech pic layer and press Opt–[ (Mac) or Alt–[ (Windows).
Paste the keyframes. This image is centered on-screen, so it’s already fully invisible!
Move the playhead to 9;04, when the last illustration will start rotating.
Select the staff pic layer and press Opt–[ (Mac) or Alt–[ (Windows).
Paste the keyframes. Looks like we need to adjust these too.
Deselect all, then select the staff pic layer’s first keyframe
.While holding Cmd (Mac) or Ctrl (Windows), drag the Y Rotation value until you can no longer see the illustration. It should disappear at 0x–81.9°.
-
Now that we’ve seen how the camera’s perspective works, let’s make sure the –90° rotation actually hides the two lines of text. Select the line 1 layer and press I.
Eek, you will see a tiny sliver of text! (Zoom in and pan around if you can’t see it.) We’re seeing this because the original mask was not perfectly centered on-screen. When we ran the script, we moved its anchor point to the mask’s center.
Tweak the Y Rotation ever so slightly by typing –89.9.
Select line 2 and press I to see that once again, we’re close but not perfect.
Set its Y Rotation to –90.1°.
Go to the bottom left of the Composition panel and click the Toggle Mask and Shape Path Visibility button
 so you see the layer handles once more.
Press Spacebar to preview the entire animation. Looks good, but the second line could have a bit more oomph.
Adding Realistic Oscillating Overshoot Keyframes
Let’s jazz up line 2’s rotation by adding multiple overshoot keyframes. To simulate a realistic loss of momentum over time, let’s give it some back and forth oscillation that will reduce by half each time it spins.
With line 2 still selected, press J or K until you get to its second keyframe at 10;00.
To make its initial overshoot a bit more dramatic, bump up the Y Rotation to 0x+20°.
Press the K key to advance to the layer’s final keyframe at 10;04.
We don’t want this line to rest quite yet! Let’s change the value so it moves in the opposite direction from the previous keyframe, but reduced by half. Our previous tilt was +20°, so change the value to 0x–10°.
Let’s stagger each decelerating overshoot keyframe by six frames instead of four. Move the keyframe two frames over to 10;06 by pressing Opt–Right Arrow (Mac) or Alt–Right Arrow (Windows) twice.
-
At the timecodes listed below, create the remaining Y Rotation keyframes that swing in the opposite direction as the previous one, but at half its distance:
10;12: 0x+5° 10;18: 0x–2.5° 10;24: 0x+1° 11;00: 0x+0° Excluding the initial keyframe at 9;20, draw a selection around all the diamond-shaped linear keyframes. Press F9 to add an Easy Ease.
To see, graphically, what a “decaying oscillation” looks like, at the top middle of the Timeline, click the Graph Editor icon
 .
.At the bottom of the graph, click Fit all graphs to view
 .
.When you’re done, click the Graph Editor icon
again.Press I to get to the layer’s in point, then press the Spacebar to preview from this point in time. Awesome!
Syncing the Text Color Changes with Their Graphic’s Spin
We don’t need to do anything fancy to change the color of the three covered up words in line 1 to match the border color of their associated illustrations. All we need is to shorten their layers and turn on their visibility, so they appear when each graphic is no longer distorted by 3D perspective.
When duplicate layers with the same position are stacked on top of each other, the bottom layer will form a bit of a halo behind the top layer. Because the text colors are different in our case, this is really undesirable! This is why there are three white shape layers that will cover up each word. To see them in our layer stack, go to the top middle of the Timeline and click the big Shy button
.Go to the top of the layer stack and click and drag in the eye column
until all the layers from space white to staff (Layers 1–6) are visible on-screen.-
Keeping the order for the three shape layers, drag each individual word layer on top of its corresponding white layer.
When done, space should be Layer 1, tech should be Layer 3, and staff should be Layer 5. Remember that these three layers contain the color that gets revealed.
Move the playhead to 8;05 (halfway through the left graphic’s first animation, a few frames before it overshoots its final destination).
Select the space and space white layers, then press Opt–[ (Mac) or Alt–[ (Windows) to set their in points here. You could also click into the In column and type in 805.
-
Trim the in points for the remaining four layers as follows:
tech layers: 8;21 staff layers: 9;09 Press Spacebar to preview the entire animation. Stupendous! Let’s start transitioning away from this layout.
Moving the Lines of Text Off-Screen: Ready, Set, Exit!
In real life, it often takes a bit of preparation to perform an action, so a person or object first does the opposite of what they are about to do to get that extra oomph. Think of a kid taking a deep breath before blowing out all the candles on their birthday cake, or a pitcher moving backward so they can then throw the ball forward at blazing speed.
This type of motion is called anticipation. It’s one of the 12 main principles that are used in both traditional and computer animation. Let’s incorporate it into the exit animation for our two lines of text!
Move the playhead to 11;18, when the lines of text will get ready for their exit.
Select the line 1 layer, Shift–click on the line 2 layer, and press the P key.
Draw a selection box around the Position property for both layers.
Separate Dimensions and deselect all.
Reselect the line 1 layer and click the stopwatch
next to X Position.So we can keyframe the anticipation four frames later, move the playhead to 11;22.
-
Set X Position to 978, moving it slightly to the right, in anticipation for its leftward exit.
NOTE: To learn more about anticipation and the other 11 principles of animation, watch animator Alan Becker’s series of videos at tinyurl.com/alan-becker-12-principles
Move the playhead to 12;06, when we want line 1 to finish its exit.
Change the line 1 layer’s X Position to –550 so it’s totally off-screen left.
Select the second keyframe
(at 11;22) and press F9 to Easy Ease it.-
Press J until you get to the first keyframe
at 11;18, then slowly drag the playhead to scrub through the sequence.You should see that not long after the playhead leaves the anticipation keyframe to move toward its exit, portions of the text are cut off by something invisible. Oops, that’s our three white shape layers! Let’s fix the issue using parenting.
Select the space white layer, then Cmd–click (Mac) or Ctrl–click (Windows) on the tech white and staff white layers.
Go back to 11;18 using the J or K keys.
Set line 1 (the seventh layer) as their parent. Remember that you can either drag a selected layer’s pick whip
or go into its Parent & Link menu.Press K to get to the second keyframe at 11;22.
This is when we want the second line to start preparing for its exit. Select the line 2 layer and keyframe its X Position by clicking the stopwatch
.-
Finish keyframing the line 2 layer’s X Position as follows:
11;26: 964 (moving it about 10 pixels to the right) 12;08: –355 (so it’s fully off-screen to the left) Select the second keyframe
(at 11;26) and press F9 to add an Easy Ease.To trim the out points, select the space layer and Shift–click on line 2 (Layers 1–8).
While still at 12;08, press Opt–] (Mac) or Alt–] (Windows) so they are fully invisible in the next frame.
Stacking the Graphics to Form a Solid Color Square
As the text makes its exit, we want the left and right illustrations to move toward the center, where they will get covered over by the gold-bordered graphic.
We want the graphics’ exit animation to start at 11;24, so move the playhead there.
Deselect all, then select the staff pic layer, Shift–click on the space pic layer, and press P.
The tech pic is positioned in the center of the screen, so we do not need to move it. Just look at this layer’s first Position value, which should be 961. This is the X Position we want for the other two layers!
Cmd–click (Mac) or Ctrl–click (Windows) on the tech pic layer name to remove it from the selection.
In any of the remaining two selected layers, click to activate their stopwatches
.Move the playhead to 12;10, when the left and right graphics will stack under the center one.
In any selected layer, set the first Position value to 961.
Draw a selection around the first set of keyframes at 11;24 and press F9 to add an Easy Ease.
Deselect all, then click on the tech pic layer and Shift–click on the space pic layer.
Once these graphics get covered up by the gold one, we don’t want to see them. To trim their out points, press Cmd-Left Arrow (Mac), Page Up, or Fn–Up Arrow, to go back a frame (12;09).
Press Opt–] (Mac) or Alt–] (Windows) so the tech and space pics are fully invisible in the next frame when they layer under the gold-bordered staff pic.
Press Cmd-Right Arrow (Mac), Page Down, or Fn–Up Arrow, to return to the next frame at 12;10.
Select the staff pic layer and press Cmd–Shift–D (Mac) or Ctrl–Shift–D (Windows) to split the layer.
At this point in time, we want the top layer to change to a solid gold square. With the top layer still selected, go to Effect > Generate > Fill.
Go to the Effect Controls panel and click the swatch next to Color.
Set it to #F4BC44 (WaitingRoom’s branded gold—the same color we used for the individual word “staff”) and click OK.
Rename the split staff pic 2 layer to gold square and turn off its 3D Layer switch
because we don’t need 3D from this point onward.In the Timeline, use the arrows
 to swivel closed any open layers.
Close the 03-Leverage tab.
Back in Text Animation-MAIN, select [03-Leverage] and press I to get to its in point.
Press the B key on your keyboard, to set the Composition’s Work Area to start here.
Press the Spacebar to preview the animation from this point. Very cool!
Save the project and leave it open. We’ll continue working on it in the next exercise.