Learn how to create a Superman animation in After Effects, including syncing audio and adding text presets, creating a shape layer, adding a property to a preset, and creating a curved position motion path.
This exercise is excerpted from past After Effects training materials and is compatible with After Effects updates through 2020. To learn current skills in After Effects, check out our After Effects classes and video editing classes in NYC and live online.
Topics Covered in This After Effects Tutorial:
Syncing Audio & Adding Text Presets, Adding a Property to a Preset, Creating a Shape Layer, Creating a Curved Position Motion Path
Exercise Preview
Exercise Overview
In this exercise we’ll continue to create the Superman animation. We’ll use more Text Animation Presets, and learn how to add a property to an existing preset. We’ll also use the Convert Vertex tool to animate a shape layer’s motion path. Lastly, we’ll add and edit an additional sound effect to accompany the animation.

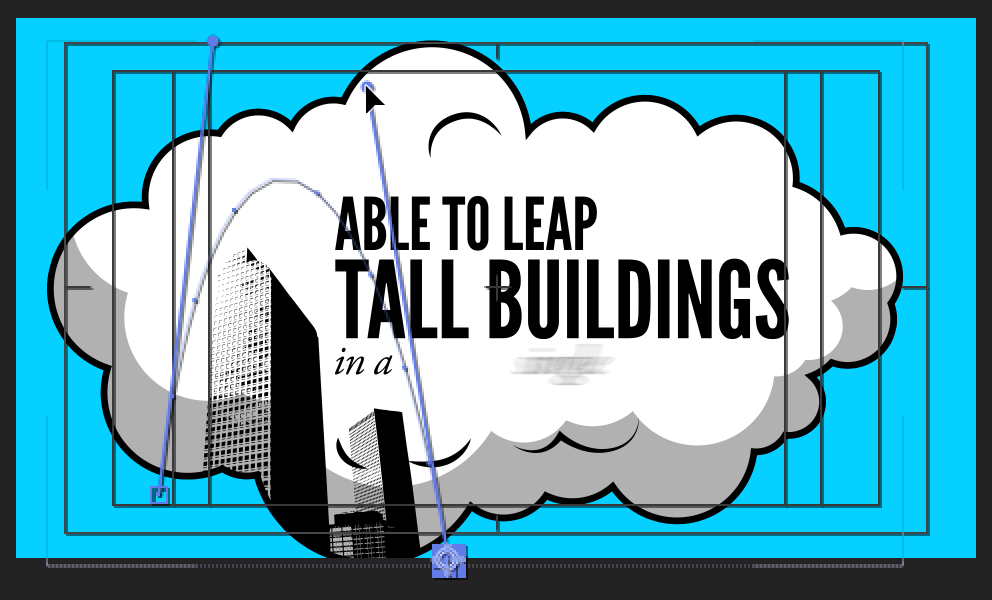
Previewing What You’ll Make in This Exercise
-
You should still have yourname-Superman.aep open in After Effects. If you closed it, re-open it now. We recommend you finish the previous exercises (B1–B2) before starting this one. If you haven’t finished it, do the following:
- Open Superman-Ready for Tall Buildings.aep (from the Superman > Finished AE Projects folder).
- Save the file as yourname-Superman.aep in the Superman folder.
On the Desktop, navigate to Class Files > After Effects Level 2 Class > Superman > Finished Clips and double–click Tall-Buildings.mov.
-
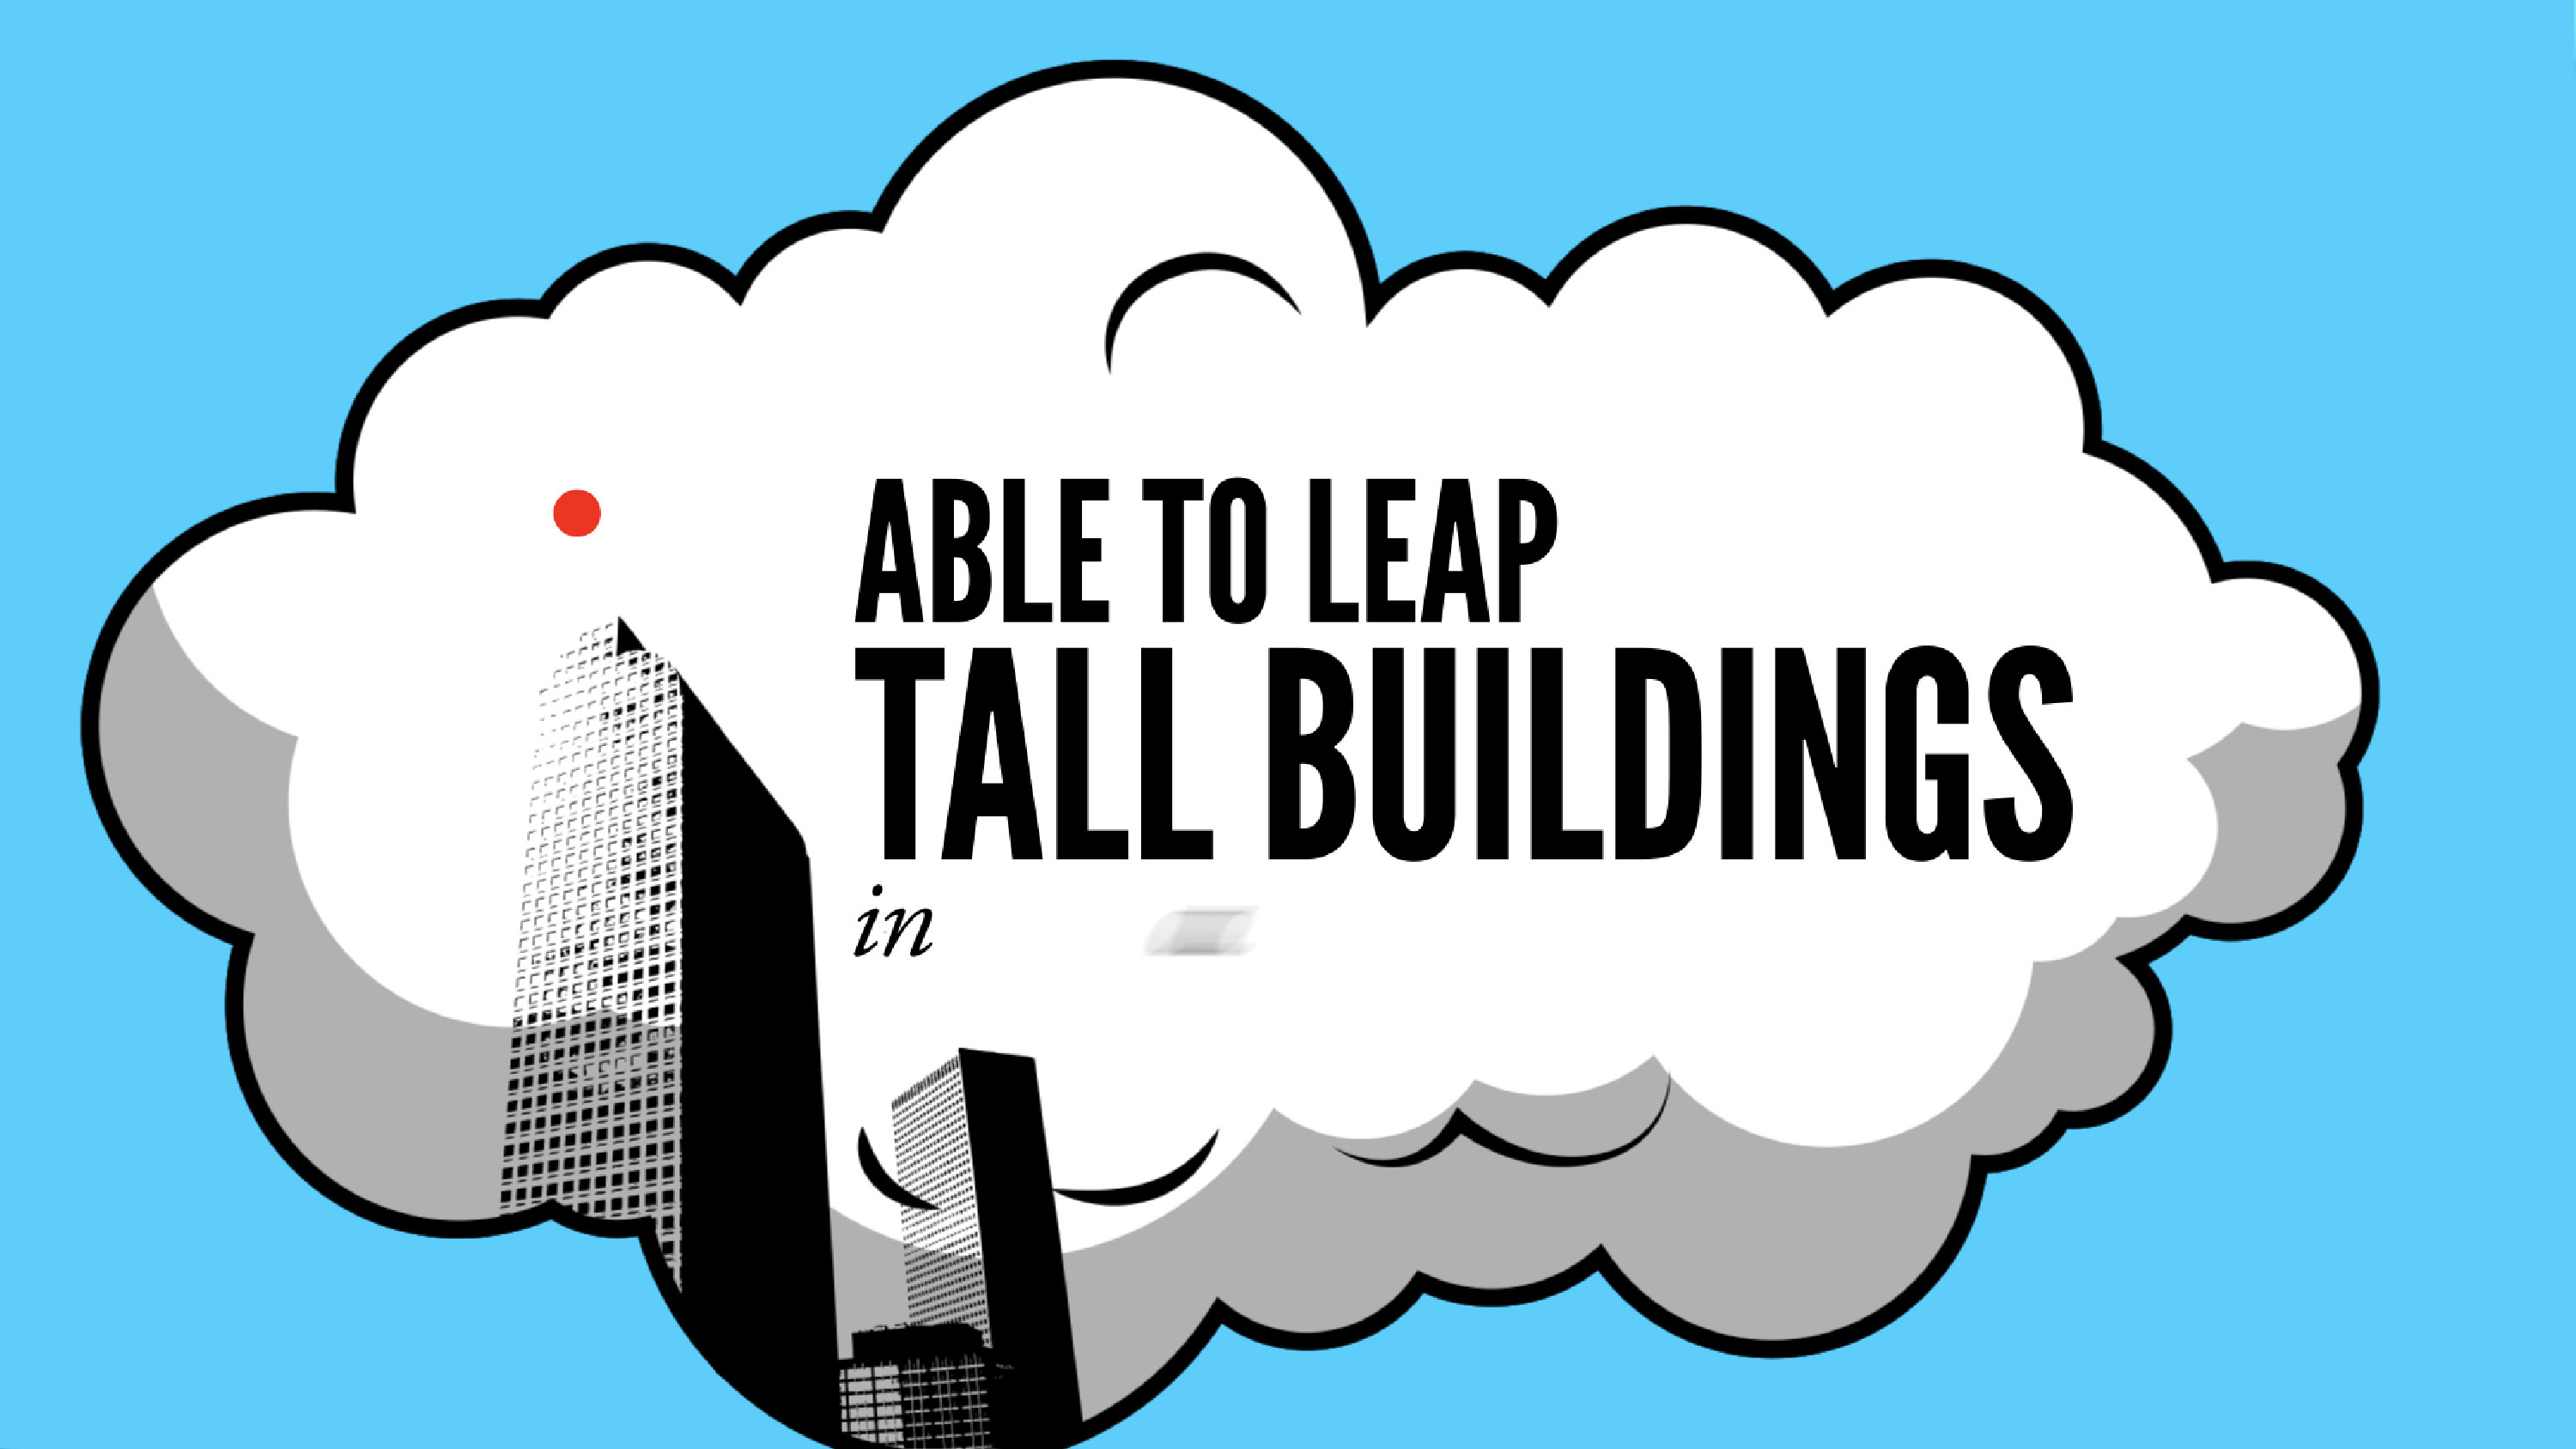
Play the video and notice the following (you may need to slide the playhead slowly):
- As the previous locomotive layout rotates and scales up, the next layout transitions through the train’s cyan stripe.
- The new layout uses more text animation presets.
- A small red dot moves in an arc over the “tall buildings”, accompanied by a slide whistle sound.
Replay the video as many times as you need—we’ll be reproducing it in this exercise. Keep it open so you can refer back to it as needed.
Reverse Parenting to a Static Layout
Similar to the previous exercise, we’ll use reverse parenting to transition from the second locomotive layout to the static third layout, which we’ll continue to animate shortly.
In the Timeline, make sure you are in the Superman-MAIN tab.
Select the [02-Locomotive.mov] layer.
We want the next layout transition to begin at 5;03 so move the playhead there.
-
Select the Pan Behind (Anchor Point) tool
 and move the anchor point
  to a cyan part of the train as shown below:
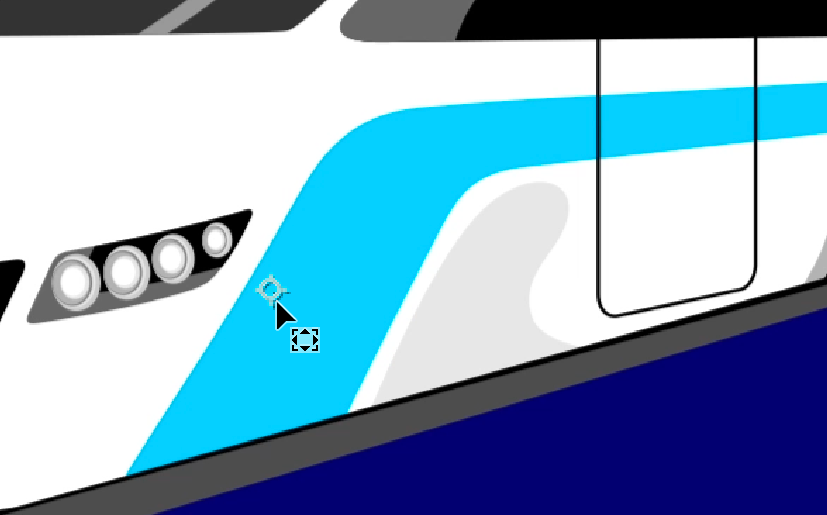
We set our Anchor Point values to 1160,792 and Position values to 1106,504.7.
If you haven’t already, expand [02-Locomotive.mov] layer’s Transform properties.
-
To the left of Position, Scale, and Rotation, click the stopwatch
 to add three keyframes.
Keep in mind that the Scale value is very small, as the layer is parented to the [01-Speeding Bullet-PC] layer, which has a huge scale value!
Move the playhead to 5;09.
Change the Scale value to 25%.
Change the Rotation value to 0x+145°.
We want to move the Position of the layer upwards and to the left, to fill the screen almost entirely with the cyan color of the train stripe. Set the Position values to 1118,495.
Move the playhead back to 5;03, where we’ll add the third layout.
At the top of the Timeline, click on Superman PSD comp to switch to its tab.
Select 03-Tall Buildings and copy it.
Return to the Superman-MAIN tab and paste it. The layer should be above [02-Locomotive.mov].
Press the left bracket ([) key so that the layer’s in point becomes 5;03.
Press the K key to move the playhead to 5;09, where we want to parent the layers.
Reverse parent these layers by going to the [03-Tall Buildings] layer’s Parent & Link menu on the right and changing None to 3. 02-Locomotive.mov.
Lastly, we want to turn on Motion Blur
 for [03-Tall Buildings]. Try to turn it on, but notice that After Effects won’t let us!
Turn off Continually Rasterize
 , and notice that the Motion Blur switch becomes available again. We want to have both switches on, so to work around this, we’ll need to go into the composition and turn on Motion Blur for all the layers individually.
Make sure Continually Rasterize
is switched back on.Double–click [03-Tall Buildings] to open it in a new Timeline tab.
Locate the Motion Blur button
above the layers, and click and drag down the column to switch motion blur on for all the layers.Switch back to the Superman-MAIN tab.
Under the [02-Locomotive.mov] layer, select the first column of keyframes (at 5;03).
Press Cmd–Shift–F9 (Mac) or CTRL–Shift–F9 (Windows) to add an Easy Ease Out.
Scrub through to check that the new layout is transitioning nicely through the train’s cyan stripe. We’re ready to animate the third layout!
Swivel closed [02-Locomotive.mov].
To the left of the layer, click the Audio switch
 to turn off the sound.
Syncing Audio & Adding Text Presets
To animate the text of the third layout in time with the audio, we’ll copy the corresponding section of audio into the layout pre-comp.
Move the playhead to 5;09.
Select the audio layer [Superman-1940-no4.mp4] and go to Edit > Split Layer.
The second part of the audio should already be selected. Copy it.
Let’s keep our audio layer intact in case we need to do something with it later. Go to Edit > Undo Split Layer or use the keystroke Cmd–Z (Mac) or CTRL–Z (Windows). After Effects will still remember that you copied the layer when it started at 5;09.
Double–click [03-Tall Buildings] to open the composition tab.
Paste (Cmd–V (Mac) or CTRL–V (Windows)) the audio layer. It should be the topmost layer.
-
So that we can animate the text in time with the audio, let’s set the correct in point. In the [Superman-1940-no4.mp4] layer, go to the In column and click on the value.
If you can’t see it, CTRL–click (Mac) or Right–click (Windows) on the Layer Name or Source Name column. Go to the Columns menu and check on In.
In the Layer In Time dialog that pops up, set it to 6 (0;06) and click OK.
At the bottom of the Composition panel, click the Choose grid and guide options button
 and select Title/Action Safe to turn on the grid, if it’s not already.
Click on ABLE TO LEAP and Shift–click the in a single bound! layer to select all three text layers.
Go to Layer > Create > Convert to Editable Text so that we can use text presets on them.
We’ll animate ABLE TO LEAP first. Make sure the playhead is still at 0;06, deselect everything, and select the ABLE TO LEAP layer.
Make sure the Effects & Presets panel is open (Window > Effects & Presets).
In the Effects & Presets panel’s search field
 , type large scale.
Double–click Large Scale to apply it to the text layer.
Select the layer, and press the U key to view the new keyframes. We need to adjust the timing of the animation to make it go faster.
Move the playhead to 0;16.
Select the second keyframe
 , and start dragging it left. As you get close to the playhead at 0;16, hold Shift so it snaps to it.
Scrub through the animating text so far, and notice that the letters are appearing in a random order. This looks a bit weird so let’s fix it.
With ABLE TO LEAP selected, swivel open Text > Animator 1 > Range Selector 1 > Advanced. (You may need to close
 up the layer and then open it again.)
To the right of Randomize Order, click on the word On to change it to Off.
Scrub through again and notice that the letters now scale up in order.
This layer is done, so swivel it closed.
Move the playhead to 0;22 where we’ll animate in the next line of text.
Select the TALL BUILDINGS layer.
In the Effects & Presets panel’s search field
, type scale up w.Double–click Scale Up Word to apply it to the layer.
With the layer selected, press the U key.
Move the playhead to 1;03.
Select the second keyframe
, start dragging and hold Shift to snap it to the playhead at 1;03.Collapse this layer.
Move the playhead to 1;09 and select the in a single bound! layer.
Go to Animation > Recent Animation Presets and select Straight In By Word, to apply the same effect we used in the first layout.
-
Press Spacebar to preview our text animation.
At the moment, the in a single bound! text is neither off-screen or invisible before we hear the corresponding audio, and animates on much too slowly. To fix this, we’ll add a property to the animation preset and speed it up a little.
Adding a Property to a Preset
Firstly, to fix the timing of the animation, move the playhead to 2;02.
With in a single bound! still selected, press the U key to view the keyframes.
Select the second keyframe
, start dragging and hold Shift to snap it to the playhead at 2;02.Press UU to view all the settings that have changed from the defaults.
-
To the right of Animator 1, and next to Add, click on the arrow
 to open the Property menu and select Opacity.
This will add an Opacity property to our existing animation preset.
The new Opacity property should still be selected. Change the Opacity value to 0%.
Above the Timeline, switch on the large Motion Blur button
.Press Spacebar to preview. The text is looking good!
Creating a Shape Layer
As we saw in the preview video, this layout also contains an animated red dot. We’ll create the dot shape layer, and animate it so that it appears to jump over the buildings.
-
Swivel any open layers closed and click in an empty area to deselect everything.
Remember that to create a Shape Layer, everything must be deselected. If a layer is already selected, After Effects will try and mask the selected layer instead.
In the Tools panel, click and hold on the Rectangle tool
 and select the Ellipse tool
  .
.In the Tools options panel to the right of the tools, you’ll see two options appear, for Fill and Stroke. First make sure the checkbox next to Bezier Path is NOT turned on.
Still in the Tools panel, click on the blue word Fill (not its swatch!).
Make sure the Solid Color (second) swatch
 is highlighted, the Blend Mode is set to Normal, and Opacity is 100%.
Click OK.
Next to Fill, click on the color swatch.
Enter #F41F14 (a bright red) and click OK.
Click on the blue word Stroke, and make sure None
 is selected. Click OK.
-
Using the screenshot below as a reference, hold Shift and draw a small circle anywhere on the composition. We’ll position it shortly.
Creating a Position Motion Path
With Shape Layer 1 selected in the Timeline, press UU.
-
Under Transform: Ellipse 1, set the Position values to 0,0.
NOTE: Remember that the shape group’s Transform properties are different from the layer’s Transform properties. It’s easiest to zero out the Position values in the shape group because these values are based on the center of the screen.
Click on the layer name and then rename it to dot.
Drag the dot layer between the skyscrapers and cloud layers.
So that we don’t accidentally change the shape of the dot, go to the bottom left of the Composition panel and make sure Toggle Mask and Shape Path Visibility
 is turned off (gray).
Move the playhead to 1;16.
Hit the Left Square Bracket key [ to start this layer here.
Press the P key to bring up the traditional Position property we use to animate.
-
Change the Position values to 284,952. (Remember that these values are based on the composition frame’s top-left corner.)
The dot should now be at the bottom-left of the buildings (below the cloud).
To the left of Position, click the stopwatch
to add a keyframe.Move the playhead to 1;24.
Change the Position values to 864,1084. This will be the dot’s final resting place, once it has jumped over the buildings.
In the Tools panel, click and hold the Pen tool
 and select the Convert Vertex tool
  from the menu that appears.
-
Between these two Position keyframes, we’ll create an arced path for the dot to follow. At the moment, the two dot keyframes will be showing as square vertices with a straight line path between them. The Convert Vertex tool
will allow us to manipulate the path between these two vertices.Using the Convert Vertex tool
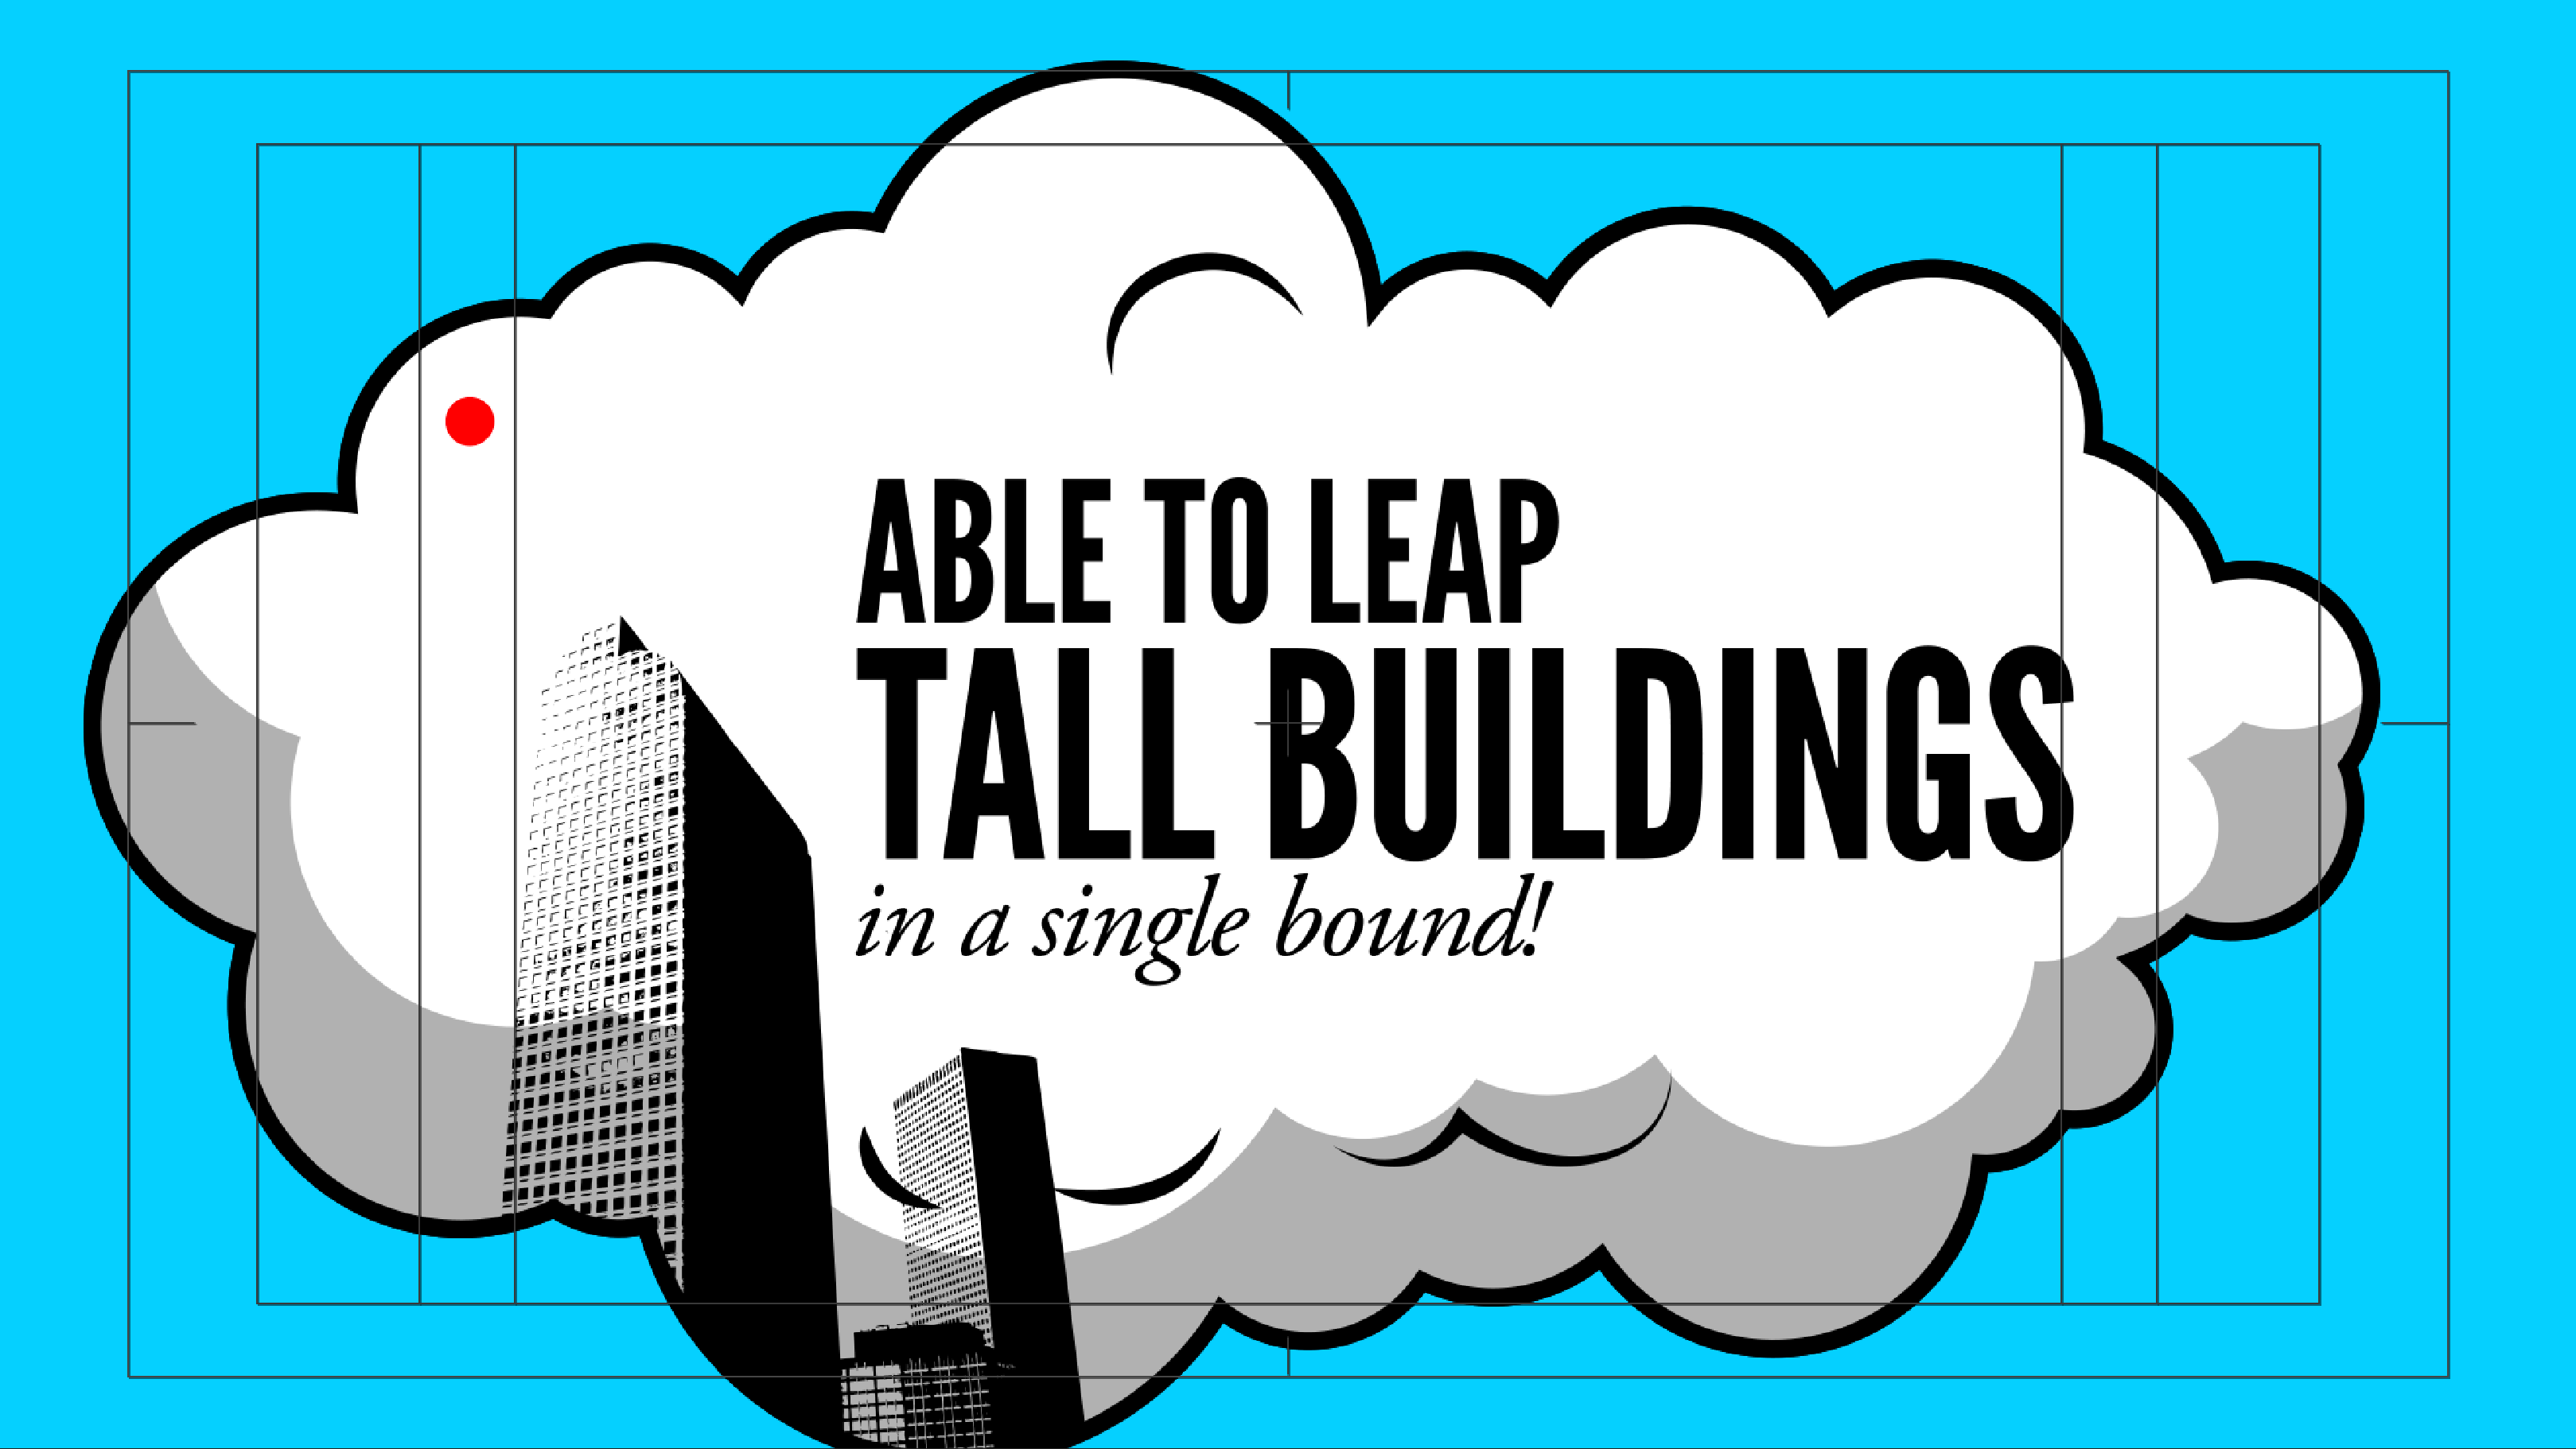
, click on the left vertex and drag upwards, releasing the mouse at the top of the title safety grid. Use the image below as a guide: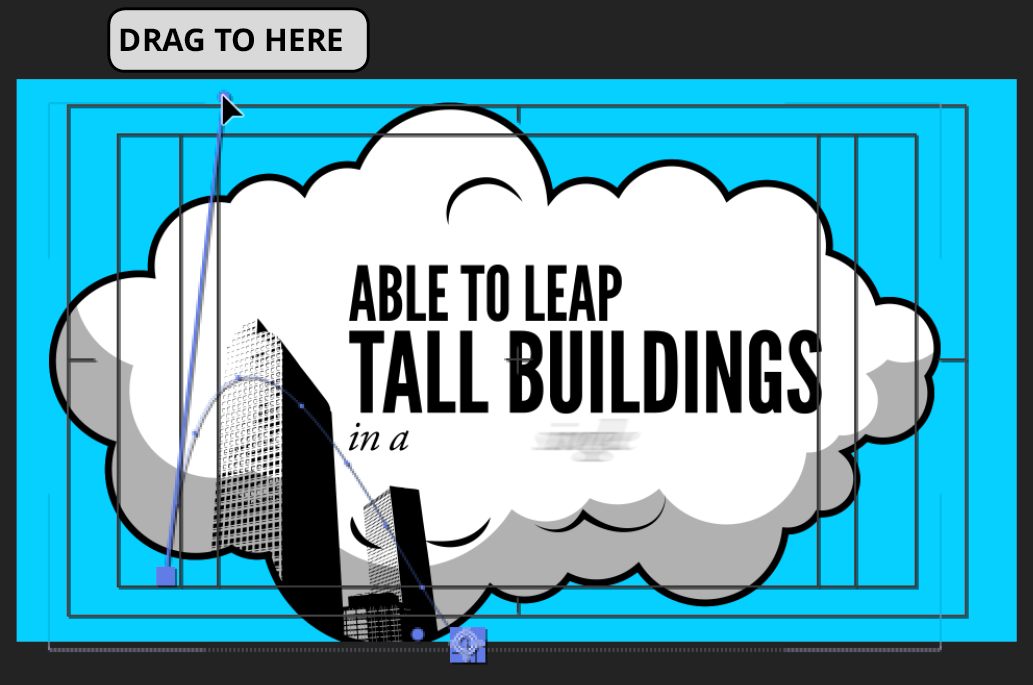
-
Click on the right vertex and drag upwards to the inside of the top of the cloud (as shown below). You should now have an arc over the top of the buildings. Feel free to click and drag on either handle (the rounded end) to adjust the path.
-
In the Timeline, select the cloud layer so we can see the dot when we scrub through to check our work. Scrub the playhead through the two keyframes to view the dot animating over the top of the buildings.
Cute! There is one slight problem we need to fix—our dot can be seen outside of the cloud at both its start and end points, but we only want it visible within the cloud.
To hide the dot when it’s outside of the cloud, we’ll create an alpha matte of the cloud layer and add it above the dot layer. With the cloud layer selected, go to Edit > Duplicate.
Drag cloud 2 above the dot layer.
Select the dot layer.
Make sure the TrkMat column is showing. If you don’t see it, click on Toggle Switches/Modes at the bottom of the Timeline.
-
Set the TrkMat (Track Matte) menu to Alpha Matte “cloud 2”.
The dot will now only be visible in any area where the cloud’s alpha transparency is at 100%.
Editing Audio
To complete this layout, we need to add the cartoon clown slide sound effect that accompanies the animated dot.
From the Project panel’s Assets folder, drag Clown-Slide-Sound-Effect.mp3 to the Timeline above all the other layers.
-
Let’s take a look at the audio layer’s Waveform. With the [Clown-Slide-Sound-Effect.mp3] layer selected, press LL (two L s in quick succession) to bring it up.
We only want to use the end sound effect so we’ll need to isolate the last waveform.
Move the playhead to 6;18, a little before the sound effect begins.
Go to Edit > Split Layer.
Delete the first section of the audio.
Move the playhead to 7;27, a little after the sound effect ends.
With the audio layer selected, go to Edit > Split Layer.
Delete the last part of the audio (the topmost layer).
Select the remaining [Clown-Slide-Sound-Effect.mp3] layer, and under the In column, click on the timecode (currently 6;18).
In the Layer In Time panel that opened, type in 101 and click OK.
The audio is a little too loud for our liking. Go to Window > Audio to open the Audio panel.
With the layer selected, drag the middle slider
 downward to –7 dB.
-
So that the clown slide effect will also play in the main comp, we’ll copy the audio file into Superman-MAIN, and edit its in point to play at the correct time.
Select [Clown-Slide-Sound-Effect.mp3], and press the I key.
Copy the layer.
Switch to the Superman-MAIN tab, and paste the layer.
Under the In column, click on the timecode. Set it to 604 and click OK.
Drag [Clown-Slide-Sound-Effect.mp3] down so that it’s above the other audio layer. (It should become Layer 5.)
Next to [03-Tall Buildings], click on the Audio switch
to turn off its sound.-
Press the Spacebar to preview the first three layouts we have animated so far.
TIP: If you find the preview to be slow, reduce the Resolution.
Do a File > Save and leave this project open. We’ll continue working on it in the next exercise.