Before beginning your journey with Adobe After Effects, a careful setup is crucial for the smooth functioning of the software. This guide covers the step-by-step process of setting preferences in Adobe After Effects 2020, which ensures that all future projects will work as expected.
Key Insights
- The guide uses Adobe After Effects 2020 for the setup, but most steps should work similarly for older or newer versions as well.
- Setting preferences before starting a project ensures that the selected preferences stay the same for all future projects.
- Various preferences mentioned in the guide include "Show Tool Tips", "Create Layers at Composition Start Time", "Default Spatial Interpolation to Linear", and "Preserve Constant Vertex and Feather Point Count when Editing Masks".
- The guide also emphasizes enabling options that ensure smooth working of the software like "Synchronize Time of All Related Items", "Mute Audio When Preview is Not Real-time", and "Use Label Color…".
- It is recommended to uncheck "Use Default File Name and Folder" to make sure the files exported from After Effects will save to a folder chosen by the user each time.
- For additional information about After Effects preferences, users can refer to Adobe’s After Effects Preferences Reference.
Get started with Adobe After Effects by following this comprehensive guide to setting up preferences, ensuring your projects run smoothly and effectively.
This exercise is excerpted from past After Effects training materials and is compatible with After Effects updates through 2020. To learn current skills in After Effects, check out our After Effects classes and video editing classes in NYC and live online.
Complete the following setup prior to beginning any exercises.
Exercise Preview

Exercise Overview
To get started with this book, you’ll need to do some setup first. It’s important to do this exercise, or some things later in the book will not work correctly!
Setting Preferences
-
Launch Adobe After Effects.
NOTE: This book has been tested with After Effects 2020. If you’re using an older or newer version, most things should still work the same or similarly.
If you’re seeing a Home screen, close the window.
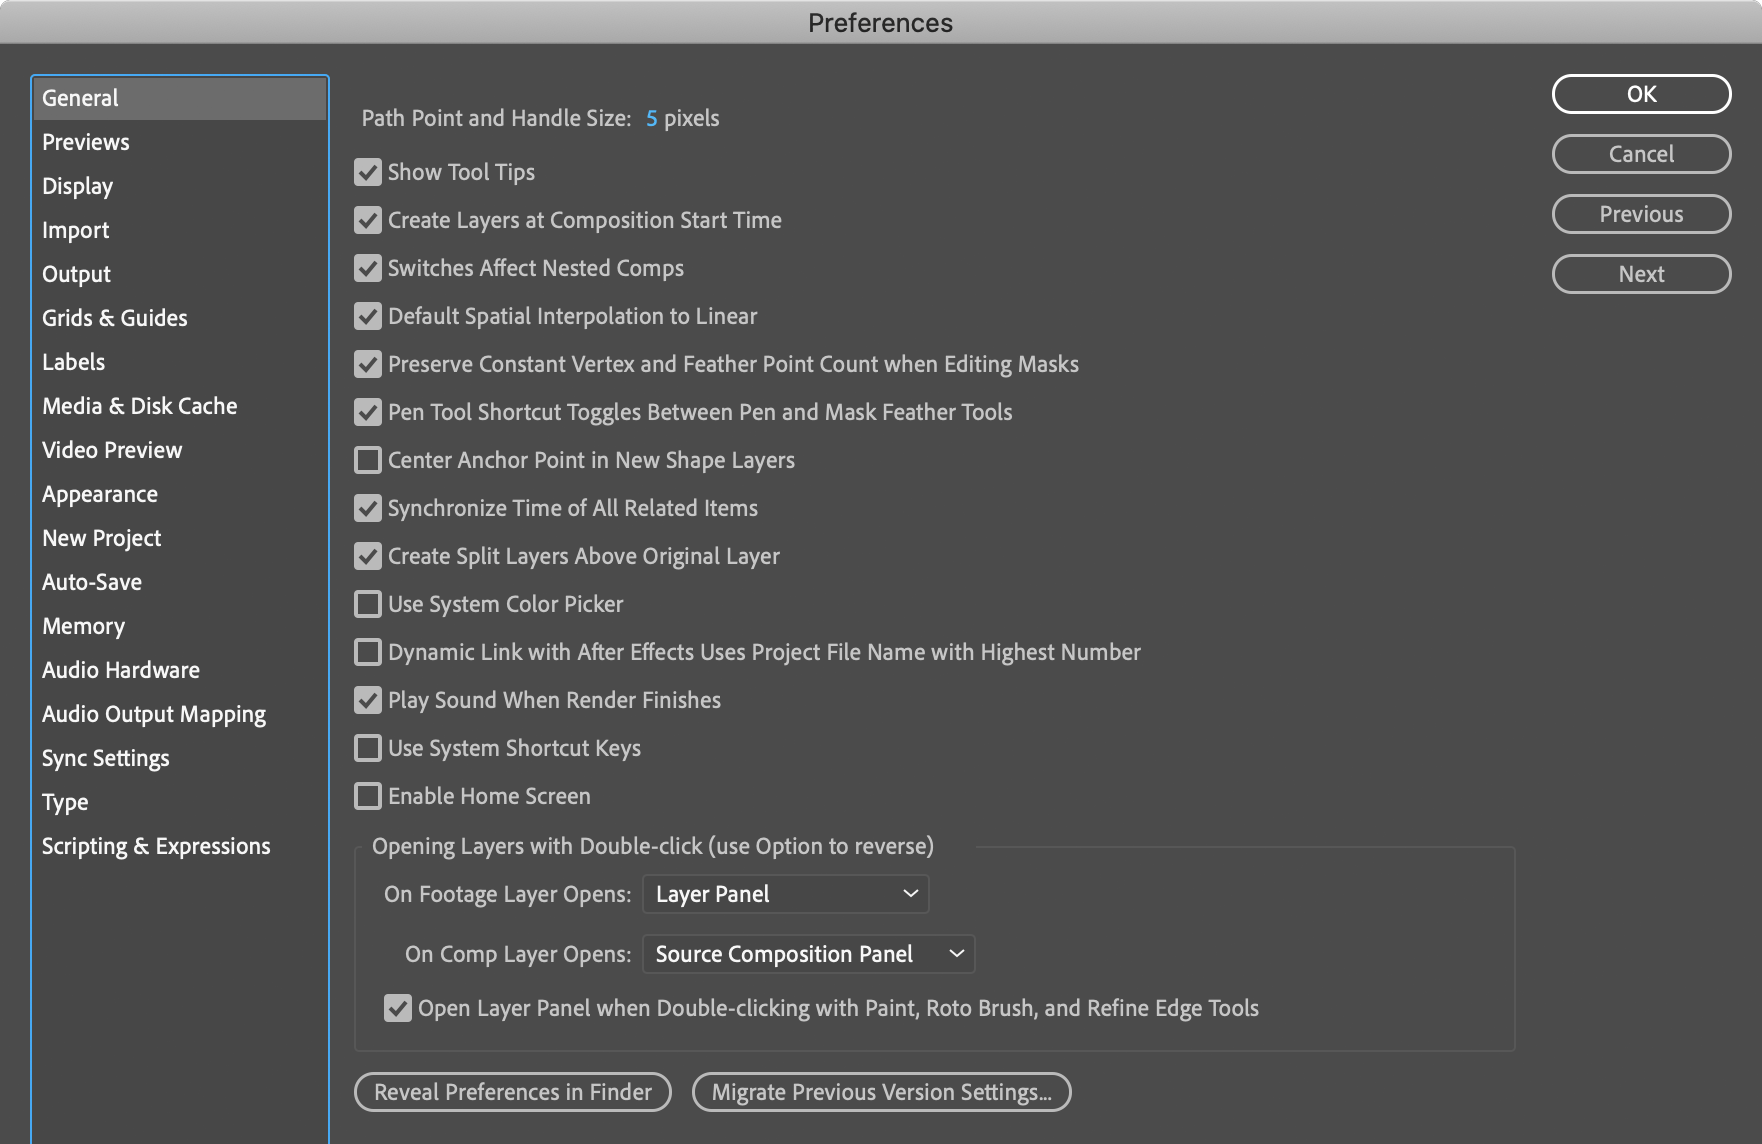
Like other Adobe software, setting preferences before working on a project will ensure the preferences we select will stay this way for all future projects. Go to After Effects (Mac) or Edit (Windows) menu and choose Preferences > General.
Make sure Show Tool Tips is checked on, so you’ll see helpful tips when hovering over interface elements.
Make sure Create Layers at Composition Start Time is checked on, so the layers you create start at the same time as your movie does.
-
Make sure Default Spatial Interpolation to Linear is checked on, to ensure that all of the animations we’ll create work as expected in this book.
If checked on, this makes path corners default to angled corners instead of rounded curves (think straight lines instead of smooth curves).
-
Make sure Preserve Constant Vertex and Feather Point Count when Editing Masks is checked on.
We’ll be creating masks to hide parts of our layers, and we want them to always have the same number of points throughout their animation.
-
Make sure Synchronize Time of All Related Items is checked on.
A lot of the work involves adding animation at a specific point in time. This preference ensures the playhead that marks the current time works as expected in this book.
-
Make sure Create Split Layers Above Original Layer is checked on.
When we split video layers into two parts. This preferences puts the new layer above the original layer (instead of below).
-
Mac Users Only: Uncheck Use System Shortcut Keys.
This ensures all After Effects shortcuts work, even if they conflict with the macOS.
Uncheck Enable Home Screen (we don’t find it useful).
On the left of the Preferences window, click on the Previews section.
-
Under Audio, check on Mute Audio When Preview is Not Real-time.
After Effects is not a real-time program, which means that individual frames of picture and audio must get loaded into the computer’s memory before they can play back normally. Audio sounds creepy when it loads frame by frames, so we don’t want to hear it unless it’s real-time.
On the left of the Preferences window, click on the Display section.
-
Under Motion Path, select All Keyframes.
Motion Paths help us see the journey that our layers take as they change position. We want to see all our keyframes whenever we select a layer.
On the left of the Preferences window, click on the Output section.
Uncheck Use Default FIle Name and Folder to make sure the files you export out of After Effects will save to a folder that you choose each time.
On the left of the Preferences window, click on the Appearance section.
-
Make sure both of the Use Label Color… options are checked on.
Label Colors help us organize and keep better track of our layers.
-
Make sure Cycle Mask Colors (uses label colors) is checked on.
Sometimes we’ll need more than one mask. To help track of these masks we want each mask to have a different color.
Check on Use Contrasting Color for Mask Path.
On the left of the Preferences window, click on the Auto-Save section.
Make sure Save every is checked on and set it to 5 minutes.
Make sure Save when starting render queue is checked on.
Next to Maximum Project Versions, set it to 5.
Under Auto-Save Location, select Next to Project.
At the top right of the window, click OK.
To ensure that the preferences get saved for the future, quit After Effects by pressing Cmd–Q (Mac) or CTRL–Q (Windows).
Adobe’s After Effects Preferences Reference
For more about After Effects preferences, feel free to read Adobe’s reference at helpx.adobe.com/After Effects/using/preferences.html


