Delve into the fascinating world of rotoscoping with this comprehensive After Effects tutorial, exploring everything from the basics of rotoscoping to the usage of tools like the Roto Brush and the creation of masks and mattes for video editing.
This exercise is excerpted from Noble Desktop’s Adobe After Effects training materials and is compatible with After Effects updates through 2023. To learn current skills in After Effects with hands-on training, check out our After Effects Bootcamp, Motion Graphics Certificate, and video editing classes in-person and live online.
Topics Covered in This After Effects Tutorial:
What is Rotoscoping?, Using the Roto Brush Tool, Refining the Roto Brush Properties
Exercise Preview

Exercise Overview
In this exercise you’ll learn how to use rotoscoping to mask out parts of a live–action video.

Previewing the Final Video
- Let’s see a preview of what you’ll be making. If you’re in After Effects, keep it open but switch to your Desktop.
- On the Desktop, navigate to Class Files > After Effects Advanced Class> Rotoscoping > Preview Movie and double–click Flying Over Donuts.mp4.
-
Notice the following:
- There are animated graphics placed on top of a video.
- The graphics seem to be matching the movement of the video and also appear from behind one of the elements in the video.
Replay the video if you need to, and close it when done.
Setting up the Workspace
In After Effects, go to Window > Workspace > Standard.
Choose Window > Workspace > Reset “Standard” to Saved Layout.
-
If the After Effects window does not fill the screen, maximize it:
Mac: At the top left of the window, click the green button (the third button). Windows: At to the top right of the window, click the Maximize button (the middle button).
Getting Started
In After Effects, if you have a project open, choose File > Save.
-
Choose File > Open Project and:
- Navigate to Desktop > Class Files > After Effects Advanced Class > Rotoscoping.
- Double–click on Rotoscoping—Started.aep to open it.
-
Choose File > Save As > Save As and:
- Name the file Your Name—Rotoscoping.aep and
- Save it into Desktop > Class Files > After Effects Advanced Class> Rotoscoping.
What is Rotoscoping?
In animation and visual effects the term rotoscoping has many meanings. One example of rotoscoping in animation is the use of video or film footage as in films such as Richard Linklater’s A Scanner Darkly (2006) or Ralph Bakshi’s Fire and Ice (1983). Another use of the term, this one from the area of Visual Effects and compositing where it is used to describe the process of creating a matte or mask around an element in your video. This mask allows you to isolate an element from the rest of content of a video layer. This isolated element can then be used to composite with other elements in the scene, color corrected individually or otherwise treated separately from the rest of the elements in the video.
Setting up for Rotoscoping
In this example we have provided you with a project and composition to start with. However, normally you’ll have to create one yourself. When tracking it is necessary to make sure that the dimensions of the video you are going to track match those of your composition.
When creating a project from scratch, follow these instructions:
-
Drag your main video (the one you want to roto) into the empty Timeline panel or onto the Create a New Composition
 button located at the bottom of the Project panel.
While not absolutely necessary for rotoscoping, if you need to use the 3D Camera Tracker or MochaAE effects you will need to start with a comp that matches the footage attributes.
Rename the layer so that you can remember this is the one you want to roto.
If necessary use motion (as in the case of a screen replacement) or camera (match moving) tracking so that you can place your graphics where you need them.
Manual Rotoscoping
Manual rotoscoping is just what it sounds like. In this process, you would create a mask/matte around your objects by tracing them with the Pen tool. This process can be very tedious and it is sometimes necessary to proceed frame by frame. The most flexible and reusable way to manually rotoscope an element is to use either a shape layer or a solid layer with a mask on it as a track matte.
Add the footage you want to rotoscope to your composition.
Move to the frame of the video where you can see the element you want to rotoscope the best.
-
In the Tools panel, click on the Pen
 to activate it.
NOTE: As long as you don’t have a layer selected the Pen tool will create a new shape layer.
In the tool options, assign the shape a fill color and disable its stroke.
Use the Pen
tool to begin to outline the element. The fill color will start to cover the video.Pause your tracing and turn off the visibility of the new shape layer. You will still be able to see your path.
Continue outlining the element in this frame.
Open the shape layer options until you find the new shape’s Path property and turn on its stopwatch. This allows you to animate the mask shape.
In the Timeline move the playhead to the first or last frame where you can see your element and use the Selection tool to adjust the shape’s anchor points.
Move the playhead between the first two keyframes and adjust the shape path again.
-
Continue moving the playhead halfway between existing keyframes until you have rotoscoped the entire video.
NOTE: You will find using this halfway method that you won’t need to create keyframes for every frame of video. Some frames will have very little movement between them and the path interpolation will take care of it.
Applying the Roto Brush Tool
The Roto Brush tool in After Effects allows you to select parts of a video layer based on color similarity. In this scenario you are using the Roto Brush tool on a copy of your background video layer to create a matte.
Make a copy of the layer with the element you want to roto.
-
Rename this duplicate layer and move it above the layer you want to matte.
Delete any tracker effects you may have on this duplicate.
Switch to the Paint workspace by choosing Window > Workspace > Paint
Double–click on the layer you want to use the Roto Brush tool on. The Roto Brush tool only works in a Layer panel.
Click on the Roto Brush
 tool to activate it.
-
Adjust the brush size as necessary. The Roto Brush tool settings can be adjusted using the Brushes panel.
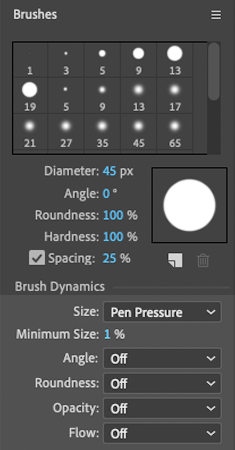
NOTE: The brush size can also be adjusted by holding down the Cmd (Mac) or CTRL (Windows) key and dragging with the mouse.
-
In the Layer panel, the roto brush appears as a green circle when you are going to add an area.
Drag the roto brush over the element you want to select. It’s important to keey the brush inside the objects you want to remain visible.
-
If you accidentally select something you don’t want, hold the Option (Mac) or ALT (Windows) key and drag over the area you want to remove.
When the Roto Brush tool is removing an area from the selection it turns into a red circle.
-
The Roto Brush tool needs to propagate into order to affect the entire video. If you are idle for a few seconds the brush will automatically begin to propagate out from your playhead.
The brush will also propagate whenever you move the playhead forward or back on the timeline.
In the Paint workspace you can view the Composition and Layer panels side by side so you can compare the roto edge you are creating with the final result.
Move the playhead forward or back and adjust the Roto Brush tool edge as necessary. Continue this until you have rotoscoped your element for every frame of your video.
When you are done with your roto work, free the propagation using the Freeze
 button at the bottom of the Layer panel.
Save your project.
Refining the Roto BrushMatte
Once created the Roto Brush edge can be refined using both the tool itself as well as the properties available to you in the Effects Controls panel. Once the Roto Brush tool has been applied and frozen you can still make adjustments to it using either the Refine Edge Tool or Roto Brush & Refine Edge properties.
If necessary, switch to the Standard workspace by choosing Window > Workspace > Standard.
-
In the Effect controls panel open the Roto Brush Matte properties.
Roto Brush Matte Properties
Feather: Similar to mask feather, this property adjusts the edge of the matte effectively fading it out.
Contrast: Increase the sharpness of the edgecan be used to reduce the edge fade caused by feathering.
Shift Edge: can be positive or negative. Negative value pull the edge in closer to the center of the matte, while positive numbers push it further away. Similar to mask expansion, this property can be used to increase or decrease the radius of the edge without having to recreate it.
Reduce Chatter:
For additional information on the Roto Brush tool you can check out the Adobe help files on the tool: https://helpx.adobe.com/After Effects/using/roto-brush-refine-matte.html
-
If necessary adjust the properties to refine your roto brush matte.
NOTE: If you are wondering why half of the effect’s properties are grayed out, it becuase they only turn on when using the Roto Brush and Refine Edge tools together. The Refine Edge tool is used when the element you are trying to roto has semi–transparent areas like hair or feathers.
Save your project.