Improve your Adobe Bridge skills with this comprehensive tutorial, designed to guide you through the process of organizing, managing, and renaming image files. Learn how to make your image management tasks easier with Adobe Bridge's visual file previews, batch file renaming, and other user-friendly features.
Key Insights
- This tutorial covers how to browse files, manage and compare images, and batch rename files in Adobe Bridge.
- The tutorial demonstrates how Adobe Bridge can enhance traditional desktop organization tasks with its visual file previews and batch file renaming features.
- Readers learn how to navigate to a specific folder, organize files into a new folder and change the size of icons for easier viewing.
- The tutorial provides step-by-step instructions for rotating images, deleting images that are not needed, and renaming images for easy identification.
- It also illustrates how to select multiple images and apply batch renaming using the "Tools" function in Adobe Bridge.
- The tutorial offers a detailed exercise that walks users through the process of downloading and installing class files, navigating to a specific folder, and manipulating images using Adobe Bridge.
Master how to organize, navigate, and manage files in Adobe Bridge with comprehensive exercises that cover everything from batch renaming images to rotating and deleting images.
This exercise is excerpted from past Adobe Bridge training materials and is compatible with InCopy updates through 2016. To learn current skills in Adobe Creative Cloud and graphic design, check out our graphic design classes in NYC and live online.
Topics Covered in This Adobe Bridge Tutorial:
Browsing Files in the Bridge, Managing & Comparing Images, Batch Renaming Images
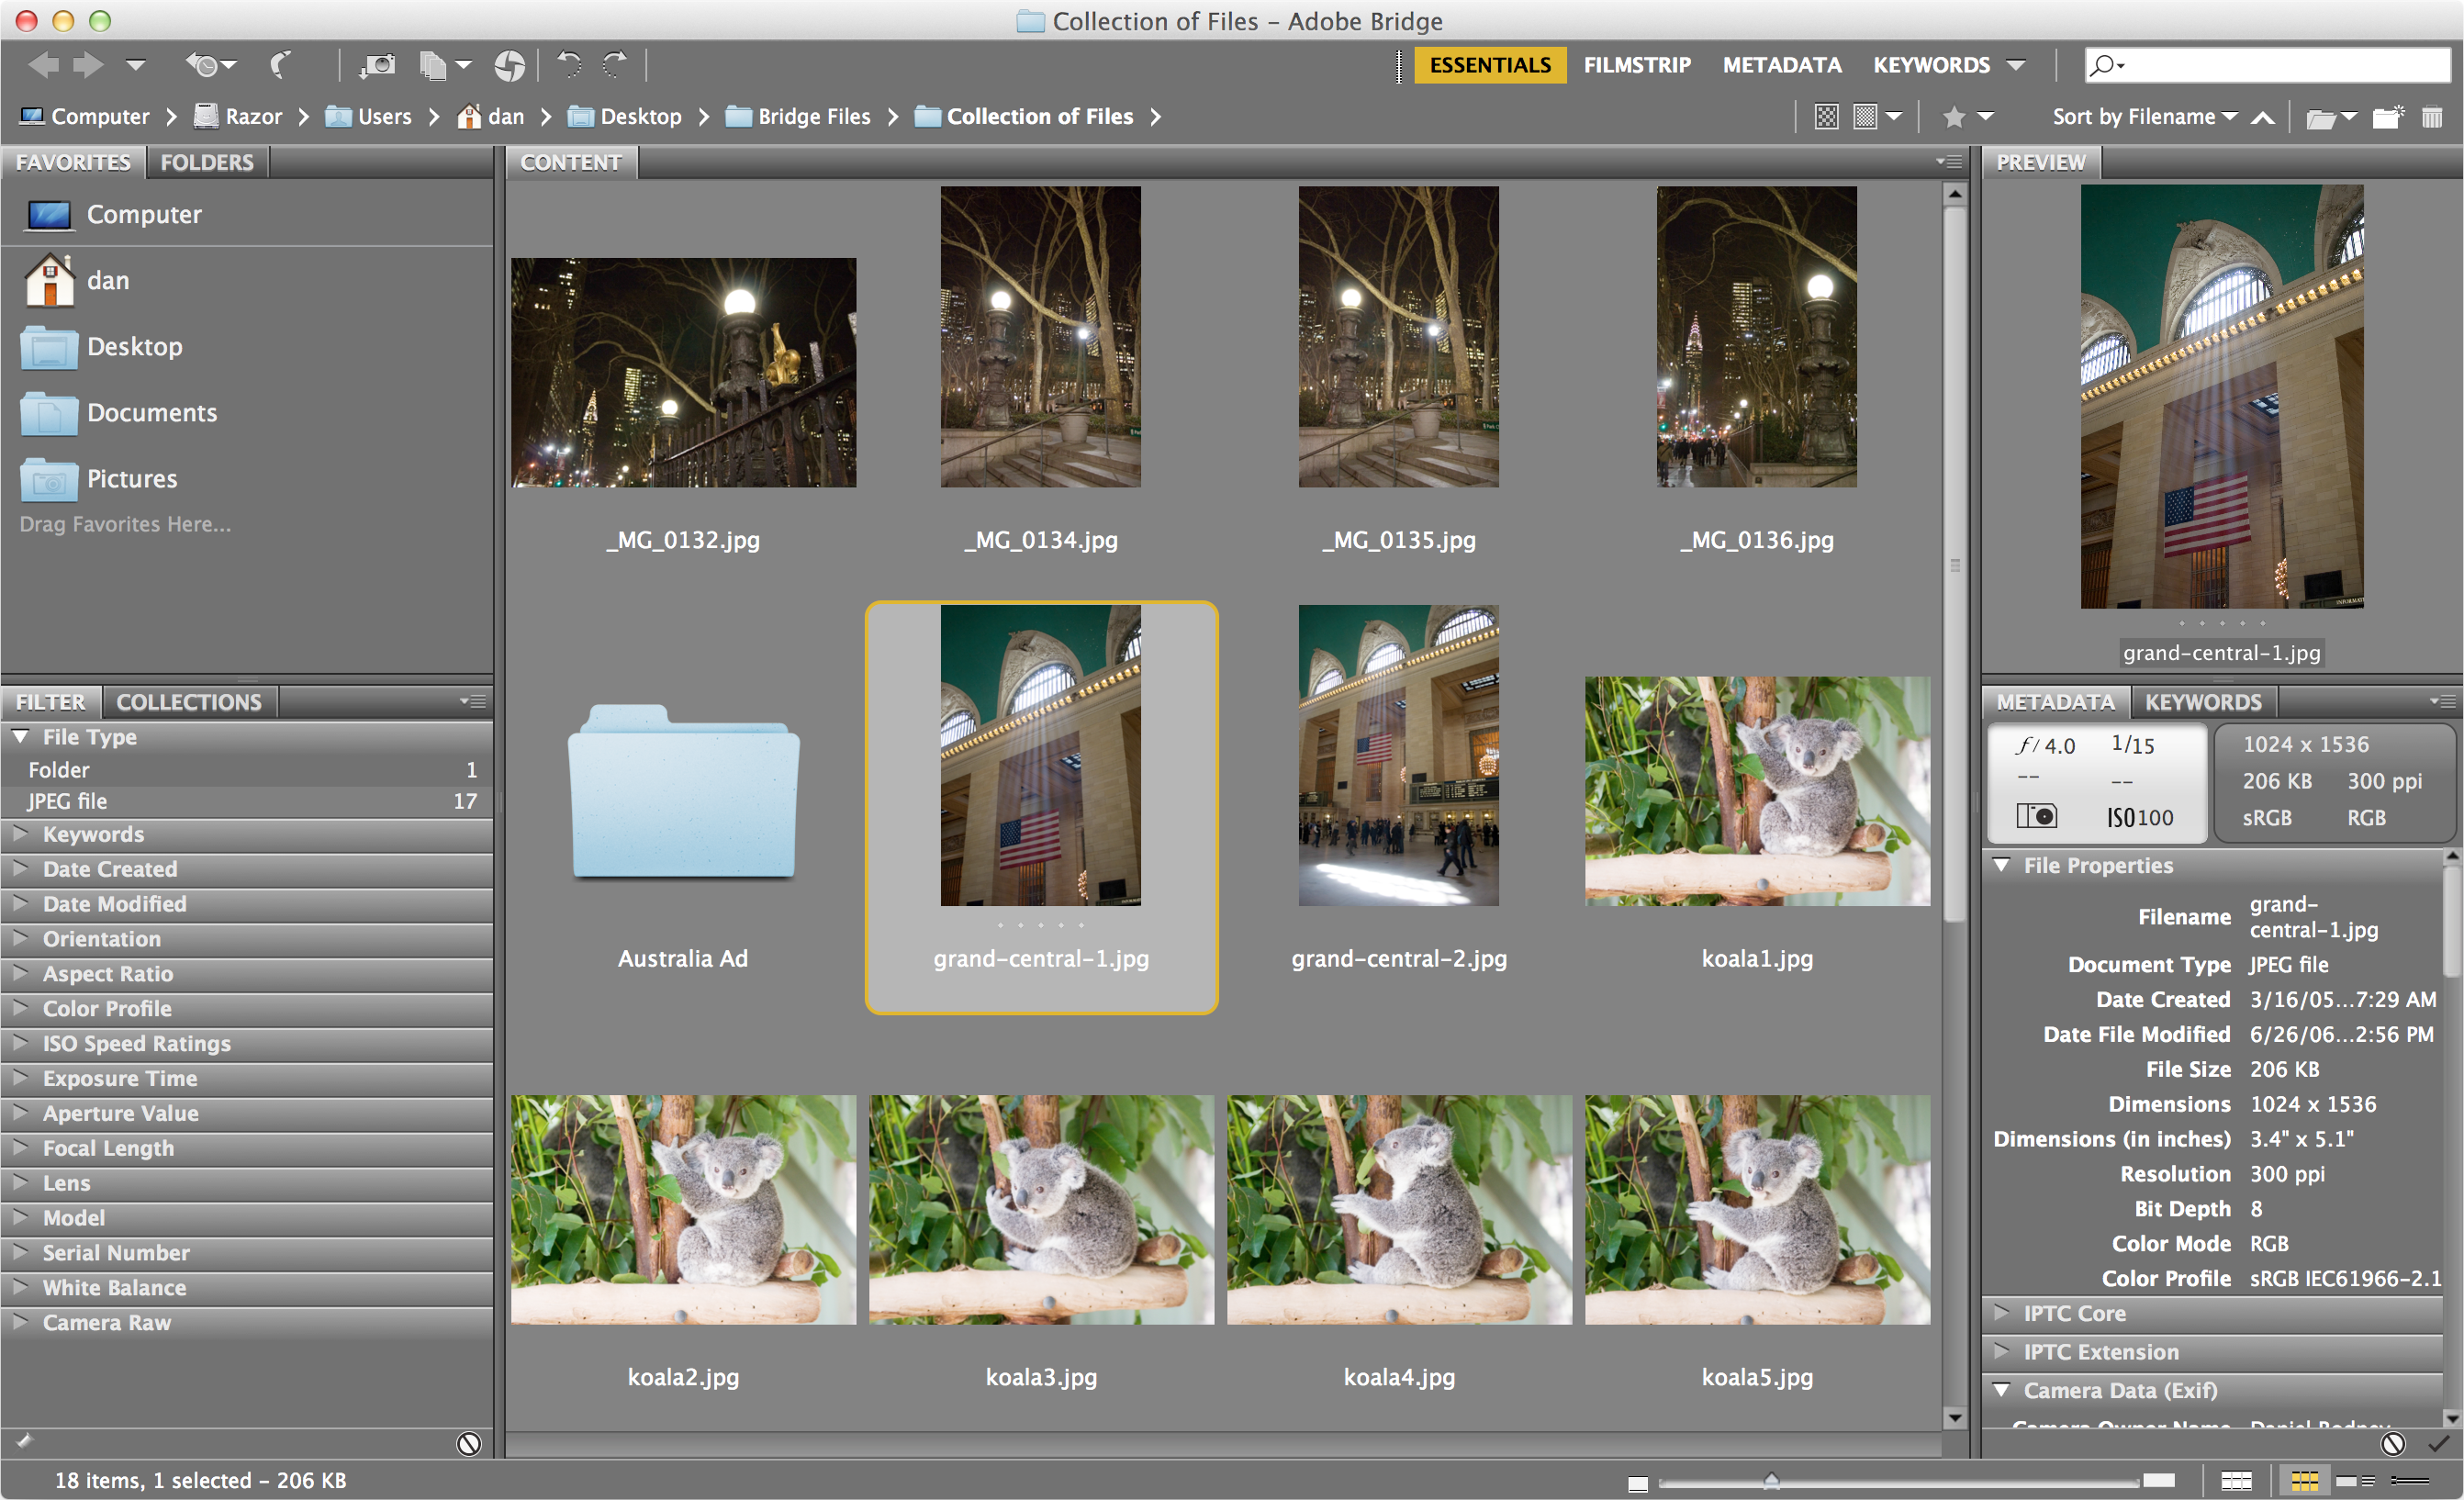
Exercise Preview

Exercise Overview
Organization tasks such as organizing files into folders and renaming or deleting files are typically done on your Desktop. In this exercise, you’ll learn how Adobe Bridge can not only do these same tasks, but its visual file previews, batch file renaming, and other features make these tasks even easier.
Navigating to a Folder
We have a collection of files from a photo shoot. We need to choose our top picks to present to a client.
Download the class files. Refer to the Downloading the Class Files page at the beginning of the workbook on how to download and install the class files.
-
Launch Adobe Bridge using one of these two ways:
- Directly launch Bridge.
- In any Creative Cloud program (such as Photoshop), choose File > Browse in Bridge.
-
To make sure we are looking at the same thing:
- Go to Window > Workspace > Essentials.
- Then go to Window > Workspace > Reset Workspace.
At the top left of the window, you should see a Favorites and a Folders tab.
You should already be viewing the Favorites tab, so in the list of favorites click on Desktop.
-
The icons are fairly small. To make it easier to read longer names, let’s make the icons bigger. At the bottom right of the window, drag the zoom slider (illustrated below) a little to the right.

In the Content section of the window (should be the largest middle section), find the Class Files folder and double–click it to open it.
Double–click on the Bridge Files folder.
Double–click on the Collection of Files folder.
Now that you see the collection of files, play with the zoom slider to see how the thumbnail size changes.
Organizing Some of the Files
Several of these files belong to the same project. It would be nice to put them all together in a folder. Go to File > New Folder.
Name the new folder Australia Ad.
Click once on the thumbnail of the InDesign file named australia ad-started.indd.
Hold Shift and click on the thumbnail of the Illustrator file named australia dot com logo-white.ai.
All four Australia files should now be selected: one InDesign file, one text file, and two logos.
Drag any of the thumbnails into the Australia Ad folder.
Double–click on the Australia Ad folder to go into it to see that the files are there.
-
Toward the top left of the window you’ll find a breadcrumb trail of folders ending with Collection of Files and Australia Ad, as shown here:

Click Collection of Files to return to that folder.
Rotating Images
Some of the images need to be rotated. Click once on the image named
_MG_0134.jpg. (It’s one of the night shots.)Hold Shift and click on the image named
_MG_0136.jpg.-
The image in between should have been selected as well. Three images should now be selected.
NOTE: To select images that are not in a continuous row, you can hold Command (Mac) or Control (Windows) when clicking on the images.
-
To rotate the images, use one of the following methods:
- Hit Cmd–
](Mac) or CTRL–](Windows). - Click the Rotate 90° clockwise button
 at the top left of the window.
- Hit Cmd–
Deleting the Worst Images
Some of the images are too bad to even keep. To see a larger preview, go to Window > Workspace > Preview.
Then go to Window > Workspace > Reset Workspace.
-
The thumbnails in the Content panel should be in a vertical column with a large Preview panel on right. Adjust the thumbnail size by dragging the slider at the bottom right of the window.

If needed, you can resize the thumbnail area (the Content panel) by mousing over the divider. When you see the Resize cursor
 , drag to make it larger or smaller.
Flip between images by clicking on a thumbnail or pressing the Up/Down arrows on the keyboard.
Arrow up/down to (or click on) the fourth image
_MG_0132.jpg which is a picture of a fence with the Chrysler building in the distance.Hit the Down arrow to see the next picture, which is very similar, but the background is more out of focus.
Flip between these two images a couple times by hitting the Up/Down arrows to quickly compare the differences between the images.
We do not like the second, blurrier image so we can delete it. With that image selected (
_MG_0133.jpg) hit Delete (Mac) or CTRL-Delete (Windows).-
To finish deleting the photo, follow the instruction for your operating system:
Mac: It will ask if you want to Reject or Delete the image. Click Delete, then click OK if it asks you to confirm. Windows: If it asks you if you are sure you want to send the file to the Recycle Bin, click OK.
Renaming Images
Go back to the Essentials view (Window > Workspace > Essentials).
-
Adjust the thumbnail size so you can see all the images by dragging the slider at the bottom right of the window.

Select the third image (
_MG_0113.jpg) and then click directly on the filename. Be careful not to click too fast, or Bridge will think that you double–clicked and open the image in Photoshop.After a moment the name will become editable. Change it to Noble Desktop (leaving the .jpg after the name).
Select 2005-10-08 20-56-23.jpg (the thumbnail of the Sydney Opera House).
Then click directly on its filename. When it becomes editable type in: sydney-opera-house (leaving the .jpg after the name).
Click on the thumbnail of the first image
_MG_0075.jpg to select it.Shift–click on the second image
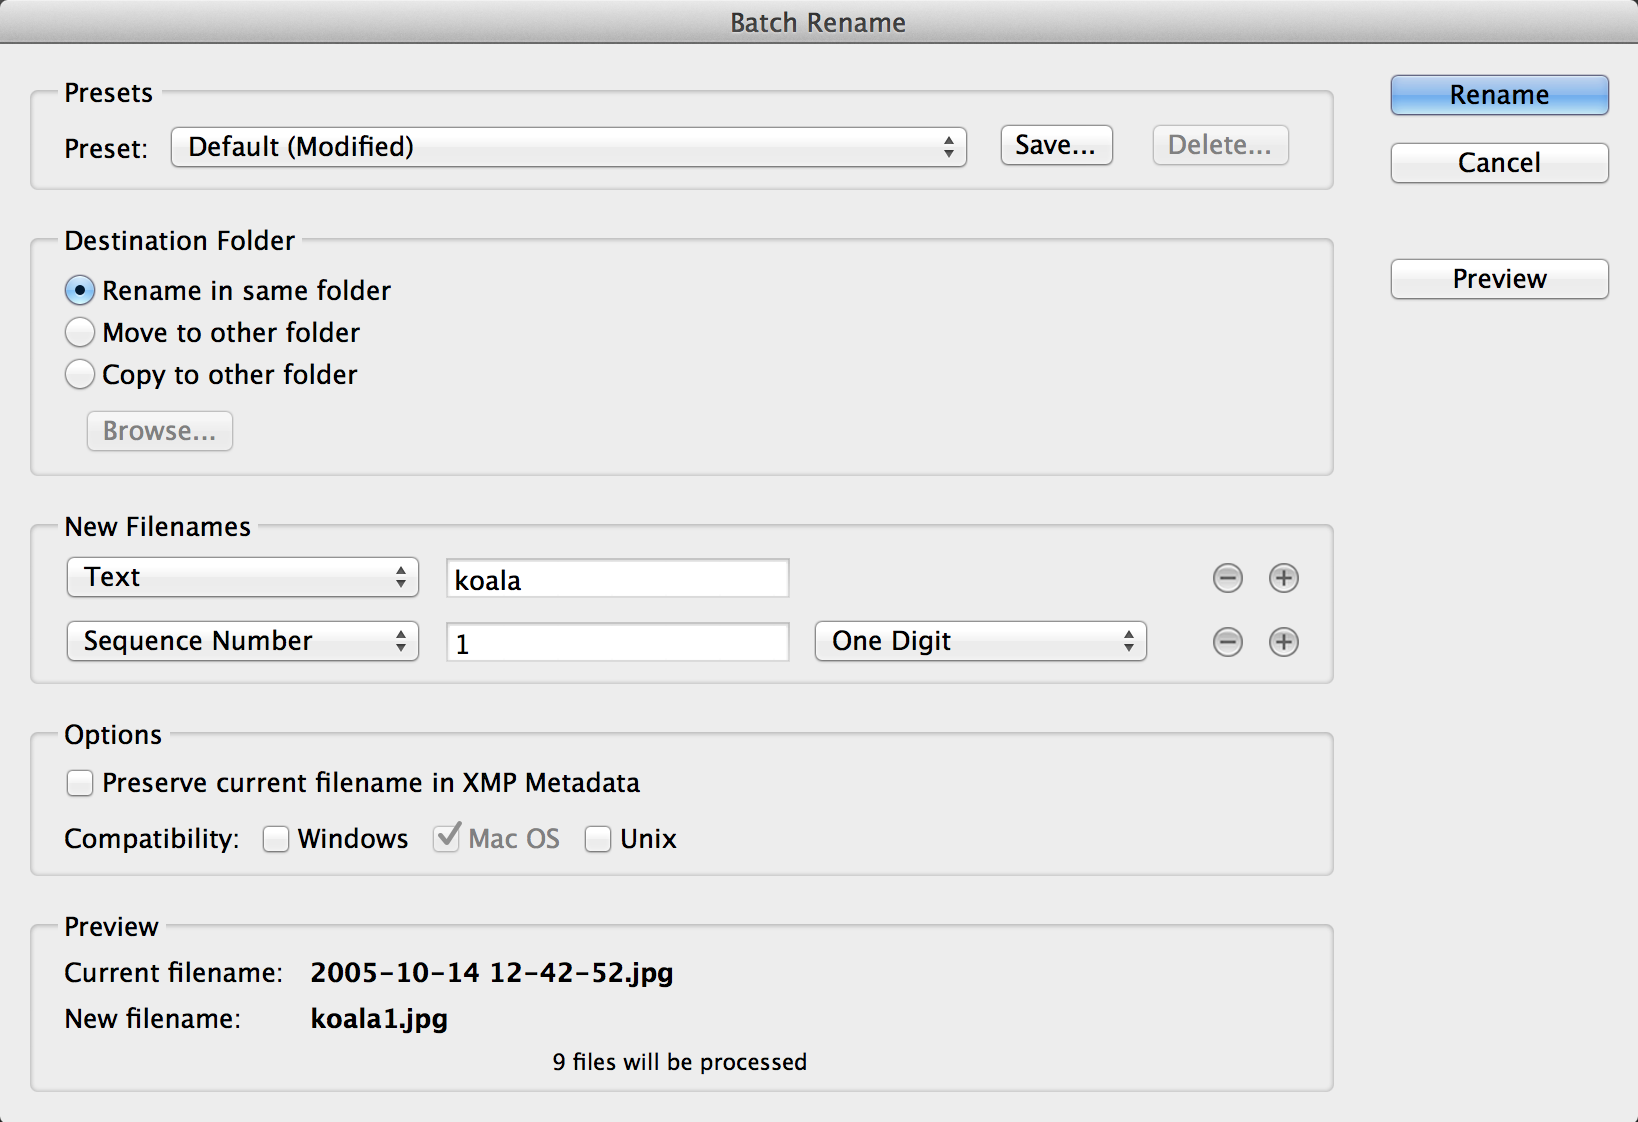
_MG_0076.jpg so both images are selected.Go to Tools > Batch Rename.
-
Don’t click Rename until we say so!
Under Destination Folder leave Rename in same folder checked.
Under New Filenames, go into the topmost menu and choose Text if it’s not already.
To its right type in grand-central-
-
If there are no other menus under New Filenames, click the plus button
 to the right.
If there ARE other menus, click the minus button
 until only two menus remain: the Text menu you just edited and another one below it.
 In the second menu choose Sequence Number.
-
On the right will be a menu for the number of digits. Set that to One Digit to end up with the settings shown below:

NOTE: There’s a Preview at the bottom of the dialog that shows an example of the new filename.
Click Rename.
Click on the first koala picture.
Hold Shift and click on the last koala image.
Go to Tools > Batch Rename.
-
Most of the previous options are correct, but change the text to koala and change the sequence number to 1.

Click Rename.