Dive deep into GreenSock's animation capabilities with our comprehensive tutorial, covering topics such as TweenMax, repeat features, callbacks, and creating seamless animations using GSAP.
This exercise is excerpted from Noble Desktop’s past web development training materials created in partnership with GreenSock. It is compatible with GreenSock version 2. To learn current skills in web development, check out our coding bootcamps in NYC and live online.
Topics Covered in This GreenSock Tutorial:
Introduction to TweenMax, Only in TweenMax: Repeat, RepeatDelay, & Yoyo, Calbacks: OnStart, OnRepeat, & OnComplete
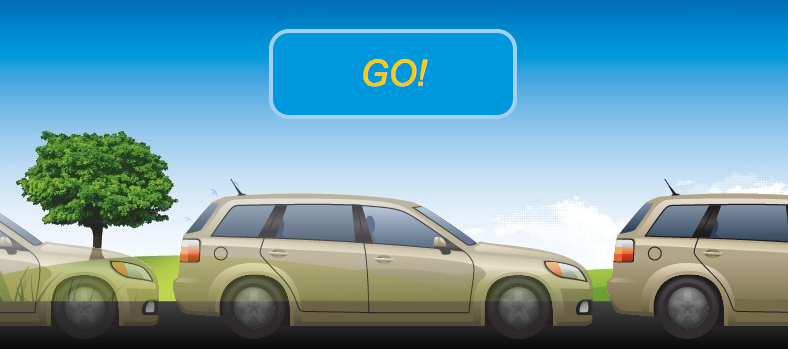
Exercise Preview
Images courtesy of istockphoto: AtomA, Image #20846177; Jamie Farrant (enjoynz), Image #11822906

Exercise Overview
So far we have explored many features and capabilities of TweenLite, which was designed as the lightweight core of GSAP. TweenMax extends TweenLite, offering more features, methods, and callbacks. Now that you understand the basics of TweenLite, it’s super easy to get into TweenMax’s more advanced features.
TweenMax’s most notable feature is the ability to repeat a tween a certain amount of times or infinitely. Tweens that repeat also have a very handy callback called onRepeat. These features are the focus of this exercise.
Previewing the Finished Animation
To take a look at the animation we’ll be building, open up Google Chrome.
Hit Cmd–O (Mac) or CTRL–O (Windows), navigate to Desktop > Class Files > yourname-GSAP Class > TweenMax, and double–click on finished.html.
For a split second, all you see is a background. After a short delay, notice that a GO! message appears in the sky. A tan station wagon “drives” into the landscape from the left and moves to the right until it is off-screen, as shown in the exercise preview.
-
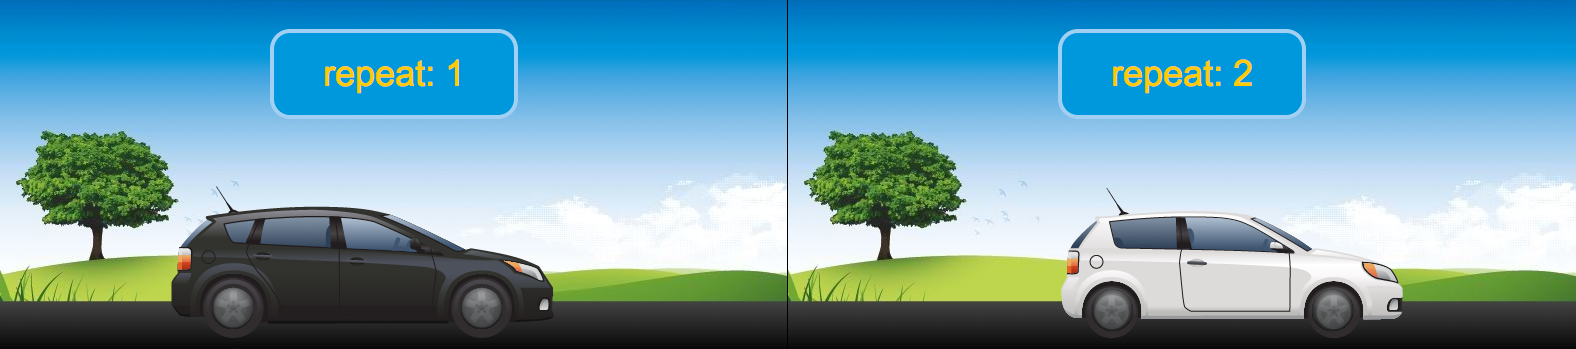
The rest of the animation involves various cars moving at a steady pace into and off the screen. In the screenshot with the second and third cars shown below, notice that the message changes to show how many times the tween has repeated.
Images courtesy of istockphoto: AtomA, Image #20846177; Jamie Farrant (enjoynz), Image #11822906
Once the tween ends, the message The End is displayed. Reload the page as many times as you need to get a feel for the animation.
Examining the DOM Structure & JavaScript
In a code editor, open start.html from the TweenMax folder.
-
Take a look at the code from lines 45–48 to familiarize yourself with the simple DOM structure, as shown below:
<div id="demo">
   <div id="message"><em>GO!</em></div>
   <div id="car"></div>
</div>
We are going to animate both of the elements enclosed within the div with the ID of demo. We’ll tween the element with an ID of message to initially display the word GO, then switch over to the repeat count for most of the animation, ending with an end message. We will also animate the element with an ID of car.
-
In the JavaScript around lines 58–61, notice the following four variables that we will use in our animation:
$(document).ready(function() { var $car = $("#car"), $message = $("#message"), count = 0, tween;- We will change the
$message’s text with callback functions. - The count variable keeps track of the number of times the animation has played.
- We will assign the tween variable to our TweenMax.to() tween that targets the
$car element.
- We will change the
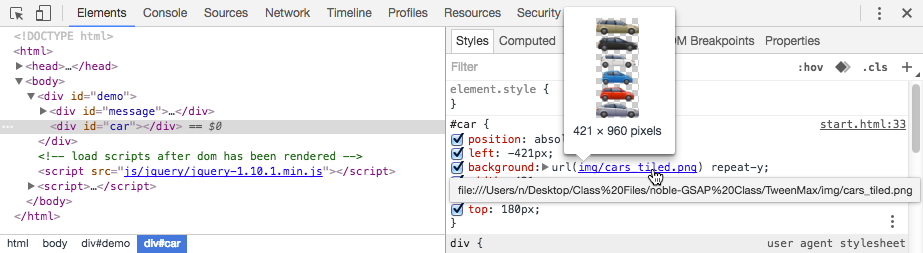
Preview start.html in a browser. Notice that all the cars appear in a single long vertical strip to the left of the landscape illustration in the demo div.
-
CTRL–click (Mac) or Right–click (Windows) on the cars and select Inspect to open the DevTools. Note that the strip of cars is a background image in the car div:
Only in TweenMax: Repeat, RepeatDelay, & Yoyo
To simulate multiple cars, we’ll code our tween so that every time the animation repeats, the vertical position of the $car element moves up the width of a single car. The technique is similar to using CSS Sprites. We will make the strip of cars invisible to the viewer once we have made sure our tween works.
To do this, we will use TweenMax because it lets us take advantage of properties that allow us to control if and how animations repeat. Let’s investigate!
Return to your code editor.
-
After the load scripts comment (around line 52), load TweenMax as shown below in bold:
<!—load scripts after dom has been rendered—>
<script src="js/gsap/TweenMax.js"></script>
<script src="js/jquery/jquery-1.10.1.min.js"></script>
Notice you did not have to load CSSPlugin and EasePack. While TweenLite was specifically designed to be more convenient, favoring features and ease of loading over file size, TweenMax includes many of GSAP’s key components and plugins.
TweenMax’s Contents
The following goodies come pre-loaded with TweenMax: TweenLite, CSSPlugin, EasePack, BezierPlugin, DirectionalRotationPlugin, AttrPlugin, RoundPropsPlugin, TimelineLite, and TimelineMax.
For your production site, we recommend using the minified version of TweenMax, which gets you all the tools you need for animating CSS properties at a file size of ~30kb (gzipped). Loading one file is also often faster than making multiple server requests. Download the minified files or get the CDN link at greensock.com
-
Around line 63, type the following bold code to define our tween:
$(document).ready(function() {

   var $car = $("#car"),
       $message = $("#message"),
       count = 0,
       tween;

   tween = TweenMax.to($car, 1, {X:1250});

});
Save the file and preview the page in a browser. The cars move across the browser over a duration of 1 second and stop when their X value is 1250 pixels. This animation happens immediately and would work better with a bit of a delay.
-
Return to your code editor and edit your tween to add the following bold code:
tween = TweenMax.to($car, 1, {X:1250, delay:1}); -
Save the file and preview the page in a browser. There should now be a 1 second delay before the tween begins.
The default ease in TweenMax and TweenLite is Power1.easeOut, which can give a more natural feel than a linear ease, but in this case we are looking for a steady, mechanical look. To get a linear motion, we can use the Linear.easeNone ease.
-
Return to your code editor and edit your tween to add the following bold code:
tween = TweenMax.to($car, 1, {X:1250, ease:Linear.easeNone, delay:1});Linear.easeNone means the
$car element will move at a constant (linear) speed with no easing whatsoever. Save the file and preview the page in a browser. After the one second delay, the cars move steadily across the browser from left to right.
Return to your code editor so we can try out some specific features of TweenMax. We’ll start with the repeat property.
-
Add the following bold repeat property, specifying how many times the animation will repeat:
tween = TweenMax.to($car, 1, {X:1250, ease:Linear.easeNone, delay:1, repeat:-1});A repeat of –1 means the tween will play indefinitely!
Save the file and preview the page in a browser. As expected, the animation runs over and over and… you get the point. It’s awesome at first, but gets old really fast.
-
Let’s test out another TweenMax-specific property. In your code editor, add the following bold yoyo property to the tween, which will play the animation forward and repeat it in reverse:
tween = TweenMax.to($car, 1, {X:1250, ease:Linear.easeNone, delay:1, repeat:-1, yoyo:true}); Save the file and preview the page in a browser. Our never-ending animation bounces back and forth like a yoyo. Endless hours of entertainment (for cats)!
Experimenting is fun, but let’s make our tween a little fewer ridiculous. Return to your code and delete the yoyo:true property in the tween.
-
Let’s also change the repeat to 4 and add a repeatDelay, as shown below in bold:
tween = TweenMax.to($car, 1, {X:1250, ease:Linear.easeNone, delay:1, repeat:4, repeatDelay:0.5});repeatDelay is a TweenMax property that allows you to specify the amount of time between repeats.
Save the file and preview the page in a browser. After the one second delay, the cars start animating. Unlike before, there is a 0.5 second delay between the repeats and the animation only repeats four times, running a total of five times.
Callbacks: OnStart, OnRepeat, & OnComplete
We don’t want to see the GO! message until the animation actually starts. To do that, we need to make it invisible by default. We also want to change the $message element each time the tween repeats, displaying the number of repetitions to the viewer and telling them when the animation is complete. Callbacks will come in handy here.
-
Let’s first hide the GO! message. Find the CSS rule for #message (around line 18) and add the following property (in bold) at the end of the declaration stack, like so:
border: solid 4px #A2D0F3;
   visibility: hidden;
}
Save the file and preview the page in a browser. The GO! message is now hidden from view.
-
Return to your code editor. To show the
$message when the animation starts, add the following bold code to the tween (around line 64):tween = TweenMax.to($car, 1, {X:1250, ease:Linear.easeNone, delay:1, repeat:4, repeatDelay:0.5, onStart:startHandler});onStart is a basic callback that is also available in TweenLite.
-
When the animation starts, the startHandler() function will be called. Two lines below the tween, type the following bold code to define this function:
tween = TweenMax.to($car, 1, {X:1250, ease:Linear.easeNone, delay:1, repeat:4, repeatDelay:0.5, onStart:startHandler});

function startHandler() {
   TweenLite.set($message, {visibility:"visible"});
}
Remember that set() is a tween with no duration. This code changes the default CSS of hidden to visible, making the GO! text visible when the tween starts.
Save the file and preview the page in a browser. Now the
$message appears when the cars start driving across the screen. Looking good so far.-
We want to change the
$message element each time the tween repeats, displaying the number of repetitions to the viewer. TweenMax’s onRepeat handler will do the trick. In your code editor, add the following bold callback to the to() tween:tween = TweenMax.to($car, 1, {X:1250, ease:Linear.easeNone, delay:1, repeat:4, repeatDelay:0.5, onStart:startHandler, onRepeat:repeatHandler});Remember: the onRepeat callback is only available in TweenMax.
-
Under the startHandler() function, add the following new function (in bold):
function startHandler() { TweenLite.set($message, {visibility:"visible"}); } function repeatHandler() { count++; $message.text("repeat: " +count); } -
Let’s break down the repeatHandler() function you just coded:
- count++ increments the value of count (our tracking variable) by one.
-
$message.text() tells the browser to display the text string repeat: and then the value of count, which is incremented each time the animation plays.
Save the file and preview the page in a browser. Nice! But we’re seeing the same car over and over. It’s time to move the background image up to the next car each time the tween repeats.
-
Return to your code and add the following set() method (in bold) to the repeatHandler() function (around line 72), like so:
function repeatHandler() {
   count++;
   $message.text("repeat: " +count);
   TweenLite.set($car, {backgroundPosition:"0px -=160px"});
}
The set() method moves the vertical position of the
$car element 160 pixels above the current position. Note that we are using a relative value here. Relative values are added onto or subtracted from whatever the current value is set to. Save your file and preview it in a browser. Each time the tween repeats, a new car is revealed and the message changes! When the animation is over, though, we want the
$message element to display The End.Let’s use the onComplete callback to do the job. Return to your code editor.
-
Around line 64, add the following bold callback to the tween:
tween = TweenMax.to($car, 1, {X:1250, ease:Linear.easeNone, delay:1, repeat:4, repeatDelay:0.5, onStart:startHandler, onRepeat:repeatHandler, onComplete:completeHandler});Just like onStart, onComplete is a basic callback that is available in TweenLite.
-
Under the repeatHandler() function, around line 74, add the following new function (in bold):
function completeHandler() {
   $message.text("The End");
}
Save the file and preview the page in a browser. When the tween is done, the
$message element displays: The End
Cleaning up
Now that we know our tween is working as planned, it’s time to hide the strip of cars so that only one vehicle is visible at a time.
Return to your code editor.
-
Find the CSS rule for #demo (around line 9) and add the following bold property at the end of the declaration stack:
#demo{
   position: relative;
   width: 788px;
   height: 340px;
   margin: 50px auto 0 auto;
   padding-top: 10px;
   background: url(img/landscape.jpg);
   overflow: hidden;
}
Save the file and preview the page in a browser. Perfect!
To see more of what TweenMax can do be sure to visit: greensock.com/tweenmax