This exercise is excerpted from Noble Desktop’s past web development training materials created in partnership with GreenSock. It is compatible with GreenSock version 2. To learn current skills in web development, check out our coding bootcamps in NYC and live online.
Note: These materials are provided to give prospective students a sense of how we structure our class exercises and supplementary materials. During the course, you will get access to the accompanying class files, live instructor demonstrations, and hands-on instruction.
Topics covered in this GreenSock tutorial:
Getting & setting tween-related values, Event callbacks, Changing a tween’s timeScale()
Exercise Preview
Exercise Overview
In this exercise, we will explore more of TweenLite’s methods that not only allow us to control tweens but also give us access to important information about those tweens. We will also start using event callbacks which allow us to run our own custom functions when specific tween events occur.
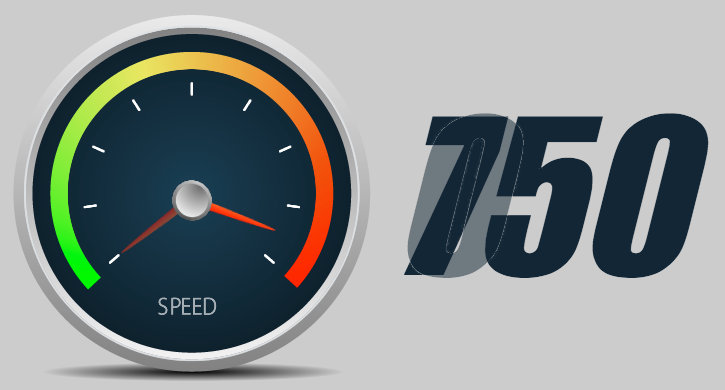
Previewing the Finished Animation
We are going to be building off the previous exercise. To take a look at the expanded version of the speed gauge, open up Google Chrome.
Hit Cmd–O (Mac) or Ctrl–O (Windows), go to Desktop > Class Files > yourname-GSAP Class > Tween Methods and Callbacks, and double–click on finished.html.
Pretty familiar, except there is a large number zero to the right of the speed gauge.
Mouse over the speed gauge to start the animation. The large numbers to the right increase as the tween rotates clockwise.
Move the mouse off of the speed gauge to reverse the animation. The tween reverses at an accelerated rate.
While mousing over the speed gauge, click on it. Notice that this forces the tween to restart. The pointer is instantly placed back in the start position at the bottom left. While the tween plays too fast to see the number zero again, you will see double-digit numbers to the right of the speed gauge. Neat!
Mouse over and off of the speed gauge as many times as you need to get a feel for the animation.
Examining the DOM Structure & JavaScript
In a code editor, open start.html from the Tween Methods and Callbacks folder.
Take a look at the code from lines 52–58 to familiarize yourself with the DOM structure. The page has been revised a bit from the last exercise. As shown below in bold, all the elements are now enclosed in a wrapper div that centers everything on the page. The div with an ID of numberDisplay has an initial value set to zero. The goal of the exercise is to display the animation “speed” in this div.
<div id="wrapper">
   <div id="speedGauge">
      <img id="pointer" src="img/pointer.png" height="9" width="89">
      <img id="center" src="img/disc.png" height="41" width="40">
   </div>
   <div id="numberDisplay">0</div>
</div>
In the JavaScript around lines 70–74, notice that the
$gauge and$pointer variables are now joined by three new variables, as shown below in bold:var $gauge = $("#speedGauge"), $pointer = $("#pointer"), $numberDisplay = $("#numberDisplay"), displayValue, finalValue = 750;Take note of the following:
$numberDisplay allows us to target the div where the user will see the animated numbers in the speedometer.- displayValue holds the value of the numbers that will be displayed in the
$numberDisplay. - finalValue is the maximum value of the number we will animate to (750).
Preview start.html in Chrome. The
$pointer is in its start position on the bottom left and the$numberDisplay shows its initial value of zero.Mouse over the
$gauge and notice that the tween plays, but the numbers in the$numberDisplay are not increasing at all.Move the mouse off the
$gauge. The tween reverses at the same speed as when the tween plays forward.
Getting & Setting Tween-Related Values
GSAP has a number of methods that are used as both getters and setters. In this exercise, we’ll try out the duration(), time(), and timeScale() methods.
You can use the duration() method as a getter to find out the duration of a tween. As a setter, you can use it to change the duration of the tween.
To use the duration() method as a getter, type the following bold code below the pointerTween object (around line 81), like so:
var pointerTween = TweenLite.to($pointer, 1, {rotation:"20_cw", transformOrigin:"0px 4px", paused:true, ease:Power1.easeIn});

console.log("tween duration = " + pointerTween.duration());
Save the file and preview the page in Chrome.
To pull up the Console tab in Chrome’s DevTools, Ctrl–click (Mac) or Right–click (Windows) on the page, select Inspect and click the Console tab. You can also use the keyboard shortcut Cmd–Opt–J (Mac) or Ctrl–Shift–J (Windows).
Notice the Console printed out: tween duration = 1
Let’s go one step further and use the duration() method to set a value after it has been created. In your code editor, above the console.log() method, type the following bold code:
var pointerTween = TweenLite.to($pointer, 1, {rotation:"20_cw", transformOrigin:"0px 4px", paused:true, ease:Power1.easeIn});

pointerTween.duration(10);
console.log("tween duration = " + pointerTween.duration());
Save the file and preview the page in Chrome.
Mouse over the gauge and the duration plays slowly. In the Console you’ll see: tween duration = 10
Now that you know what this method does, in your code editor, delete both the duration() method and the console.log().
Let’s next investigate the time() method, which gets or sets the local position of the playhead.
First, we’ll get the current time of the tween. Below the pointerTween object, input the following bold code:
var pointerTween = TweenLite.to($pointer, 1, {rotation:"20_cw", transformOrigin:"0px 4px", paused:true, ease:Power1.easeIn});

console.log("tween time = " + pointerTween.time());
Save the file and preview the page in Chrome. Because the tween has not played yet, the output in the DevTools Console reads: tween time = 0
In your code editor, above the console.log() method, type the following bold code that uses the time() method to set the playhead to a specific position of the animation further along the timeline:
var pointerTween = TweenLite.to($pointer, 1, {rotation:"20_cw", transformOrigin:"0px 4px", paused:true, ease:Power1.easeIn});

pointerTween.time(0.5);
console.log("tween time = " + pointerTween.time());
This means we’re going to be 0.5 seconds into the duration of the tween when the page loads.
Save the file and preview the page in Chrome. The page loads showing a later stage of the animation where the pointer has already moved up to around the third notch.
Now that we understand how to get and set a couple of key tween-related values, we can start experimenting with some others. First, let’s get rid of the practice code you just wrote. In your code editor, delete both the time() method and the console.log() method.
Event Callbacks
TweenLite has a wide variety of event callbacks that allow you to run custom functions when certain tween events happen. We’ll use the onUpdate callback to change the number that the user sees every time the tween updates.
We specify a tween’s callback in the object that contains all the other tween properties. Edit the tween’s duration to three seconds—to make it easier to test the callback—and add an onUpdate property, as shown below in bold:
var pointerTween = TweenLite.to($pointer, 3, {rotation:"20_cw", transformOrigin:"0px 4px", paused:true, ease:Power1.easeIn, onUpdate:showValue});showValue is the function that will be called every time the object updates.
The showValue function has not been defined yet. To code it to show us the current time of the tween as it is playing, type the following bold code around line 81:
var pointerTween = TweenLite.to($pointer, 3, {rotation:"20_cw", transformOrigin:"0px 4px", paused:true, ease:Power1.easeIn, onUpdate:showValue});

function showValue() {
   console.log(pointerTween.time());
}
Save the file and preview the page in Chrome, making sure to open the Console tab of the DevTools window.
Mouse over the tween and keep an eye on the Console as the
$pointer animates. In the Console, you will see incremental values between zero and three seconds. This represents the current time of the tween.Move the mouse off the
$gauge. In the Console you will see the numbers decreasing from three to zero. This means the onUpdate callback fires no matter if the tween is playing forward or in reverse. Awesome!Return to your code editor. Now that we’ve seen how time() and duration() work, we’re going to explore TweenLite’s progress() method. A tween’s progress() represents a value between zero (the beginning) and one (the end of the tween). A value of 0.5, then, will signify that the animation is halfway through.
In the console.log(), replace time() with progress() as shown in bold:
console.log(pointerTween.progress());Save the file and preview the page in Chrome, making sure to open the Console.
Mouse over the tween and make sure the end value in the Console is 1 (When the tween reverses, you will end up with 0.)
Great! Now we have a ratio. We can use it to build our display value.
- Return to your code editor. Around lines 73–74, there are two variables that we looked at earlier in the exercise:
- displayValue
- finalValue
Take another look at them now to refresh your memory of them. We’ll use them to calculate and display the current speed as the animation plays.
We’re going to use this progress() value and multiply it by our finalValue to create the displayValue we’ll need. Add the following bold code to the showValue() function (around line 82):
function showValue() {
   displayValue = pointerTween.progress() * finalValue;
   console.log(pointerTween.progress());
}
In order to test our displayValue, edit the console.log() as shown in bold:
function showValue() {
   displayValue = pointerTween.progress() * finalValue;
   console.log(displayValue);
}
Save the file and preview the page in Chrome, making sure to open the Console tab to see that the displayValue goes from 0 to 750! Math is fun, but the number needs to be simplified. Let’s get rid of all the digits after the decimal place.
Return to your code editor. To recalculate the value in full integers, modify the display value by placing it inside a parseInt() function, like so:
function showValue() {
   displayValue = parseInt(pointerTween.progress() * finalValue);
   console.log(displayValue);
}
To recap, we have added the following capabilities to the showValue() function:
- pointerTween.progress() * finalValue will multiply progress()—a number between 0 and 1—by finalValue (which is 750).
- parseInt is a standard JavaScript function. It gets rid of all the extraneous junk after the decimal point, making it so only whole numbers are displayed.
Save the file and preview the page in Chrome, making sure to open the Console.
Mouse over the tween and notice that the numbers in the Console no longer have the pesky decimal point. The tween goes from 0 to 750 in three seconds!
Move the mouse off the
$gauge and make sure the numbers in the Console decrease to the initial value of 0. Just what we wanted!Now that we know the showValue() function is working, we don’t want this information to remain in the console—we want to show it in the numberDisplay div.
Return to your code editor and around line 83, replace console.log with the following bold text, making it so the numbers display in the
$numberDisplay element to the right of the$gauge:function showValue() { displayValue = parseInt(pointerTween.progress() * finalValue); $numberDisplay.text(displayValue); }NOTE: text() is a jQuery method that sets the content of any element to the specified text.
Save the file and preview the page in a browser.
Mouse over the tween and notice that the numbers increase from 0 to 750. They are displayed on the right, as they were in the finished file.
Move the mouse off of the
$gauge and make sure the numbers in the Console decrease to the initial value of 0. Looking awesome!
Changing a Tween’s timeScale()
Last but not least, we are going to use the timeScale() method to make the tween play faster while it is being reversed.
The timeScale factor is used to speed up or slow down the time it takes to complete the animation. The value of 1 is the normal (default) speed, 0.5 is half speed, and 2 is double speed. For example, if a tween’s duration is 2 but its timeScale is 0.5, it will take four seconds to finish.
In your code editor, scroll down to the mouseleave() function (the final code in the file before the closing HTML tags) and add the following bold code:
$gauge.mouseleave( function() {
   pointerTween.reverse();
   pointerTween.timeScale(6);
});
timeScale(6) means the animation should play six times faster once it is reversed.
- Save the file and preview the page in a browser and test the following:
- Mouse over the
$gauge and make sure the tween is going at normal speed, taking three seconds to complete. - Move the mouse off of the
$gauge and notice that the tween is over in practically the blink of an eye! Six times faster is super fast. - Mouse over the
$gauge once more. Oh no, the tween is now playing six times faster, even while it’s playing forward!
- Mouse over the
Return to your code editor and add the following code to the mouseenter() function (around line 86):
$gauge.mouseenter( function() {
   pointerTween.play();
   pointerTween.timeScale(1);
});
This code resets the timeScale back to the default value (1) when the user mouses over more than once.
- Save the file, preview the page in a browser, and test the following:
- Mouse over the
$gauge and make sure the tween is going at normal speed. - Move the mouse off and confirm the tween is six times faster.
- Mouse over again. Voilà, the tween is going normal speed again!
- Mouse over the
Return to your code editor.
Let’s simplify the code you just wrote. GSAP supports method chaining, so we can actually combine the reverse() or play() methods and timeScale(). Edit your mouseleave() and mouseenter() functions to match the following code:
$gauge.mouseenter( function() {
   pointerTween.play().timeScale(1);
});

$gauge.mouseleave( function() {
   pointerTween.reverse().timeScale(6);
});
Finally, while we’re still in the code, let’s use the restart() method to restart the tween from the beginning when the user clicks on the gauge. After the mouseleave() function, type the following bold code:
$gauge.click( function() { pointerTween.restart(); });- Save the file and preview the page in a browser one last time to test the following:
- Mouse over the
$gauge and make sure the tween is going at normal speed. - Move the mouse off and confirm the tween is six times faster.
- Mouse over again. Voilà, the tween is going normal speed again!
- When mousing over the
$gauge, click on it. Due to the restart() method, the tween restarts from the start position.
Looks awesome—you did a great job!
- Mouse over the
TweenLite Event Callbacks
In addition to onUpdate, TweenLite has four other callbacks: onStart, onReverse, onComplete, and onReverseComplete. To see an example of callbacks in action, visit greensock.com/jump-start-js/#event-callbacks
For detailed descriptions of all TweenLite methods including these various callbacks, be sure to visit the docs at greensock.com/docs/TweenLite